Showing posts with label No Kit Tutorial. Show all posts

August 27, 2019

X ~ by Joanne Salgado


Tutorial written by Joanne Salgado on August 27th, 2019
for those who have a working knowledge of PSP.
I'm using PSP9 to create my tuts.
Any resemblance to any other tutorial is coincidental.
Do not copy and paste this tutorial anywhere on the net.
If you want to translate please ask first. 

****************************************
Material:

Tube: "Sonya" by misticheskaya, you can purchase it here
do not use without the proper #license.
Font: Great Day Bold

****************************************
1. Open a new image 600x300

2. Copy and paste your tube of choise as new layer.

3. Effects/Plugins/MuRa's Meister/Copies - change to wallpaper rotate (default settings)

4. Blur/Motion Blur - Angle: 140 / Strength: 100 - repeat

5. Flip/Mirror - apply motion blur again

6. Effects/Plugins/RCS Filter Pak 1,0 / RCS TripleExposure with 210

7. Effects/Plugins/Mehdi/Kaleidoscope 2.1  (spinning effect: mirror / petals: 2 / rotate: 0 / zoom out: 1.0 / angle, horizontal, vertical: 0)

8. Effects/Edge Effects/Enhance

9. Rename layer bg. Duplicate twice.

10. On the first copy Effects/Plugins/Tramages/Tow The Line - 80/54/48/9 - change blend mode to soft light

11. On the second copy Effects/Texture Effects/Weave 1-8-1 black fill gaps checked. With free hand selection tool select the X in the middle and hit delete. The dots will be just outside it. Change the blend mode to soft light.

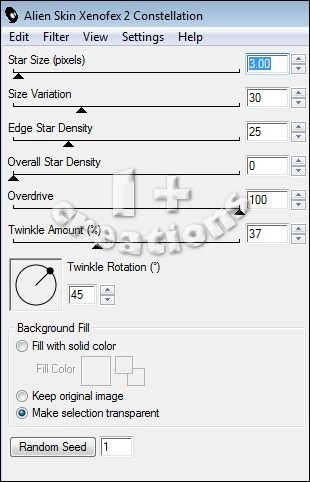
12. Go to your original bg layer and duplicate it again twice, change the names to 1, 2, 3. Go to the 1 one and Effects/Plugins/Alien Skin Xenofex 2/Constellation with settings from top to bottom - 2 / 50 / 7 / 0 / 100 / 30 - rotation 45 - keep original image.

13. Now go to 2 and 3 with the same settings, just click on random seed on each one.

14. Add your tube at the top of all layers, I like to duplicate it, change the blend mode to soft light and add blur/gaussian blur 3 - looks good and smooths the animation pixels.

15. Add a new layer, fill with #ffffff - selections/select all - Modify/Contract 5 - hit delete. keep the selection. Now fill with #000000. Modify/Contract 1 - hit delete. Selections none.

16. Now add your copyright and name as you prefer.

17. Close layers 2 and 3. Copy merged. Go to Animation Shop, paste as new animation. Go back to psp, close 1 and open layer 2. Copy merged. Go to AS and paste after current. Go back to psp, close 2 and open layer 3. Copy merged. Go to AS, paste after current.

18. Save as gif.


Here's other one


November 3, 2015

To Eat Or Not To Eat

With the white background:
With a different Customization:


Tutorial written by Marcia Salgado on November 3rd, 2015
for those who have a working knowledge of PSP.
Any resemblance to any other tutorial is coincidental.
Do not copy and paste this tutorial anywhere on the net.
If you want to translate please ask first. 

****************************************
Material:

Tube: Anna Marine "Individual Tube 50-1", you can purchase it here
do not use without the proper #license.
Material: All made by me, here
Plugin: Eye Candy 5
Font: Dhuwur

****************************************

--> Remember to save often and use my tag as reference if necessary. Use a Drop Shadow of your choice. 

--> Unzip my materials and place all Selections inside the folder Selections in your My PSP Files. Double click on Glass1 to install it to Eye Candy 5. Open base, chrome, glass, animation and curve in your PSP area. 

1. Open my base. Duplicate and close the original. Select inside the frame. Add a new layer. Move this layer below the frame.

2. Fill with #19161f. Deselect. Apply Blinds: 3-20-Color:#ecc7cd and only Light from left top marked. 

3. Add a new layer. Load the Selection opc_candy1. Fill with #19161f. Apply Weave: Gap Size>1, Width>5, Opacity>10, Both Colors>White and Fill Gaps marked. Edge Effects > Enhance. Low the opacity layer to 70. Deselect.

--> If you will use another tube you'll have to create your own noise animation. First chose 4 colors from your tube. Open a new image of 100x100 and fill with a light color. Now with the Airbrush Tool (Size:20 Hardness:40 Spep:78 Density:49 Thickness:100 Rotation:0 and Opacity:38) paint traces over the background. After finished use Noise: Uniform-50 and Monochrome NOT marked. Duplicate the layer. Mirror. Duplicate it again. Flip. Rename the layers 1, 2 and 3.

4. Add a new layer. Rename it 1. Load the Selection opc_candy3. Click on image Animation. Close layers 2 and 3. Use it as pattern to fill the selection (Angle:0 Scale:100). Fill the selection. Add a new layer. Rename it 2. On image Animation open layer 2 and close 1. Fill the selection. Add a new layer. Rename it 3. On image Animation open layer 3 and close 2. Fill the selection. Keep selected. 

5. Add a new layer. Rename it shadow. Use Cutout: V-2 H-3 Opacity-50 Blur-8 Shadow Color-Black and Fill interior NOT marked. Deselect.

6. Copy chrome and paste as new layer. Click on Deform Tool (or Pick Tool on new PSP versions) and on Tool Options mark PositionX:398 and PositionY:201. Apply Eye Candy 5 Impact > Chrome > Indoor, Platinum.

7. Copy glass and paste as new layer. Click on Deform Tool (or Pick Tool on new PSP versions) and on Tool Options mark PositionX: 402 and PositionY:205. Change the color to one that suits your tube. I used #d63e70 (Manual Color Correction tut HERE). Apply Eye Candy 5 Impact > Glass and use Glass1.

8. Copy curve and paste as new layer. Click on Deform Tool (or Pick Tool on new PSP versions) and on Tool Options mark PositionX:2 and PositionY:110. Change the color to one that suits your tube. I used #d63e70 (Manual Color Correction tut HERE).

9. Load the Selection opc_candy2. Add a new layer and fill with #d63e70. Contract > 3. Deselect. Rename this layer N1. Duplicate it twice, in a total of 3 layer. Click on N1 and apply Noise: Gaussian-Monochrome-75. Click on Copy of N1 and apply the same Noise (do NOT use Edit > Repeat). Click on Copy (2) of N1 and apply the same Noise. Leave Copy of N1 and Copy (2) of N1 invisible.

10. Click on first layer, should be the frame. Open your tube close up, resize if needed. Copy and paste as new layer. Move it to left. After place it erase the bottom shirt that is outside the frame. I leave some parts of the tube showing outside of the frame but that's your choice, you can crop it to keep only with the rectangle then you won't need to add a white background after finish the animation. Crop the extra space.

--> Add your copyright info and license#, Add your name. Save it as PSP and now we can start the animation.

ANIMATION SHOP

1. If you followed mu instructions the tag is ready to start. PSP -> Copy Merged.

2. AS -> Paste as new animation. 

3. PSP -> Close layers 1 and N1. OPen layers 2 and Copy of N1. Copy merged.

4. AS -> Paste After Current Frame.

5. PSP -> Close layers 2 and Copy of N1. Open layers 3 and Copy (2) of N1. Copy merged.

6. AS -> Paste After Current Frame. Add a white background and save as GIF.

--> You can add a different color if wanted or change the customization to better fit your necessity.

----------------------------------------------------------------------------------

Just to give an idea to create an Avatar:


September 15, 2015

Autumn Green ~ by Joanne Salgado


Tutorial written by Joanne Salgado on September 15th, 2015
for those who have a working knowledge of PSP.
Any resemblance to any other tutorial is coincidental.
Do not copy and paste this tutorial anywhere on the net.
If you want to translate please ask first.

Tube: AUTUMN DOLL 3 by LadyMishka Dolls - you can purchase here
Template by Me here
Texture here
Font: PonytailScriptSSK

Don't forget to save often.
At any point if you have doubts check my tag.

1. Open the template I've created. Duplicate. Close the original.

2. Open your texture. Copy and paste as new layer. Move this below all layers. Duplicate, change blend mode to multiply. Duplicate, change blend mode to overlay. (you may want to skip some of the steps depending on your texture and color choise).

3. Add a new layer and fill with the color of your choise. I used: #c3d8b4. Change blend mode to color.

4. Select the 'inside' layer. Change the border color to white. Select inside it with magic wand. Invert selection. Select the texture layer and Adjust/Hue and Saturation/Colorize both 0. Select all texture layers you have and apply the same in all. Select the color layer and hit delete on your keyboard. Select none. Add shadow on the inside layer. I used 1-1-65-2 black.

5. Open your tube. Copy and paste as new layer. Arrange it to the right. Select the 'outside' layer. Select inside it with magic wand. Invert Selection. Select your tube layer and hit delete on your keyboard. Select the textures layers and delete too. Select none.

6. Open your texture again. Resize 40%. Arrange it above the 'white circles' layer so it will fill the circles around the frame. Select the 'circles' layer. Select inside with magic wand, invert selection. Select the texture we just added and hit delete on your keyboard. Invert selection again, add a new layer and fill with the same color we used before. Change the blend mode to color. Select none. Merge down (so the texture and the color are one layer). Duplicate. Mirror/Flip. Merge them together. Rename layer as ANI.

7. Duplicate ANI two times, so you have a total of three layers. Select the first one, add noise uniform/10/monochrome checked. Select the other two and apply the same noise.

8. I used the tube roses around the circles.

9. Add copyright.

10. Add name.

FOR ANIMATION

1. Close the two copies from ANI we made. Copy merged. Go to animation and paste as new animation.

2. Go back to PSP, close ANI and open Copy of ANI. Copy merged. Go to animation and paste after current.

3. Go back to PSP, close Copy of ANI and open Copy (2) of ANI. Copy merged. Go to animation and paste after current.

Save as GIF

May 31, 2015

Latticed Tutorial

LATTICED TUTORIAL


Tutorial written by Marcia Salgado on May 30th, 2015
for those who have a working knowledge of PSP.
Any resemblance to any other tutorial is coincidental.
Do not copy and paste this tutorial anywhere on the net.
If you want to translate please ask first. 

****************************************
Material:

Tube: "Dolly" an Exclusive by Sweet Doll Artist,
you can purchase it at S&Co. here
do not use without the proper #license.
Mask: Narah_Mask_0304 here and my mar2015_latticed mask here
Plugin: Redfield > Lattice Composer 1.02
Simple > Top Left Mirror
Brush: PNG Brush by Cybrea, here (TOU here)
Font: Sofia

****************************************

--> Remember to save often and use my tag as reference if necessary. Used the Drop Shadow: 1-1-50-5 in most layers. My Manual Color Correction tutorial can be found HERE

1. Create a new image of 600x300. Copy your tube and paste as new layer. Apply MuRa's Meister > Copies > Wall Paper(rotate) > Default.

2. Select all. Selections > Clip to Canvas. Image > Crop to selection. Gaussian Blur > 30. Add Noise: Uniform > 10 (Monochrome not marked).

3. Add new layer. Fill it with #FEC5BA. Apply Redfield > Lattice Composer 1.02 > Rags Fall > Default OR, if you do not have the filter, use the mask I provide in my materials, called mar2015_latticed, the effect is similar. Apply Simple > Top Left Mirror. Blend Mode: Soft Mirror. --> In case of be using the mask see the blend mode that better fit the color you're using.

4. Add a new layer. Fill it with white. Apply Narah_Mask_0304. Merge Group. 

5. Add a new layer. Custom Selection: Left-0, Top-100, Right-600, Bottom-200. Fill it with #FFE0DB. Deselect. Custom Selection: Left-0, Top-20, Right-600, Bottom-280. Selection > Invert. Fill it with #FFE0DB. Deselect. Add Noise: Uniform-30-Monochrome. Blend Mode: Soft Light. Drop Shadow: 0-0-70-10-Black.

6. Custom Selection: Left-0, Top-120, Right-600, Bottom-180. Delete. Add a new layer. Fill it with white. Blinds: 3-25-Horizontal-Black. Blend Mode: Overlay. Drop Shadow: 0-0-70-10-Black.

7. Used as embellishment a Cybrea PNG Brush. Used #21. Resized and changed the color from Black to #FFE0DB using Manual Color Correction.Free Rotate: Right-90. Move it to left. Duplicate it twice (have a total of three layers with the PNG brush).

8. Rename the layers 1, 2 and 3. Click on layer 3. Add Noise: Gaussian-50-Monochrome. Drop Shadow: 1-1-50-5-Black. Turn this layer invisible. Click on layer 2. Add Noise: Gaussian-50-Monochrome. Drop Shadow: 1-1-50-5-Black. Turn this layer invisible. Click on layer 1. Add Noise: Gaussian-50-Monochrome. Drop Shadow: 1-1-50-5-Black. Let this layer visible.

9. Open your tube. Resize if needed. Copy and paste as new layer. Move it to right. Add a suitable shadow. 

--> Add your copyright info and license#. Add your name. I used Sofia Size: 30 Color: #FFE0DB. Add a border #110100. Drop Shadow: 1-1-50-5-Black.

ANIMATION SHOP

1. On PSP -> Click on Edit. Copy Merged. On Animation Shop -> Click on Edit. Paste > As new animation.

2. On PSP -> Turn layer 1 invisible and layer 2 visible. Click on Edit. Copy Merged. On Animation Shop -> Click on Edit. Paste > After Current Frame.

3. On PSP -> Turn layer 2 invisible and layer 3 visible. Click on Edit. Copy Merged. On Animation Shop -> Click on Edit. Paste > After Current Frame. Save as GIF.


May 29, 2015

Lined Up Tutorial

LINED UP TUTORIAL


Tutorial written by Marcia Salgado on May 29th, 2015
for those who have a working knowledge of PSP.
Any resemblance to any other tutorial is coincidental.
Do not copy and paste this tutorial anywhere on the net.
If you want to translate please ask first. 

****************************************
Material:

Tube: "Flor" by Vi Nina, you can purchase it at S&Co. here 
do not use without the proper #license.
Plugins: MuRa's Meister > Copies
Alien Skin Eye Candy 6 > Textures > Swirl
VM Extravaganza > Transmission
Simple > Quick Tile
Mask: Narah_mask_0307 -> here 
**Narah's Masks are no longer online 
so I have her mask available on my materials**
Font: BankGothic Lt BT

****************************************

--> Remember to save often and use my tag as reference if necessary. 

1. Create a new image 600x300.

2. Open your tube. Copy and paste as new layer. Apply MuRa's Meister > Copies > Wall Paper(rotate). Select all. Selections > Clip to canvas. Image > Crop to selection.

3. Add Gaussian Blur > 10. Add Noise: Uniform-10 (Monochrome not marked). Apply Eye Candy with the settings I show below:


4. Apply VM Extravaganza > Transmission with settings below:


5. Apply Simple > Quick Tile. Rename this layer BG. Duplicate it. Let the copy invisible. Click on BG layer. Apply Edge Effects > Enhance. 

6. Turn Copy of BG visible and click on it. Gaussian Blur > 4. Blend Mode: Soft Light. Duplicate.

7. Add a new layer. Using Selection Tool create long rectangles of selection. Made them with different heights. As I show here:


8. Fill the selections with #459fA7 or with a color that fits with your tube. Add Noise: Uniform-10 (Monochrome not marked). Keep selected. Add a new layer and fill it with white. Contract > 1. Delete. Deselect. Duplicate this layer twice (in a total of three layers).

9. Rename this layers 1, 2 and 3. Click on layer 3 and add Noise: Gaussian-100-Monochrome. Drop Shadow: 1-1-85-2. Turn this layer invisible. Click on layer 2. Add Noise: Gaussian-100-Monochrome. Drop Shadow: 1-1-85-2. Turn this layer invisible. Click on layer 1. add Noise: Gaussian-100-Monochrome. Drop Shadow: 1-1-85-2-Black. Let this layer visible.

10. Add a new layer. Fill with white. Apply Narah's Mask. Merge group. 

11. Add a new layer. Fill with white. Select all. Contract > 5. Low the opacity layer to 58. Deselect. Drop Shadow: 0-0-70-10-Black.

12. Open your tube. Resize if needed. Copy and paste as new layer. Move it to left. Drop Shadow: 0-0-70-10-Black. Duplicate. Gaussian Blur > 4. Blend Mode: Soft Light. My tube has a layer with flowers. I added it below the main tube.

13. Add a new layer. Select all. Fill with black. Contract > 1. Delete. Deselect. Drop Shadow: 0-0-70-10-Black.

--> Add the copyright info and license#. Add your name using BankGothic Lt BT Size: 42. Drop Shadow: 1-1-85-2-Black.

ANIMATION SHOP

1. On PSP -> Click on Edit. Copy Merged. On Animation Shop -> Click on Edit. Paste > As new animation.

2. On PSP -> Turn layer 1 invisible and layer 2 visible. Click on Edit. Copy Merged. On Animation Shop -> Click on Edit. Paste > After Current Frame.

3. On PSP -> Turn layer 2 invisible and layer 3 visible. Click on Edit. Copy Merged. On Animation Shop -> Click on Edit. Paste > After Current Frame. Save as GIF.


April 10, 2015

Greenary

GREENARY TUTORIAL


Tutorial written by Marcia Salgado on April 11th, 2015
for those who have a working knowledge of PSP.
Any resemblance to any other tutorial is coincidental.
Do not copy and paste this tutorial anywhere on the net.
If you want to translate please ask first. 

****************************************
Material:

Tube: "Gala" Di-Halim, you can purchase it here
do not use without the proper #license.
Plugin: Greg's Factory Output Vol. II
Font: TriacSeventyone

****************************************

--> Remember to save often.

1. Create an new image 600x300. Open your tube and copy and paste as new layer. Place the part wurg the color you want to have as background. Select all. Selections > Clip to canvas. Image > Crop to selection. Apply MuRa's meister > Copies > Wall Paper (Rotate).

2. Adjust > Blur > Motion Blur > 0,100. Repeat. Apply Motion Blur again using now: 90,100. Do it again using: 265,100. Rename it BASE. Duplicate. Effects > Distortion Effects > Pixelate: 18,1 (Symmetric not marked). Rename it PIXELATE. Duplicate. Click on PIELATE layer. Select all. Contract > 15. Delete. Keep selected. Add a new layer. Fill with white. Contract > 15. Delete. Rename it BORDER. Change blend mode to Soft Light and low the opacity to 60. Invert selection. Click on Copy of PIXELATE and delete. Change blend mode to Soft Color.

3. Click on BORDER layer. Select it. Add a new layer. Fill with #331a00. Contract > 1. Delete. Deselect. Rename it NOISE. Duplicate it twice. Apply Noise: Gaussian, 100, Monochrome on all three layers, do not use Edit > Repeat. Add shadow to all three layers too. Drop Shadow: 1-1-85-2-Black. Leave Copy (2) of NOISE and Copy of NOISE invisible.

4. Add your close up as a new layer. Change blend mode to Luminance (Legacy) and low the opacity to 32 (or use one that fits your tube). Select all. Selections > Clip to canvas. Contract > 30. Invert selection. Delete.

5. Add a new layer. Custom Selection: Top-120, Right-600, Bottom-170, Left-0. Fill with white. Deselect. Effects > Distortion Effects > Warp: H-(-75), V-100, Size-100, Strenght-(-30). Repeat. Mirror. Duplicate. Free Rotate: Right-10. Effects > Image Effects > Offset: H-(-15), V-55, Transparent. Select all. Contract > 30. Invert selection. Delete. Deselect. Merge down. Change blend mode to Soft Light and low the opacity to 60.  Select it and click on Copy of PIXELATE layer and Promote ro Selection. Click again in Copy of PIXELATE and delete. Drop Shadow: 0-0-70-10-Black.

6. Click on Promoted Selection layer. Rename it POOL SHADOW. Duplicate it twice. Click on Copy (2) of POOL SHADOW layer. Apply Greg's Factory Output Vol. II > Pool Shadow:


7. Leave Copy (2) of POOL SHADOW layer invisible. Click on Copy of POOL SHADOW layer, applly the same filter using:


8. Leave Copy of POOL SHADOW layer invisible. Click on POOL SHADOW layer, same filter using:


9. Click on first layer. Add your tube and place it on right side of the tag. Duplicate. Gaussian Blur > 4 and change the blend mode to Solft Light. Add a suitable shadow on the original tube layer. Add your copyright info and license# if necessary. Add a new layer. Fill it with #454109. Select all. Contract > 2. Delete. Noise: Gaussian, 100, Monochrome. Drop Shadow: 0-0-70-10-Black. Add your name. I'm using TriacSeventyone, size 48. Drop Shadow: 1-1-85-2-Black. Change the blend mode to Soft Light.

ANIMATION PART

1. PSP -> Edit > Copy Merged. Animation Shop -> Edit > Paste as new animation.

2. PSP -> Let invisible NOISE and POOL SHADOW and turn visible Copy of NOISE and Copy of POOL SHADOW. Edit > Copy Merged. Animation Shop -> Edit > Paste > After current frame.

3. PSP -> Let invisible Copy of NOISE and Copy of POOL SHADOW and turn visible Copy (2) of NOISE and Copy (2) of POOL SHADOW. Edit > Copy Merged. Animation Shop -> Edit > Paste > After current frame.

4. In Animation Shop select the first frame and Edit > Select all. Animation > Frame properties > 18.


March 28, 2015

Manual Color Correction Tool

MANUAL COLOR CORRECTION TUTORIAL

Tutorial written by Marcia Salgado on March 28th, 2015
for those who have a working knowledge of PSP.
Any resemblance to any other tutorial is coincidental.
Do not copy and paste this tutorial anywhere on the net.
If you want to translate please ask first. 

****************************************

Here's a simple tutorial to show where you can find
the Manual Color Correction Tool.
I'll use many images so you can really "see" it step-by-step.
After I show where you can find it in PSP 9 and in newer PSP versions, I also show how to use it. If you already know where it is but need to learn only how to use all you need to do is scroll the page down.

****************************************

PSP 9 VERSION

In this case find the tool is very easy.
All you have to do is:

1. Click on Adjust.

2. Click on Color Balance

3. Click on Manual Color Correction


****************************************

NEWER PSP VERSIONS

In this case you'll have to add the tool to your Standard Toolbar.
Here is what we'll do.


1. Click on View > Customize.


2. In Customize Window roll down Categories until the end and click on All Commands. In Commands options roll down until you find Manual Color Correction. It's in alphabetical order so it's easy to find. Click and drag it to the Standard Toolbar and release the button to fix it wherever you want it.


****************************************

HOW TO USE MANUAL COLOR CORRECTION TOOL

It's a very easy tool.


1. Click on Manual target color.

2. Set the colors you want to change.

**Be aware this tool works better with solid colors
and not so well with gradients or images with many shades of color**
  • In Source (1) you put the color you want to remove. Just click with the left mouse button on it OR click on the color square and add its HTML color, i.e. #000000
  • In Target (2) you put the new color you want to use. If the color already is in the image just click on it using the right mouse button OR click on the color square and add its HTML Color, i.e. #FFFFFF
3. Click OK


March 15, 2015

Striped Tag Tutorial

STRIPED TAG TUTORIAL


Tutorial written by Marcia Salgado
for those who have a working knowledge of PSP.
Any resemblance to any other tutorial is coincidental.
Do not copy and paste this tutorial anywhere on the net.
If you want to translate please ask first. 
It's one of my first Forum Style Tutorial, it's a very old tag
I created when I was in Rac's Forum.

****************************************
Material:

Tube: ©Ismael Rac (a free one no longer available) 
you can find many more great ones at his site www.xeracx.com/, 
remember to follow the artist TOU. 
Do not use it without the #license.
Filter: Penta.com > ColorDot 
Gradient by me, here
A doodle, used one from a FTU Kit Inked created by Kat,
no longer available, you can use a Dingbat font - one good: SLSquiggles.
Font:ITC Jeepers

****************************************

*~* First - Tag. *~*

1. Put the gradient in your gradient folder (My PSP Files > Gradients). If you downloaded the free kit Inked, open element27, duplicate it (Shift+D) and close the original. Open the tube, duplicate and close the original.

2. Choose 2 colors from your tube. Open the gradient 2masa and use: Angle=0 Repeat=7. Open a new canvas of 600 x 200 and fill with your gradient.

3. Select the lighter color strips with the Magic Wandt and apply Effects > Texture Effects > Blinds, with the follow: Widht=3, Opacity=60, Horizontal marked and color #C0C0C0. Selections > Select None.

4. Select the darker color strips and apply Penta.com filter, preset Color Dot (Effects > Plugins > penta.com > color dot), using: 60-2-255-255-255. Selections > Select None.

5. Use the element27 from FTU Kit Inked criated by Kat - NKDigitAlart OR any other doodle OR even a dingbat. Colorize it to go with your tube if necessary (Adjust > Hue and Saturation > Colorize). Apply a shadow, I used: H=2, V=1, Opacity=55, Blur=5 and the color black. 

6. Add your tube and put it wherever you want it, remember to leave space to your name. Apply the same shadow used before. Select the Crop tool. At Tools Options use Widht=600 and Height=200 and apply it.

7. Add a new Raster Layer, move it over your tube layer. Selections > Select All. Selections > Modify > Select Borders with: Both, Width=2 and Antialias marked. Fill this selection with the darker color and apply a shadow, I used: V-H=0, Opacity=40, Blur=10 Color: Black.

8. Add a new Raster Layer. Add Copyright info needed. 

9. Add a new Raster Layer to your name. Apply same shadow. Save as JPG or PNG.


*~* Second - Avatar *~*

1. Open a new canvas of 150 x 150. (When this tut was written the forum avatar was 150x120)

2. Now is very simple, leave the name, the copyright and the frame layers invisible, with Selection tool, Rectangle shape, draw a selection around your tube and doodle (see mine for example). Edit > Copy > Copy Merged.

3. Click on canvas of 150 x 150, Selections > Select All. Edit > Paste Into Selection. Repeat step 7 to recreate the frame. Add a new layer to add Copyright info and another one for your name or just your initials. Save as JPG or PNG.


The Zone Proud Member Tag

THE ZONE PROUD MEMBER TAG


Tutorial written by Marcia Salgado on September 4th, 2014
for those who have a working knowledge of PSP.
Any resemblance to any other tutorial is coincidental.
Do not copy and paste this tutorial anywhere on the net.
If you want to translate please ask first. 

****************************************
Material:

Tube: FTU Artist - Burkhard Niebert - www.kunstmaler-niebert.de 
The Zone Groups forum has the artist permission, do not use it 
unless you have the same permission of usage.
Fonte: BankGothic Lt BT
Plugin: Alien Skin Eye Candy 5 Impact - Glass 
(if you do not have it you can use a Inner Bevel or nothing)
My Materials: Template, Filter Settings and Gradient here
(To install the EC5 Settings just click twice on the MS_TheZoneTemplate.f1s
and move the MS_TheZoneTemplate.jgd inside your gradient folder)

****************************************

--> Remember to save often and use my tag as reference if necessary.

1. Open the The Zone Template, duplicate and close the original. Delete the © info layer.

2. Activate the zone layer. Selections > Select All. Selections > Float. Selections > Defloat. Add a new layer. Fill with a gradient of your choice. I used MS_TheZoneTemplate Gradient - Angle: 45 - Repeats: 3 - Style: Linear. Keep selected. Effects > Edge Effects > Enhance More

3. Effects > Distortion Effects > Pixelate > Symmetric Marked and Block Width/Height: 25.

4. Effects > Edge Effects > Enhance. Duplicate this layer, change the Layer Blend Mode to Overlay and leave it invisible for now.

5. Click on the zone layer to activate it. Add as a new layer the tubes or elements or image you want to use inside the text to fill it. 

6. Arrange the tubes as you wish. Leave only the tubes layers visible. Layers > Merge > Merge Visible. Selections > Invert. Press the Delete key from your keyboard.

7. Selections > Select All. Selections > Clip to Canvas. Image > Crop to Selection. Change the Layer Blend Mode to Luminance (L).

8. Activate the Copy of the zone layer. Selections > Select All. Selections > Float. Selections > Defloat and add a new layer.

9. Apply the Alien Skin Eye Candy 5 Impact Glass preset I provide or use the Settings below.


10. Activate the Only Wh Border and use Adjust > Add/Remove Noise > Add Noise > Gaussian - Monochrome - Noise: 100. Add this same effect again. Effects > 3D Effects > Drop Shadow > V/H: 1 - Opacity: 85 - Blur: 2 - Color: Black.

11. Activate the Proud Member Layer. Selections > Select All. Selections > Float. Selections > Defloat. Add a new layer. Selections > Modify > Expand 2 and fill it with white color. Move it below the Proud Member Layer. Deselect. Apply the same Drop Shadow above.

12. Add your copyright and name (same Drop Shadow as before) and save it as PNG.


** The Avatar template is used the same way just 
change the EC5 Impact Glass - Bevel Width to 15. **


March 13, 2015

Blue Star Shine

BLUE STAR SHINE TUTORIAL


Tutorial written by Marcia Salgado on March 13th, 2015
for those who have a working knowledge of PSP.
Any resemblance to any other tutorial is coincidental.
Do not copy and paste this tutorial anywhere on the net.
If you want to translate please ask first. 

****************************************
Material:

Tube: Souldesigner "Amanda", you can purchase it at S&Co. here,
do not use without the proper #license.
Plugin: Mura's Meister > Copies > Wallpaper (rotate)
Xenofex 2 > Constelation
Font: DJB Holly Enchanted

****************************************

--> Remember to save often and use my tag as reference if necessary. 

1. Open a new image 600x250. Open your tube. Copy and paste s new layer. Move it until the colors you want are showing. Select All. Selections > Clip to canvas. Image > Crop to selection. Apply Mura's Meister > Copies > Wall Paper (rotate) > Default. If the image do not cover all space, apply it again. Blur > Motion Blur > Angle=90 Strength=100. Duplicate. Mirror. Change blend mode to Soft Light. Merge Visible. 

2. Add a new layer. White on foreground and black on background layer. Create a gradient: Style=Radial Angle=0 Repeats=7 Center Point=H:100 V:50. Fill the layer. Move it down. Duplicate. Mirror. Low opcity to 50. Mege down. Duplicate. Change blend mode to Multiply.

3. Click on first layer. Select all. Contract > 15. Fill with black. Contract > 15. Delete. Effects > Texture Effects > Wave > Gap size=3 Width=3 Opacity=10 Use a color from your tube in both squares Fill gap marked. I'm using the color:#1fb4ba. Rename the layer BASE. Duplicate it three times, in a total of 4 layers. Rename the duplicated layers to 1,2 and 3. Click on layer 1 and apply Alien Skin Xenofex2 > Constelation > Settings below. Repeat the same on layers 2 and 3 just cliking one on Random Seed button. Leave layers 2 and 3 invisible.


4. Click on first layer. Select all. Contract 15. Fill with same color used on Wave effect. Contract 1. Delete. Contract> 13. Fill with same color. Contract > 1. Delete. Drop Shadow: 1-1-85-2-Black. 

5. Add new layer. Select all. Fill with white. Contract > 4. Delete. Drop Shadow: 0-0-70-10-Black. Add new layer. Select All. Fill with same color used before. Contract > 3. Delete. Duplicate this layer twice. In a total of 3 layer. Rename layer 1N, 2N and 3N. Click on 1N and apply Noise: Gaussian-75-Monochrome. Apply the same in layer 2N and 3N but repeat all process, do not use Edit > Repeat. Leave layers 2N and 3N invisible.

6. Add your tube close up. Resize it and move it to right. Add a suitable shadow. Add a new alyer. Select all. Contract > 1. Delete. Drop Shadow: 0-0-70-10-Black. Add your copyright info and #license. Add your name. Edit > Copy Merged.

ANIMATION

1. In Animation Shop paste as new animation. Back to PSP, let invisible layers 1 and 1N and visible layers 2 and 2N. Copy Merged.

2. In Animation Shop paste after current frame. Back to PSP, let invisible layers 2 and 2N and visible layers 3 and 3N. Copy Merged. 

3. In Animation Shop paste after current frame. Select all frames. Animation > Frame Properties > 18. Save.


March 12, 2015

Yellow Kiss ~ by Joanne Salgado


Tutorial written by Joanne Salgado on February 18th, 2015
for those who have a working knowledge of PSP.
Any resemblance to any other tutorial is coincidental.
Do not copy and paste this tutorial anywhere on the net.
If you want to translate please ask first. 

Tube: Sexy Beauty by The Hunter - you can purchase here
Template here
Font: AR BONNIE

Don't forget to save often.

1. Open the template. Duplicate. Close Original. Delete Info layer.

2. Open your tube. Copy and paste as new layer. Plugins/MuRa's Meister/ Copies - wallpaper rotate. Blur/Motion Blur - angle: 62 / strength: 100%. Repeat. Edge Effects/Enhance. Plugins/Filter Factory Gallery N/X Exchange. Texture Effects/Weave - 1/5/1/black/black/fill gaps checked. Move this layer above the bottom layer. 

3. Select the upper layer. Color Balance/Manual Color Correction with source: #808080 and target: #f6e569. (you may want to choose a color that match your tube). Plugins/AP [Lines/SilverLining with line options: vertical and change the three color[R] to 255. With the magic wand (tolerance: 20 | feather: 0 | anti-alias unchecked. select the lines we just made. Selections/Promote Selection to Layer. Selections None. Rename LINES. We'll back on this later.

4. Select the curve layer. Color Balance/Manual Color Correction with source: #000000 and target: #ffffff.

5. Open your tube. Resize as you like and arrange it to the left. Add shadow as you like. I used 1-1-65-2 black.

6. Add your copyright.

7. Add your name. I used: AR BONNIE / size: 72.

For Animation.

1. Select the LINES layer. Duplicate two times. You will have a total of three layers. Select the first. Plugins/Xenofex 2/Constellation with this settins: 


Hide this layer, select the second. Repeat the constellation. Don't forget to hit random. Hide this layer. Select the third. Repeat.

2. Select the curve layer. Duplicate two times. You will have a total of three layers. Select the first. Add Noise with uniform/20/monochrome checked. Add shadow 1-1-65-2 black. Hide this layer. Select the second, repeat. Hide this layer. Select the third, repeat.

3. Select the border 2 layer. Duplicate two times. You will have a total of three layers. Select the first. Add Noise with uniform/20/monochrome checked. Add shadow 0-0-65-2 black. Hide this layer. Select the second, repeat. Hide this layer. Select the third, repeat.

4. Copy Merged. Go to Animation Shop and paste as new animation. Back to PSP hide all the third layers and open the second. Copy merged. Go to Animation, paste after current. Back to PSP hide all the second layers and open the first. Copy merged. Go to Animation and paste after current.

Save as gif.