
BLUE STAR SHINE TUTORIAL

Tutorial written by Marcia Salgado on March 13th, 2015
for those who have a working knowledge of PSP.
Any resemblance to any other tutorial is coincidental.
Do not copy and paste this tutorial anywhere on the net.
If you want to translate please ask first.
****************************************
Material:
Tube: Souldesigner "Amanda", you can purchase it at S&Co. here,
do not use without the proper #license.
Plugin: Mura's Meister > Copies > Wallpaper (rotate)
Xenofex 2 > Constelation
Font: DJB Holly Enchanted
****************************************
--> Remember to save often and use my tag as reference if necessary.
1. Open a new image 600x250. Open your tube. Copy and paste s new layer. Move it until the colors you want are showing. Select All. Selections > Clip to canvas. Image > Crop to selection. Apply Mura's Meister > Copies > Wall Paper (rotate) > Default. If the image do not cover all space, apply it again. Blur > Motion Blur > Angle=90 Strength=100. Duplicate. Mirror. Change blend mode to Soft Light. Merge Visible.
2. Add a new layer. White on foreground and black on background layer. Create a gradient: Style=Radial Angle=0 Repeats=7 Center Point=H:100 V:50. Fill the layer. Move it down. Duplicate. Mirror. Low opcity to 50. Mege down. Duplicate. Change blend mode to Multiply.
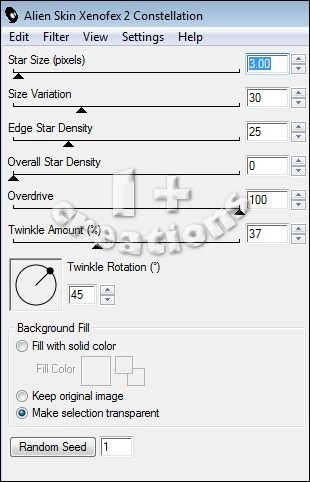
3. Click on first layer. Select all. Contract > 15. Fill with black. Contract > 15. Delete. Effects > Texture Effects > Wave > Gap size=3 Width=3 Opacity=10 Use a color from your tube in both squares Fill gap marked. I'm using the color:#1fb4ba. Rename the layer BASE. Duplicate it three times, in a total of 4 layers. Rename the duplicated layers to 1,2 and 3. Click on layer 1 and apply Alien Skin Xenofex2 > Constelation > Settings below. Repeat the same on layers 2 and 3 just cliking one on Random Seed button. Leave layers 2 and 3 invisible.
4. Click on first layer. Select all. Contract 15. Fill with same color used on Wave effect. Contract 1. Delete. Contract> 13. Fill with same color. Contract > 1. Delete. Drop Shadow: 1-1-85-2-Black.
5. Add new layer. Select all. Fill with white. Contract > 4. Delete. Drop Shadow: 0-0-70-10-Black. Add new layer. Select All. Fill with same color used before. Contract > 3. Delete. Duplicate this layer twice. In a total of 3 layer. Rename layer 1N, 2N and 3N. Click on 1N and apply Noise: Gaussian-75-Monochrome. Apply the same in layer 2N and 3N but repeat all process, do not use Edit > Repeat. Leave layers 2N and 3N invisible.
6. Add your tube close up. Resize it and move it to right. Add a suitable shadow. Add a new alyer. Select all. Contract > 1. Delete. Drop Shadow: 0-0-70-10-Black. Add your copyright info and #license. Add your name. Edit > Copy Merged.
ANIMATION
1. In Animation Shop paste as new animation. Back to PSP, let invisible layers 1 and 1N and visible layers 2 and 2N. Copy Merged.
2. In Animation Shop paste after current frame. Back to PSP, let invisible layers 2 and 2N and visible layers 3 and 3N. Copy Merged.
3. In Animation Shop paste after current frame. Select all frames. Animation > Frame Properties > 18. Save.