February 28, 2015

IB Kit - Martin Abel 45-2

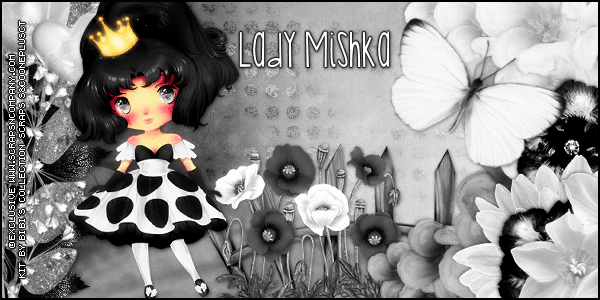
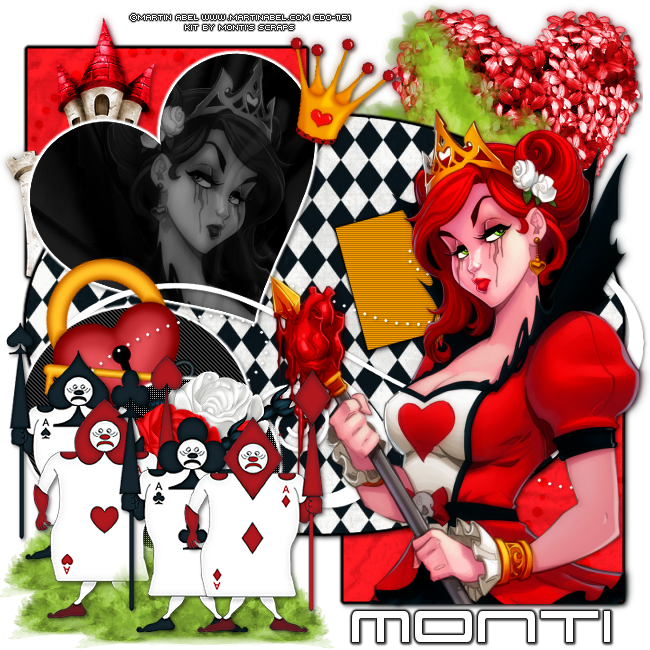
QUEEN OF HEARTS TUTORIAL


Tutorial written by Marcia Salgado on January 28th, 2015
for those who have a working knowledge of PSP.
Any resemblance to any other tutorial is coincidental.
Do not copy and paste this tutorial anywhere on the net.
If you want to translate please ask first. 

****************************************
Material:

Tube: Martin Abel, you can purchase it here at CDO 
do not use without the proper #license.
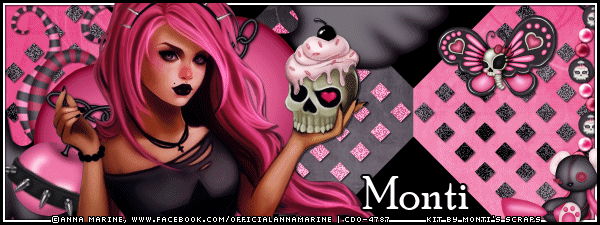
PTU Kit 'ScrapMonti_IB-MartinAbel-45-2' by Monti, 
you can purchase it  here  at CDO 
My template here 
Plugins:
Eye Candy 6 > Gradient Glow
Penta.com > Jeans and Color Dot
Font: KG This Is Not Goodbye

****************************************

--> Remember to save often and use my tag as reference always its necessary.

1. Open my template. Duplicate. Close original. Delete © layer. Click on back layer. Open ScrapMonti_IB-MartinAbel-45-2-Element39. Resize 80%. Copy and paste as new layer. Move it to the right. Drop Shadow: 1-1-50-2. Open ScrapMonti_IB-MartinAbel-45-2-Element38. Mirror. Place in front of first tree, a little to left. Same shadow.

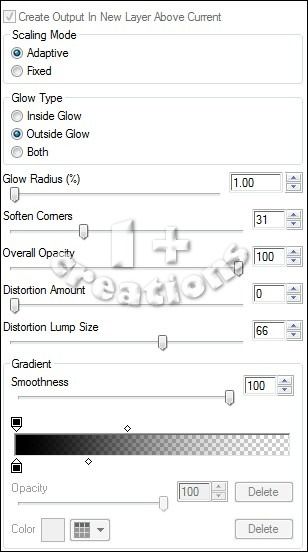
2. Click on square left layer. Select the shape. Add a new layer. Open ScrapMonti_IB-MartinAbel-45-2-Paper6. In material Palette  chose pattern and look for the paper with this settings: Angle=0 Scale=50. Fill the selection. Deselect. Apply Eye Candy > Gradient Glow, using color black. Settings below. Add same shadow. Delete square left layer.


3. Click on doodle left layer. Add same shadow. Open ScrapMonti_IB-MartinAbel-45-2-Element1. Resize 50%. Copy and paste as new layer. Move it over upper square at left. Same shadow. Click on square right layer. Apply same paper. Deselect. Use same gradient glow and same shadow as did before. Delete square right layer. Click on doodle right layer. Same drop shadow. 

4. Click on big oval layer. Select the shape. Add a new layer. Open ScrapMonti_IB-MartinAbel-45-2-Paper2. Use it as pattern with this settings: Angle=0 Scale=80. Fill the selection. Deselect. Apply the gradient glow and use same shadow. Delete big oval layer. Click on heart layer. Select the shape. Add new layer. open ScrapMonti_IB-MartinAbel-45-2-Paper8. Use as pattern with this settings: Angle=0 Scale=50. Fill the selection. Keep selected. Copy the close up of your tube and paste as new layer. Place it over the heart. Selections > Invert. Delete. Deselect. Change Blend Mode to Luminance (Legacy) and low the opacity to 40. Duplicate. Adjust > Blur > Gaussian Blur: 3. Change Blend Mode to Soft Light (or any other that suits your tube best). Delete hearts layer. Click on heart paper layer. Apply the Gradient Glow, just change color to white. Same shadow.

5. Click on swirl layer. Same drop shadow. Click on circle back. Apply filter Penta.com > Jeans > Default (62,4). Apply same Gradient Glow (white color). Same shadow. Open ScrapMonti_IB-MartinAbel-45-2-Element12. Resize 35%. Free Rotate: Left-20. Copy and paste as new layer. Move it to top of black circle. Same shadow. Click on circle dark grey layer. Select and change the color to black. Apply filter Penta.com > Color Dots > Default (90,2,255,255,255). Same Gradient Glow (white) and same shadow.

6. Open ScrapMonti_IB-MartinAbel-45-2-Element28. Resize 35%. Copy and paste as new layer. Move it to top of the dotted circle at right. Same shadow. Open ScrapMonti_IB-MartinAbel-45-2-Element29. Resize 35%. Copy and paste as new layer. Move it to left of first rose and move it a little down. Click on lil square up layer. Select and change the color to #f29900. Blinds: Width=2 Opacity=25 Color=Black Horizontal marked. Gradient Glow using black color. Same shadow. Click on little square bottom layer. Select and change color to #f29900. Blinds: Width=2 Opacity=25 Color=Black Horizontal NOT marked. Same gradient Glow and same shadow.

7. Click on swirl dots layer. Same shadow. Copy and paste your tube. Resize it if needed. Apply a suitable shadow. Open follow elements and do the action: ScrapMonti_IB-MartinAbel-45-2-Element19. Resize 45%. Mirror. ScrapMonti_IB-MartinAbel-45-2-Element20. Resize 45%. Mirror. ScrapMonti_IB-MartinAbel-45-2-Element21. Resize 45%. ScrapMonti_IB-MartinAbel-45-2-Element22. Resize 45%. Now copy and paste each of one and paste as new layer on the tag. Place them at bottom left. Arranje them as you please or look to my tag as reference. Apply same shadow on every one. Open ScrapMonti_IB-MartinAbel-45-2-Element37. Mirror. Merge down. Resize 40%. Copy and place as new layer. Use it as ground for the cards. Duplicate as much as you need and place betwen cards.

8. Open ScrapMonti_IB-MartinAbel-45-2-Element5. Resize 20%. Free Rotate: Left-20. Copy and paste as new layer. Place it over the heart at its right side.

--> Resize if you want. Add your copyright info and #license. Add your name. Save as PNG.


Flora ~ by Joanne Salgado


Tutorial written by Joanne Salgado on February 18th, 2015
Any resemblance to any other tutorial is coincidental.
Do not copy and paste this tutorial anywhere on the net.
If you want to translate please ask first. 

Tube: Natalia Nz - you can purchase here 
Kit Fairy Fungus by Disturbed Scraps - you can purchase here
Mask by Dee here
Template by Melissaz Creationz here
Font: Canter Bold

Don't forget to save often.

1. Open template. Duplicate. Close original. Delete all text and leafs layers. Image/Canvas Size - 600x600 pixels/placement: center.

2. Open paper 'DS - FF Paper 8'. Copy and paste as new layer. Layers/Arrange/Send to Bottom. Resize 80%. Rename MASK.

3. Select 'raster 6' layer. With flood fill tool change it to texture. Using paper 'DS - FF Paper 8' colorize the layer. Select 'raster 3' layer and colorize with the same paper.

4. Open paper 'DS - FF Paper 3'. Select 'raster 4' and colorize with the paper. Select 'copy of raster 4' layer and colorize with the same paper.

5. Open paper 'DS - FF Paper 13'. Select 'raster 5' and colorize with the paper. Select 'copy of raster 5' layer and colorize with the same paper.

6. Select 'raster 2' layer. Colorize with white. Adjust/Add-Remove noise/Add noise - uniform/20/monochrome checked. Select 'merged' layer (the border of raster 6). Colorize with white. Adjust/Add-Remove noise/Add noise - uniform/20/monochrome checked.

7. Open element 'DS - FF Element (25)'. Copy and paste as new layer. Resize 70%. Arrange it to the left.

8. Open element 'DS - FF Element (8)'. Copy and paste as new layer. Resize 60%. Arrange it to the left, at the bottom of the tree.

9. Open element 'DS - FF Element (46)'. Copy and paste as new layer. Resize 30%. Arrange a little to the left, next the tree, near the grass.

10. Open element 'DS - FF Element (48)'. Copy and paste as new layer. Resize 30%. Arrange it to the far left, as it's flying to the tree.

11. Open element 'DS - FF Element (7)'. Copy and paste as new layer. Resize 30%. Image/Mirror. Arrange it neart the basket at the bottom of the tree.

12. Open element 'DS - FF Element (15)'. Copy and paste as new layer. Resize 30% Image/Rotate/Free Rotate 90-left. Image/Mirror. Arrange it to the far right above the frame border. (see my tag).

13. Open your tube. I used 'Flora' by Natalia Nz. Copy and paste as new layer. Resize 15%. Arrange it to the right.

14. Select your MASK layer. Open your mask (I used 'DD_VMask_7_zpshp5bfwbc' by Dee). Layers/New Mask Layer/From image - select the mask - source luminance/invert mask unchecked. Layers/Merge/Merge Group.

Add shadow as you like. I used 1-1-65-2 black.
Add your copyright.
Add your name - I used Canter Bold 60 white with black border.

Save.

Steampunk Beauty


== NEW PTU DANCE IN THE RAIN CT TAG ==

Featuring "Steampunk Beauty" Kit by Dance In The Rain at Smiley Creation Shop.

Dance In The Rain's beautiful kit with 177 elements and 30 papers for you to play with.

Dance In The Rain kit can be found at:

-> Smiley Creation Shop, here


February 27, 2015

Magical Fairy Realm


== NEW PTU DANCE IN THE RAIN CT TAG ==

Featuring "Magical Fairy Realm" Kit by Dance In The Rain at PicsForDesign - PFD and Smiley Creation Shop.

Dance In The Rain's beautiful kit with 70 elements and 10 papers for you to create a magical world.

Dance In The Rain kit can be found at:

-> PicsForDesign - PFD, here

-> Smiley Creation Shop, here


Blanco Y Negro

BLACK & WHITE GARDEN TUTORIAL


Tutorial written by Marcia Salgado on January 28th, 2015
for those who have a working knowledge of PSP.
Any resemblance to any other tutorial is coincidental.
Do not copy and paste this tutorial anywhere on the net.
If you want to translate please ask first. 

****************************************
Material:

Tube: © Exclusive - Lady Mishka, you can purchase it here at S&Co. 
do not use without the proper #license.
PTU Kit 'Blanco Y Negro' by Bibi's Collection Scraps, 
you can purchase it here at S&Co. 
Font: KG Skinny Latte

****************************************

--> Remember to save often, use my tag as reference for elements placement.

1. Open a new image 600x300. Opem BIBIBLANCO Y NEGRO PAPERS (5). Resize 80%. Copy and paste as new layer. Move until the mushrooms show at left. Open BIBI BLANCO Y NEGRO ELEMS (43). Resize 50&. Copy and paste as new layer. Move it to right side. Blend Mode: Soft Light. Rename it ANIM1. Duplicate it twice, finish with 3 layer. Add Noise: Uniform-75-Monochrome on all 3 layer. Drop Shadow: 1-1-50-5. Leave copies invisible. 

2. Open BIBI BLANCO Y NEGRO ELEMS (10)
. Resize 32%. Copy and paste as new layer. Move it to bootom. Open BIBI BLANCO Y NEGRO ELEMS (52). Resize 40%. Move it to bottom and a little to right. Same shadow. Open BIBI BLANCO Y NEGRO ELEMS (46). Resize 33%. Copy and paste as new layer. Place it in front of the fence. Same shadow.

3. Open BIBI BLANCO Y NEGRO ELEMS (60). Copy and paste as new layer. Move to the far left. Same shadow. Open BIBI BLANCO Y NEGRO ELEMS (69). Resize 80%. Copy and paste as new layer. Move it to same placeat left. Same shadow. Open BIBI BLANCO Y NEGRO ELEMS (67). Copy and paste as new layer. Place it in front of last element. Duplicate. Flip. Merge down. Same shadow. 

4. Open BIBI BLANCO Y NEGRO ELEMS (37). Copy and paste as new layer. Mirror. Copy and paste as new layer. Move to right bottom. Drop Shadow: (-1)-(-1)-50-5. Open BIBI BLANCO Y NEGRO ELEMS (38). Mirror. Flip. Copy and paste as new layer. Move it to right top. Same shadow. Open BIBI BLANCO Y NEGRO ELEMS (42). Resize 33%. Copy and paste as new layer. Move it to middle right side.  Duplicate. Free Rotate: Right-90.Same shadow on both layers. Open BIBI BLANCO Y NEGRO ELEMS (45). Resize 50%. Copy and paste as new layer. Move it bottom right. Move this layer one down. Same shadow. Click on first layer. Open BIBI BLANCO Y NEGRO ELEMS (36). Resize 50%. Copy and paste as new layer. Move it to far bottom right. Same shadow. 

5. Open BIBI BLANCO Y NEGRO ELEMS (25). Resize 26%. Free Rotate: Right-15. Copy and paste as new layer. Place it over the flowers at right. Add your tube. Resize if needed. Apply a suitable shadow. Open BIBI BLANCO Y NEGRO ELEMS (5). Resize 40%. Free Rotate: Left-15. Copy and paste as new layer. Move it behind your tube - left side.

6. Add a new layer. Select All. Fill with black. Contract:2px. Delete. Drop Shadow: 0-0-70-10.

--> Add your copyright info and #license. Add your name.

7. Edit > Copy Merged. --> Newer versions: Edit > Copy Special > Copy Merged.


ANIMATION SHOP

1. Paste as new animation. Back to PSP. Close ANIM1 and open Copy of ANIM1. Copy Merged.

2. Paste After Current Frame. Back to PSP. Close Copy od ANIM1. Open Copy (2) of ANIM1. Copy Merged.

3. Paste After Current Frame. Save.


Winter Valentine


This one was made using my tutorial.
You can find it here.


== NEW PTU DANCE IN THE RAIN CT TAG ==

Featuring "Winter Valentine" Kit by Dance In The Rain at PicsForDesign - PFD and Smiley Creation Shop. And Featuring "Amy" tube by Swan Scraps at PicsForDesign - PFD.

Dance In The Rain's beautiful kit with 150 elements and 30 papers match for the great tube by Swan Scraps. This kit will also work with many other tubes.

Dance In The Rain kit can be found at:

-> PicsForDesign - PFD, here

-> Smiley Creation Shop, here

Swan Scraps's tube can be found at: 

-> PicsForDesign - PFD, here


February 26, 2015

Cute Helen


== NEW PTU DANCE IN THE RAIN CT TAG ==

Featuring "Cute Helen" Kit by Dance In The Rain at PicsForDesign - PFD

Dance In The Rain's beautiful kit with 121 elements and 25 papers match for the tube by Stan Dudin. This kit will also work with many other tubes, as you can see for my tags.

Dance In The Rain kit can be found at:

-> PicsForDesign - PFD,  here


February 25, 2015

Pink Sugar ~ by Joanne Salgado


Tutorial written by Joanne Salgado on February 18th, 2015
Any resemblance to any other tutorial is coincidental.
Do not copy and paste this tutorial anywhere on the net.
If you want to translate please ask first. 

Tube: Anna Marine - you can purchase here 
Kit AnnaMarine-50-1 by Monti's Scraps - you can purchase here 
Template by Allison here 
Font: Poor Richard

Don't forget to save often.

1. Open the template. Duplicate. Close the original. Delete de info layer. (Since there's a few forums that only allow width of max. 600 I used Image/Canvas Size and change the dimensions, but if you want you can work with the template as it is).

2. Open paper 'ScrapMonti_IB-AnnaMarine-50-1-Paper7' copy and paste as new layer. Move this layer above the background layer.

3. Open paper 'ScrapMonti_IB-AnnaMarine-50-1-Paper6' copy and paste as new layer. With the eraser tool clean the paper from the left and right side. It will be only in the center. Use the upper and lower triangles to know de exact place to clean. (see my tag)

4. Select the triangles middle layer. Open paper 'ScrapMonti_IB-AnnaMarine-50-1-Paper7' again, change the flood fill to pattern. Look for the paper and colorize it.

5. Select the triangles right layer. Open paper 'ScrapMonti_IB-AnnaMarine-50-1-Paper6' again, change the flood fill to pattern. Look for the paper and colorize it. Do the same with triangles left. Merge the three triangles layers together. Rename ANI.

6. Select lower right triangle layer and colorize it with black. Do the same with upper right triangle layer.

7. Open element 'ScrapMonti_IB-AnnaMarine-50-1-Element9' copy and paste as new layer. Resize 40%. Arrange it to the far left of the template.

8. Open element 'ScrapMonti_IB-AnnaMarine-50-1-Element13' copy and paste as new layer. Resize 20%. Arrange it to the upper right.

9. Open element 'ScrapMonti_IB-AnnaMarine-50-1-Element34' copy and paste as new layer. Arrange it to the left with a part above the vines. 

10. Open element 'ScrapMonti_IB-AnnaMarine-50-1-Element36' copy and paste as new layer. Resize 20%. Arrange it to the bottom left.

11. Open element 'ScrapMonti_IB-AnnaMarine-50-1-Element15' copy and paste as new layer. Resize 20%. Image/Rotate/Free Rotate - right/25. Arrange it on top of the cherry and with the eraser tool clean the inside part to look as its around the cherry.

12. Open element 'ScrapMonti_IB-AnnaMarine-50-1-Element33' copy and paste as new layer. Resize 50%. Arrange it to the far right, only one side will appear. (see my tag).

13. Select the inner border layer. Colorize it white.

14. Open element 'ScrapMonti_IB-AnnaMarine-50-1-Element11' copy and paste as new layer. Resize 20%. Image/Mirror. Arrange it to the bottom right.

15. Open your tube. I used Anna Marine. Copy and paste as new layer. Arrange it to the left above the heart.

Add shadow as you like. I used 1-1-65-2 black.
Add copyright.
Add name. I used Poor Richard 26 white with black border.

Save.

For Animation.

1. Select the ANI layer. Duplicate it two times, you should have a total of three. Rename the other two ANI2 and ANI3.

2. With the ANI layer selected. Adjust/Add-remove noise/Add Noise - uniform/40/monochrome checked. Add drop shadow if you want.

3. Select ANI2. Adjust/Add-remove noise/Add Noise - uniform/40/monochrome checked. Add drop shadow if you want.

4. Select ANI3. Adjust/Add-remove noise/Add Noise - uniform/40/monochrome checked. Add drop shadow if you want.

5. Hide layer ANI2 and ANI3. Edit/Copy Merged. Go to Animation Shop. Paste as new animation.

6. Back to PSP. Hide ANI layer. Open ANI2. Edit/Copy Merged. Go to Animation Shop. Paste after current.

7. Back to PSP. Hide ANI2 layer. Open ANI3. Edit/Copy Merged. Go to Animation Shop. Paste after current.

Save as gif.

In My Heart


== NEW CT DANCE IN THE RAIN PTU TAGS ==

Featuring "In My Heart" Kit by Dancing In The Rain at PicsForDesign and Smiley Creation Shop.

Featuring "Melinda" tube by Swan Scraps at PicsForDesign a gorgeous girl that fits perfectly with any romantic tag.

PTU PU Only Tagger Sized Kit with a Romantic/Valentine's Day Theme.
It has 25 Papers and 145 Elements so you can play with it.

Kit can be found in two stores:

-> PicsForDesign, here

-> Smiley Creation Shop, here

Tube can be found at:

-> PicsForDesign, here

Don't forget to check-out her blog:


Leprechaun ~ by Joanne Salgado


Tutorial written by Joanne Salgado on February 18th, 2015
Any resemblance to any other tutorial is coincidental.
Do not copy and paste this tutorial anywhere on the net.
If you want to translate please ask first. 

Tube: Danny Lee - you can purchase here 
Kit Angry Leprechaun by Bibi's Collection - you can purchase here 
Font: DinosaursAreAlive

Don't forget to save often.

1. Open a new image 600x600

2. Open element 'BIBI-ANGRYLEPRECHAUN ELEMS (164)' copy and paste as new image. Resize 80%. Image/Rotate/Free Rotate left-90. Rename as FRAME.

3. Open paper 'BIBI-ANGRYLEPRECHAUN PAPERS (14)' copy and paste as new image. Resize 50%. Move below FRAME layer. Select FRAME layer, with magic wand select inside it. Selections/Modify/Expand 4. Selections/Invert. Select the paper layer and hit delete on your keyboard. Selections/Select None.

4. Open element 'BIBI-ANGRYLEPRECHAUN ELEMS (106)' copy and paste as new image. Resize 60%. With Freehand selection tool (feather 5/smoothing 12) remove the leafs leaving only the grass part. Image/Mirror. Image/Flip. Arrange it down. Move this layer below the paper layer.

5. Open element 'BIBI-ANGRYLEPRECHAUN ELEMS (114)' copy and paste as new layer. Resize 50%. Move this layer down. Arrange the tree to the right side behing the frame. With the eraser tool clean all the bottom part of the element.

6. Open element 'BIBI-ANGRYLEPRECHAUN ELEMS (136)' copy and paste as new layer. Resize 60%. Arrange to the left around the frame.

7. Open element 'BIBI-ANGRYLEPRECHAUN ELEMS (107)' copy and paste as new layer. Resize 60%. Image/Mirror. Move this layer above the paper layer. Arrange the unicorn to the left leaving only the upper torso appearing. Select FRAME layer, with magic wand select inside it. Selections/Modify/Expand 4. Selections/Invert. Select the unicorn layer and hit delete on your keyboard. Selections/Select None.

8. Open element 'BIBI-ANGRYLEPRECHAUN ELEMS (75)' copy and paste as new layer. Resize 60%. Move this layer above the FRAME layer. Image/Mirror. Arrange it to the left. (see my tag)

9. Open element 'BIBI-ANGRYLEPRECHAUN ELEMS (167)' copy and paste as new layer. Resize 60%. Arrange it to the left. (see my tag)

10. Open element 'BIBI-ANGRYLEPRECHAUN ELEMS (55)' copy and paste as new layer. 

11. Open element 'BIBI-ANGRYLEPRECHAUN ELEMS (176)' copy and paste as new layer. Resize 40%. Arrange it to the top left of the frame.

12. Open element 'BIBI-ANGRYLEPRECHAUN ELEMS (138)' copy and paste as new layer. Resize 30%. Arrange it in front of the clover we just added. (see my tag).

13. Open element 'BIBI-ANGRYLEPRECHAUN ELEMS (3)' copy and paste as new layer. Resize 30%. Arrange it to the bottom right.

14. Open element 'BIBI-ANGRYLEPRECHAUN ELEMS (1)' copy and paste as new layer. Resize 30%. Arrange by the side of the last item added. (see my tag).

15. Open element 'BIBI-ANGRYLEPRECHAUN ELEMS (46)' copy and paste as new layer. Resize 50%. Image/Mirror. Arrange it to the bottom left.

16. Open your tube. I used Angry Leprechaun by Danny Lee. Copy and paste as new layer. Resize 50%. Arrange it to the right.

Now you can add your shadow. I used 1-1-65-2 black.
Add your copyright.
Add your name. I used DinosaursAreAlive 72 white with green border.

Save.

Sexy Beauty ~ by Joanne Salgado


Tutorial written by Joanne Salgado on February 18th, 2015
Any resemblance to any other tutorial is coincidental.
Do not copy and paste this tutorial anywhere on the net.
If you want to translate please ask first. 

Tube: The Hunter - you can purchase here 
Kit Sexy Beauty by Lizquis Scraps - you can purchase here 
Mask by Dee here (the first one).
Font: Canter Bold

Don't forget to save often.

1. Open a new image 600x600.

2. Open element 'LizquisScraps_SexyBeauty_frame3' copy and paste as new image. resize 80%. Rename as FRAME.

3. Open your closeup tube. I'm using The Hunter's Sexy Beauty. Copy and paste as new image. Image/Mirror. Move this layer below FRAME layer. Arrange it to be inside the frame. Change opacity to 50 and change blend mode to Luminance (L).

4. Open paper 'LizquisScraps_SexyBeauty_paper4' copy and paste as new image. Move blow the closeup tube. Effects/Texture Effects/Weave - 1/5/1 color #c0c0c0 fill gaps checked.

5. Select the FRAME layer. With magic wand select inside it. Selections/Modify/Expand 5. Selections/Invert. Select the closeup tube layer and hit delete on your keyboard. Select the paper layer and hit delete on your keyboard. Selections/Select None.

6. Open element 'LizquisScraps_SexyBeauty_crown' copy and paste as new image. Image/Rotate/Free Rotate - 25 right. Move this layer above FRAME layer. Arrange it at the top of the frame. (see my tag).

7. Open element 'LizquisScraps_SexyBeauty_box' copy and paste as new layer. resize 60%. Arrange it to the bottom left.

8. Open element 'LizquisScraps_SexyBeauty_cupcake' copy and paste as new layer. resize 50%. Arrange it a little above the box.

9. Open element 'LizquisScraps_SexyBeauty_flower' copy and paste as new layer. resize 40%. Arrange it at the bottom corner of the crown.

10. Open element 'LizquisScraps_SexyBeauty_dice' copy and paste as new layer. resize 50%. Arrange it to the left above the box. (It will be behind the tube, you can change its location later).

11. Open your tube. Resize 60%. Arrange it to the left (see my tag).

12. Open element 'LizquisScraps_SexyBeauty_butterfly' copy and paste as new layer. resize 35%. Image/Rotate/Free Rotate - 25 right. Arrange it to the bottom of the frame.

13. Open element 'LizquisScraps_SexyBeauty_light3' copy and paste as new layer. resize 80%. Image/Mirror. Arrange it to the bottom of the tag.

14. Open element 'LizquisScraps_SexyBeauty_speakers' copy and paste as new layer. resize 60%. Arrange it to the bottom right.

15. Open element 'LizquisScraps_SexyBeauty_light1' copy and paste as new layer. Layers/Arrange/Send to Bottom. Duplicate. Image/Mirror.

16. Open paper 'LizquisScraps_SexyBeauty_paper6' copy and paste as new layer. Open your mask. Layers/New Mask Layer/From Image. Select the mask (I used DD_NGM1_2015_1). Source Luminance/Invert mask data unchecked. Layers/Merge/Merge Group.

Now you can add shadow. I used 1-1-65-2 black.
Add your copyright info.
Add your name. I used Canter Bold 72 #f6e238 and added black border.

Save.


Maleficent ~ by Joanne Salgado


Tutorial written by Joanne Salgado on February 18th, 2015
Any resemblance to any other tutorial is coincidental.
Do not copy and paste this tutorial anywhere on the net.
If you want to translate please ask first. 

Tube: Di-Halim - you can purchase here 
Kit Maleficent 1 by Bibi's Collection - you can purchase here 
Font: Mussica Swash

Don't forget to save often.

1. Open a new image 600x300.

2. Open element 'BIBIMALEFICENT 1 PAPERS (5)' copy and paste as new image. Resize 60%. Arrange so only the upper part of the paper appears. Duplicate. Change blend mode to screen.

3. Open element 'BIBIMALEFICENT ELEM (40)' copy and paste as new image. Duplicate. Image/Mirror. Image/Flip.

4. Open element 'BIBIMALEFICENT ELEM (43)' copy and paste as new image. Resize 60%. Arrange to the right. Duplicate. Image/Mirror.

5. Open element 'BIBIMALEFICENT ELEM (33)' copy and paste as new image. Resize 60%. Arrange to the left. Duplicate. Image/Mirror. Layers/Merge/Merge Down.

6. Open element 'BIBIMALEFICENT ELEM (23)' copy and paste as new image. Resize 60¨%. Arrange down.

7. Open element 'BIBIMALEFICENT ELEM (53)' copy and paste as new image.

8. Open element 'BIBIMALEFICENT ELEM (54)' copy and paste as new image.

9. Open element 'BIBIMALEFICENT ELEM (130)' copy and paste as new image. Resize 50%. Arrange left.

10. Open your tube. I used Maleficent from Di-Halim. Copy and paste as new image. No resize needed. Arrange a little to the left (see my tag).

11. Open element 'BIBIMALEFICENT ELEM (124)' copy and paste as new image. Resize 50%. Arrange it to the far left and a little down. Just a little of the grass will be showing. Duplicate. Image/Mirror. Arrange it so only the grass appears. (see my tag). Layers/Merge/Merge Down.

12. Open element 'BIBIMALEFICENT ELEM (134)' copy and paste as new image. Resize 40%. Arrange it to the left near the woodstick.

13. Open element 'BIBIMALEFICENT ELEM (48)' copy and paste as new image. Resize 40%. Arrange left near the potion.

14. Add a new layer. Selections/Select all. Image/Crop to Selection. Selections/Select All. Flood fill with black. Selections/Modify/Contract 2. Hit delete on your keyboard. Selections/Select None. Adjust/Add-remove noise/Add noise - uniform/60/monochrome checked. 

Add shadow as you like - I used 1-1-65-2 black.
Add your copyright.
Add your name.
(After adding the name, change the blend mode to screen)
Save.

Vanessa

DREAMING TUTORIAL


Tutorial written by Marcia Salgado on January 25th, 2015
for those who have a working knowledge of PSP.
Any resemblance to any other tutorial is coincidental.
Do not copy and paste this tutorial anywhere on the net.
If you want to translate please ask first. 

Copyrighted.com Registered & Protected 
QVTP-LEPI-CKRP-DI2Q

****************************************
Material:

Tube: Ishika Chowdhury, you can purchase it here at S&Co.
do not use without the proper #license.
PTU Kit 'Vanessa' by Kizzed By Kelz Kits, you can purchase it here at S&Co.
Font: KG Be Still & Know

****************************************

--> Remember to save often. Look at my tag for reference if needed.

1. Open a new image 700x700. Open KBK_Vanessa (75). Copy and paste as new layer. Free Rotate: Left-15. Move it to the middle left side of the tag. With magic Wand click inside the frame. Modify selection. Expand: 2px. Add new layer. Open paper KBK_Vanessa (30). Copy. Paste Into Selection. Move this layer below frame. On frame layer use drop shadow: 1-1-50-5.

2. Open KBK_Vanessa (9). Free Rotate: Left-90. Copy and paste as new layer. Move it to left side of the tag and place the layer below paper layer. Duplicate. Mirror. Flip. Move it a little up. Merge down. Open KBK_Vanessa (35). Copy and paste as new layer. Move it to upper right side of the tag. Drop Shadow: 1-1-35-9. Open KBK_Vanessa (69). Copy and paste as new layer. Move it to upper right side of the tag too. Same shadow. Open KBK_Vanessa (55). Copy and paste as new layer. Move it to right side. Show almost half flower only. Drop Shadow: 1-1-50-5.

3. Click on paper layer. Open KBK_Vanessa (8). Copy and paste as new layer. Place it over the paper and erase any part out of frame. Low layer opacity to 50. Open KBK_Vanessa (5). Resize 50%. Place it inside frame at bottom. Same drop shadow. Click on frame layer. Open KBK_Vanessa (42). Resize 50%. Copy and paste as new layer. Move it upper left of frame. Same shadow. Open KBK_Vanessa (41). Copy and paste as new layer. Move to right side of frame. Same shadow. 

4. Open KBK_Vanessa (57), Copy and paste as new layer. Move it to bottom right side of tag. Same shadow. Open he tube. Resize if needed. Copy and paste as new layer. Place it over the ground leaves. Add a suitable shadow. Open KBK_Vanessa (82). Resize 40%. Copy and paste as new layer. Move it to bottom left side of the frame. Drop Shadow: 1-1-50-5. Open KBK_Vanessa (65). Resize 20%. Copy and paste as new layer. Move it to front of the grass at bottom left side of frame. Same shadow. Open KBK_Vanessa (68). Resize 15%. Copy and paste as new layer. Move it over the flower base  at bottom left side of frame. Same shadow. 

5. Open KBK_Vanessa (47). Resize 20%. Copy and paste as new layer. Move it to left side of the frame and place ir over the paper. Same shadow. Open KBK_Vanessa (22). Resize 20%. Copy and paste as new layer. Move to upper right corner of the frame. Same shadow. 

6. Resize the tag if you want. Add the copyright info e proper #license. Add your name and save as PNG.


February 24, 2015

Goth Girl ~ by Joanne Salgado


Tutorial written by Joanne Salgado on February 18th, 2015
Any resemblance to any other tutorial is coincidental.
Do not copy and paste this tutorial anywhere on the net.
If you want to translate please ask first. 

Tube: Swan Scraps - you can purchase here 
Kit Little Goth Girl by Dance In The Rain - you can purchase here and here
Template by Melissaz Creationz here 
Font: Bodoni MT Poster Compressed

Don't forget to save often.

1. Open the template 3. Duplicate. Close Original. Delete the first layer.

2. Open your tube. I used Denise from Swans Scraps and resized with 52%. Arrange to the center of the template.

3. Open element 5. Copy and paste as new layer. Resize with 80%. Move this layer down. Will be the last layer. Arrange to the left appearing just the top behind the layer. The lower parts that appears off the template use the eraser tool to clean.

4. Open element 41. Copy and paste as new layer. Resize with 45%. Arrange it to the right appearing behing the template.

5. Open element 26. Copy and paste as new layer. Resize with 80%. Arrange it down as the floor.

6. Select the "merged". Adjust/Add-remove noise/Add noise -uniform/30/monochrome checked.

7. Select the layer right above the merged. Is the half-moon from the template. Effects/Texture Effects/Weave - 1/5/1/white/white/fill gaps checked.

8. Select the layer above this one. Is the other half-moon. Effects/Texture Effects/Weave - 1/5/1/white/white/fill gaps checked.

9. Open element 36. Copy and paste as new layer.

10. Select the layer above the one we just added. Its the grey circles. Adjust/Add-remove noise/Add noise -uniform/30/monochrome checked.

11. Select the layer above this one. Stripes. Adjust/Add-remove noise/Add noise -uniform/30/monochrome checked.

12. Jump the next layer and select "raster 1". Should be the big circles from the template. Effects/Texture Effects/Weave - 1/5/1/black/black/fill gaps checked. Adjust/Add-remove noise/Add noise -uniform/20/monochrome checked.

13. Open element 53. Copy and paste as new layer. Move above the black borders from the big circles.

14. Open element 53. Copy and paste as new layer. Image/Mirror. Arrange it above the floor we added ealier.

15. Open element 37. Copy and paste as new layer. Arrange it to the left in front of the toombstone.

16. Open element 58. Copy and paste as new layer. Arrange it to the right. (if at any point you have doubts see my tag).

17. Open element 32. Copy and paste as new layer. Resize with 80%. Arrange it to the right. I any parts appears bellow the tube clean it with the eraser tool.

18. Open element 18. Copy and paste as new layer. Resize with 35%. Arrange it to the left.

19. Open element 18. Copy and paste as new layer. Resize with 55%. Arrange it to the left. Move this layer above the tube layer.

20. Open element 61. Copy and paste as new layer. Resize with 25%. Arrange it in front of the open book. (see my tag).

Now you can add shadow as you like.
I used 1-1-65-2 black.
Add the copyright.
Add your name.

Save

Little Goth Girl


== NEW CT DANCE IN THE RAIN TUTORIAL ==

Featuring "Little Goth Girl" Kit by Dancing In The Rain at Smiley Creation Shop and Pics For Design - PFD

Tube by Swan Scraps at PFD here
(This beautiful tube has many colors options)

PTU PU Only Tagger Sized Kit with a Goth Theme.
It has 14 Papers and 76 Elements so you can play with it.

Kit can be found in two stores:

-> PicsForDesign, here 

-> Smiley Creation Shop, here


February 23, 2015

Erin Go Braugh ~ By Joanne Salgado


Tutorial written by Joanne Salgado on February 18th, 2015
Any resemblance to any other tutorial is coincidental.
Do not copy and paste this tutorial anywhere on the net.
If you want to translate please ask first. 

Tube: Keith Garvey - you can purchase here
Kit Erin Go Braugh by Mellie Beans - you can purchase here
Material by me here
Font: KG Two is Better Than One

Don't forget to save often.

1. Open the template. Duplicate. Close the original. Delete the INFO layer.

2. Open paper 6, copy and paste as new layer. Layers/Arrange/Send to Bottom.

3. Open paper 2, copy and paste as new layer. Rename this layer as LINESBG Duplicate (hide this one for now). Select the LINES layer. With magic wand select inside the four spaces between the deco (see my tag). Selections/Modify/Expand 1. Selections/Invert. Select the layer with the paper 2 again. Duplicate. Hit delete on your keyboard. Selections/Select None.

4. Open the duplicated layer. Rename it "border". Select the INSIDE FRAME layer. With magic wand select inside of the frame. Selections/Modify/Expand 1. Select the BORDER layer and hit delete on your keyboard. We will clean the rest later.

5. Open paper 7, copy and paste as new layer. Move this layer bellow the BORDER layer. Select the LINESBG layer. Selections/Select all. Selections/Float. Selections/Defloat. Selections/Invert. Select the layer we just added. Hit delete your on keyboard. Selections/Select None. Change the blend mode to Soft Light and the opacity to 70. Effects/Edge Effects/Enhance.

6. Open "clover scatter" element. Copy and paste as new layer. Resize with 55%. Arrange it to the left. Duplicate. Image/Mirror. Layers/Merge/Merge Down. Change the blend mode to Luminance (L) and opacity to 50. Move this layer above the BORDER layer.

7. Open "wordart 2" element. Copy and paste as new layer. Change the blend mode to Luminance (L).

8. Open "horseshoe" element. Copy and paste as new layer. Resize with 25%. Arrange it to the left of the frame. (see my tag). Move this layer above the DECO layer.

9. Open "pot o gold" element. Copy and paste as new layer. Resize with 35%. Arrange it to the left. It will be a little above the horseshoe element. (see my tag).

10. Open "lucky cluster 2" element. Copy and paste as new layer. Resize with 35%. Arrange it to the left. It will be a little above the pot o gold element. (see my tag).

11. Open your yube. Copy and paste as new layer. Resize as you like. Arrange it to the right. Move this layer above the INSIDE FRAME layer. Rename this layer TUBE.

12. Open the "lucky cluster 3" element. Copy and paste as new layer. Resize with 40%. Move this layer below the INSIDE FRAME layer and arrange it behind the tube so just a little part shows. (see my tag). Change opacity to 74.

13. Open "green beer" element. Copy and paste as new layer. Resize with 20%. Image/Mirror. Arrange it behind the tube, but with a good part showing. (see my tag).

14. Open "beads" element. Copy and paste as new layer. Resize with 25%. Arrange to the top of the frame as its hanging from the frame. (see my tag). Move this layer above the TUBE layer.

15. Open "balloons" element. Copy and paste as new layer. Resize with 40%. Arrange it to the far right. It will be a little over your tube.

16. Now is time to start cleaning. Select the FRAME layer. With the magic wand select inside. Selections/Invert. Select the bottom layers (should be your papers) and hit delete on your keyboard. Select your TUBE layer and hit delete. Selections/Select None.

17. Now select INSIDE FRAME layer. With magic wand select inside. Selections/Modify/Expand 1. Selections/Invert. Now you'll select your other layers and hit delete on your keyboard. Just don't clean the layer with horseshoe element and with beads element. Keep selected.

18. Select your horseshoe element layer and with the eraser tool clean just the bottom part of it. Selections/Select None. Select the INSIDE FRAME layer and clean with the eraser tool just above the hat.

19. I changed the frames,lines and deco to white. Just select each layer and Adjust/Color Balance/Manual Color Correction. Change the source to black and the target to white. You can keep it black if you prefer.

You can add shadow now. I used 1-1-65-2 black.
Add the copyright and your name. 
Save it.

For animation.

1. Select the BORDER layer. Duplicate two times (you should have a total of three). Select the second duplicate and Ajust/Add-remove noise/Add Noise uniform/40/monochrome checked. Hide the layer. Select the first duplicate and repeat noise. Hide layer. Select the original layer and repeat noise.

2. Edit/Copy Merged. Go to animation shop and paste it as new animation. Back to PSP hide the border layer and open the first duplicate. Edit/Copy Merged. Go to animation and paste after current. Back to PSP hide the duplicate and open the second duplicate. Edit/Copy Merged. Go to animation and paste after current.

Save as gif.