
Tutorial written by Joanne Salgado on February 18th, 2015
Any resemblance to any other tutorial is coincidental.
Do not copy and paste this tutorial anywhere on the net.
If you want to translate please ask first.
Tube: Di-Halim - you can purchase here
Kit Maleficent 1 by Bibi's Collection - you can purchase here
Font: Mussica Swash
Don't forget to save often.
1. Open a new image 600x300.
2. Open element 'BIBIMALEFICENT 1 PAPERS (5)' copy and paste as new image. Resize 60%. Arrange so only the upper part of the paper appears. Duplicate. Change blend mode to screen.
3. Open element 'BIBIMALEFICENT ELEM (40)' copy and paste as new image. Duplicate. Image/Mirror. Image/Flip.
4. Open element 'BIBIMALEFICENT ELEM (43)' copy and paste as new image. Resize 60%. Arrange to the right. Duplicate. Image/Mirror.
5. Open element 'BIBIMALEFICENT ELEM (33)' copy and paste as new image. Resize 60%. Arrange to the left. Duplicate. Image/Mirror. Layers/Merge/Merge Down.
6. Open element 'BIBIMALEFICENT ELEM (23)' copy and paste as new image. Resize 60¨%. Arrange down.
7. Open element 'BIBIMALEFICENT ELEM (53)' copy and paste as new image.
8. Open element 'BIBIMALEFICENT ELEM (54)' copy and paste as new image.
9. Open element 'BIBIMALEFICENT ELEM (130)' copy and paste as new image. Resize 50%. Arrange left.
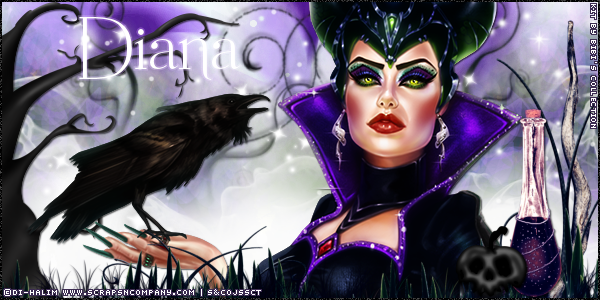
10. Open your tube. I used Maleficent from Di-Halim. Copy and paste as new image. No resize needed. Arrange a little to the left (see my tag).
11. Open element 'BIBIMALEFICENT ELEM (124)' copy and paste as new image. Resize 50%. Arrange it to the far left and a little down. Just a little of the grass will be showing. Duplicate. Image/Mirror. Arrange it so only the grass appears. (see my tag). Layers/Merge/Merge Down.
12. Open element 'BIBIMALEFICENT ELEM (134)' copy and paste as new image. Resize 40%. Arrange it to the left near the woodstick.
13. Open element 'BIBIMALEFICENT ELEM (48)' copy and paste as new image. Resize 40%. Arrange left near the potion.
14. Add a new layer. Selections/Select all. Image/Crop to Selection. Selections/Select All. Flood fill with black. Selections/Modify/Contract 2. Hit delete on your keyboard. Selections/Select None. Adjust/Add-remove noise/Add noise - uniform/60/monochrome checked.
Add shadow as you like - I used 1-1-65-2 black.
Add your copyright.
Add your name.
(After adding the name, change the blend mode to screen)
Save.