March 31, 2015

Poisoned Apple

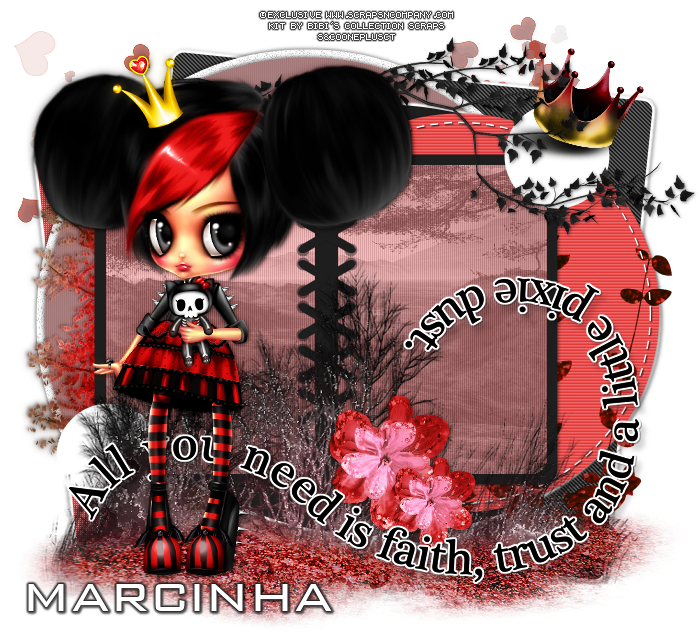
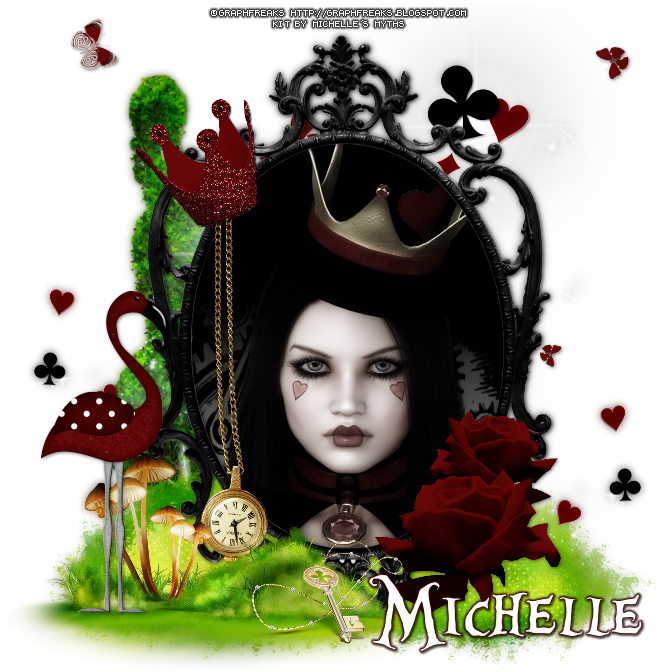
MIRROR MIRROR TUTORIAL


Tutorial written by Marcia Salgado on March 31th, 2015
for those who have a working knowledge of PSP.
Any resemblance to any other tutorial is coincidental.
Do not copy and paste this tutorial anywhere on the net.
If you want to translate please ask first. 

****************************************
Material:

Tube: "Poisoned Apple" by Paci, you can purchase it at S&Co, here
do not use without the proper #license.
PTU Kit "Mirror Mirror" by Bibi's Collections Scraps,
you can purchase it at S&Co, here
Template: by me, mar2015_template06, here
Font: Janda Elegant Handwriting

****************************************

--> Remember to save often and use my tag as reference if necessary. Used the Drop Shadow: 1-1-50-5 in most layers. 

1. Open my template. Duplicate and close the original. Image > Canvas size > 600x600 - on top use 250 - Ok. Click on bg layer. Open BIBI-MIRRORMIRROR ELEM (151). Copy and paste as new layer.

2.Open BIBI-MIRRORMIRROR ELEM (89). Resize 50%. Copy and paste as new layer. Move it up. Open BIBI-MIRRORMIRROR ELEM (141). Resize 30%. Move it to left. Open BIBI-MIRRORMIRROR ELEM (130). Copy and paste as new layer. Move it to right. Open BIBI-MIRRORMIRROR ELEM (38). Resize 70%. Copy and paste s new layer. Move it to right, in front of black leaves. Open BIBI-MIRRORMIRROR ELEM (166). Resize 50%. Copy and paste as new layer. Move it to right. 

3. Click on frame bg layer. Select it. Open BIBI-MIRROR MIRROR PAPERS (34). Resize 60%. Copy and paste as new layer. Move it down a little to show the trees in the middle of the frame. Invert selection. Delete. Keep selected. Open BIBI-MIRRORMIRROR ELEM (22). Resize 50%. Copy and paste as new layer. Move it down to better fit inside the frame. Delete. Keep selected.

4. Open your tube and resize if needed. Copy and paste as new layer. Move it to right side of frame. Duplicate and let the copy invisible for now. Click on original tube layer and delete. Deselect. Turn the copy visible again. With the Freehand Selection Tool > Point to Point create a selection around the part of the tube you want to show outside the frame. Invert selection. Delete. Arrange it above the frame layer.

5. This step is optional, only if you will use the same tube. Open BIBI-MIRRORMIRROR ELEM (73). Resize 30%. Copy and paste as new layer. Move it above the spell glow.

6. Click on frame layer. Select inside the frame. Expand > 2. Invert selection. Add a new layer. Drop shadow: 0-0-70-10-Black. Deselect and move this layer below frame layer. Click on frame layer again. Add Noise: Uniform-100-Monochrome. 

7. Open BIBI-MIRRORMIRROR ELEM (239). Resize 70%. Copy and paste as new layer. Move it far right. Open BIBI-MIRRORMIRROR ELEM (29). Resize 32%. Mirror. Copy and paste as new layer. Move it bottom left corner. Open BIBI-MIRRORMIRROR ELEM (37). Resize 40%. Mirror. Copy and paste as new layer. Move it to bottom left corner. Arrange this layer bellow apple layer. 

--> Add your copyright info and license#. Add your name and save it as PNG.


March 29, 2015

Orange Rabbit

ORANGE RABBIT TUTORIAL


Tutorial written by Marcia Salgado on March 29th, 2015
for those who have a working knowledge of PSP.
Any resemblance to any other tutorial is coincidental.
Do not copy and paste this tutorial anywhere on the net.
If you want to translate please ask first. 

****************************************
Material:

Tube: Danny Lee, you can purchase it at S&Co., here
do not use without the proper #license.
PTU Kit "Orange Rabbit" by Kizzed By Kelz,
you can purchase it at S&Co., here
Template: Dee's Template, Hoppin' Into Spring, here
Font: Georgia

****************************************

--> Remember to save often and use my tag as reference if necessary. Used the Drop Shadow: 1-1-50-5 in most layers. 

1. Open Dee's Template. Duplicate and close the original. Delete info  and Raster 1 layers. Click on top dark green rectangle layer. Merge down. Click on bottom dark green rectangle layer and change the color to #342b2e. Apply Texture Effects > Weave > 1-3-10-Color:#f3d1a9 in both color squares and Fil gaps marked. Add a white border of 2px.

2. Open KBK_OrangeRabbit (22). Resize 51%. Move it bottom left corner. Duplicate. Mirror. Flip. Merge down. Click on bottom ring layer. Merge down. Click on top ring and change the color to #cf7859. Add a white border of 2px. 

3. Open KBK_OrangeRabbit (100). Resize 80%. Copy and paste as new layer. Move it to upper left corner. Open KBK_OrangeRabbit (88). Copy and paste as new layer. Move it far up.

4. Click on top creme square layer. Merge down. Click on bottom creme square layer and change the color to #feb89e. Add a white border of 2px. 

5. Click on top plum square layer. Change the color to #ff7c5f. Apply Texture Effects > Blinds > 3-25-Color:White-Light from left/top marked. Click on bottom plum square layer and do the same. 

6. Click on pink oval layer. Select the shape. Open paper KBK_OrangeRabbit (2). Copy and paste into selection. Open KBK_OrangeRabbit (89). Copy and paste as new layer. Move it to upper part of oval shape. With Free Hand Selection Tool > Point to Point select the lower part of the oval shape as showed on image below.

7. Open KBK_OrangeRabbit (18). Resize 51%. Copy and paste as new layer. Move it to left and place it around the left curve. Duplicate. Mirror. Arrange it a liitle to right still around the left curve.

8. Open paper KBK_OrangeRabbit (8). Copy and paste as new layer and move the paper over untill you're satisfied with the green showing on selected part. Invert selection. Delete. Select all. Selections > Clip to canvas. Image > Crop to selection. Clean all green paper outside of oval shape.


9. Click on light green circle. Select it. Open paper KBK_OrangeRabbit (16). Select all. Contract > 15. Crop to selection. Copy. Paste into selection. Keep selected. Copy your tube and position a part over the circle. Invert selection. Delete. Change Blend Mode to Luminance (Legacy). Low opacity to 60. 

10. Click on font plum layer. Change the color to #342b2e. 
--> You can use Manual Color Correction to do it as I tech HERE

11. Open your tube, resize if needed. Copy and paste as new layer and move it to right. Add a suitable shadow. Open KBK_OrangeRabbit (8). Resize 51%. Copy and paste as new layer. Arrange this layer below your tube layer and place the flower around your tube. Duplicate. Free Rotate: Right-60. Place this flower around the tube again. Merge down. Erase any green steam that shows.

12. Open KBK_OrangeRabbit (104). Resize 50%. Copy and paste as new layer. Move it to upper left corner.

--> Add your copyright info and proper license#. Add your name and save as PNG.


In The Rain

IN THE RAIN TUTORIAL


Tutorial written by Marcia Salgado on March 29th, 2015
for those who have a working knowledge of PSP.
Any resemblance to any other tutorial is coincidental.
Do not copy and paste this tutorial anywhere on the net.
If you want to translate please ask first. 

****************************************
Material:

Tube: The Hunter, you can purchase it at C&Co., here
do not use without the proper #license.
PTU Kit "In The Rain" by Kizzed By Kelz Kits,
you can purchase it at C&Co., here
Masks: Yarrow's Checkered Mask (7), here
Tonya's Mask9byTonya mask, here
Font: P22 Eaglefeather

****************************************

--> Remember to save often and use my tag as reference if necessary. Used the Drop Shadow: 1-1-50-5 in most layers. 

1. Create a new image 700x450. Add a new layer. Select all. Open paper KBK_InTheRain (1). Copy and paste into selection. Apply Yarrow's mask. Merge Group. Duplicate. Change Blend Mode to Soft Light. Add a new layer. Open paper KBK_InTheRain (8). Apply Tonya's mask. Merge group.

2. Open KBK_InTheRain (35). Copy and paste as new layer. Move it bottom. Open KBK_InTheRain (101). Resize 34%. Copy and paste as new layer and move it to far right. Duplicate and drag a little to left. Merge down. 

3. Open KBK_InTheRain (29). Resize 49%. Copy and paste as new layer. Move it upper far left. Duplicate. Mirror (drag it to far right in PSP newer versions). Open KBK_InTheRain (87). Resize 34%. Copy and paste as new layer. Move it up, between the bigger clouds. Open Resize 34%. Copy and paste as new layer. Arrange this layers below all clouds layers.

4. Open KBK_InTheRain (17). Resize 47%. Copy and paste as new layer. Move it a little left and up. Open KBK_InTheRain (66). Resize 70%. Copy and paste as new layer and move it far left. Open KBK_InTheRain (23). Resize 34%. Copy and paste as new layer. Move it to right.

5. Open your tube. Resize if needed. Copy and paste as new layer and move it far right. Add a suitable shadow.

--> Add your copyright info and proper license#. Add your name and save as PNG.


Happy Easter ~ by Joanne Salgado


Tutorial written by Joanne Salgado on February 18th, 2015
for those who have a working knowledge of PSP.
Any resemblance to any other tutorial is coincidental.
Do not copy and paste this tutorial anywhere on the net.
If you want to translate please ask first. 

Tube: Happy Easter by Andy Cooper - you can purchase here 
Kit Happy Easter by Kizzed By Kelz - you can purchase here 
Font: AR CHRISTY

Don't forget to save often.
At any point if you have doubts check my tag.

1. Open a new image 600x600

2. Open element 'KBK_HappyEaster (19)' copy and paste as new layer. Free Rotate right-75. Arrange it to bottom.

3. Open element 'KBK_HappyEaster (113)' copy and paste as new layer. Resize 80%. Arrange it behind the frame. Move this layer bellow the frame layer.

4. Open element 'KBK_HappyEaster (114)' copy and paste as new layer. Resize 90%. Arrange it behind the frame.

5. Open element 'KBK_HappyEaster (26)' copy and paste as new layer. Resize 80%. Arrange it to the bottom right of the frame. Duplicate. Flip. Arrange it to the top left of the frame.

6. Open element 'KBK_HappyEaster (112)' copy and paste as new layer. Flip. Arrange it to the bottom left of the frame.

7. Open element 'KBK_HappyEaster (111)' copy and paste as new layer. Arrange it to the top right of the frame.

8. Open your tube. I'm using Happy Easter by Andy Cooper. Copy and paste as new layer. Move this layer above the frame layer. Clean the lower part of the tube so it looks like the tube is coming from inside the frame.

9. Add shadow as you prefer. I used 1-1-65-2 black.

10. Add copyright.

11. Add name. I used: AR CHRISTY / size: 72

Save as PNG

Seriously Punk 2

PUNK PRINCESS TUTORIAL


Tutorial written by Marcia Salgado on March 29th, 2015
for those who have a working knowledge of PSP.
Any resemblance to any other tutorial is coincidental.
Do not copy and paste this tutorial anywhere on the net.
If you want to translate please ask first. 

****************************************
Material:

Tube: ©Exclusive Lady Mishka "Seriously Punk 2",
you can purchase it at S&Co., here
do not use without the proper #license.
PTU Kit "Gothic Princess" by Bibi's Collection Scraps ,
you can purchase it at S&Co., here
Template: Dee's Template, DD_SATC_TemplateExclusiveMar23, here http://dangerouslydeliciousdesignz.blogspot.com.br/2013/11/satc-exclusive-templates.html
Plugin: Penta.com
Font: BankGothic Lt BT

****************************************

--> Remember to save often and use my tag as reference if necessary. Used the Drop Shadow: 1-1-50-5 in most layers. 

--> I'm using Manual Color Correction in this tutorial and if you do not know this tool yet, please check my tutorial about it HERE

1. Open Dee's Template. Duplicate and close the original. Delete info layer. Click on bg layer. Turn this layer invisible. Resize 50%. Using Manual Color Correction change the color #82081d to #7f1104. CopĂ˝ and paste as new layer and move it up. Click on pirple square layer and change the color to #1e1e1e. Apply Penta.com > Jeans > Default (62,4). Add a white border of 2px. 

2. Click on green square layer and change the color to #e53838. Apply Penta.com > Color Dot > Default (90,2,255,255,255). Add a white border of 2px. Click on pink circle and change the color to #8d8d8d. Apply Blinds > 2-25-Color:#e53838 All other options not marked. 

3. Open BIBIGOTHICPRINCESS COLLAB ELEMS (52). Resize 66%. Mirror. Using Manual Color Correction change the color #680110 to #7f1104. Copy and paste as new layer and move it far left. Click on green oval layer and change the color to #1e1e1e. Add a white border of 2px. Click on green circle and change the color to #e53838. Apply Blinds > 3-25-Color:White Horizontal marked.

4. Open BIBIGOTHICPRINCESS COLLAB ELEMS (42). Apply the same Manual Color Correction. Copy and paste as new layer. Move it far right. Click on purple rectangle and change the color to #1e1e1e. Click on right green rectangle. Merge down. Select both rectangles. Open BIBI-GOTHICPRINCESS COLLAB PAPER (7). Copy and paste into selection. Keep selected. Add a new layer. Fill it with white. Apply Blinds > 2-25-Color:Black All other options not marked. Low opacity to 40 Keep selected. Add a new layer. Fill it with color #f8c0c0 and change the Blend Mode to Color (Legacy). 

5. Click on holes layer. Change the color to #1e1e1e and low the opacity to 40. Click on x's pink layer. Change the color to #1e1e1e. Click on small pink circle and change the color to white. Open BIBIGOTHICPRINCESS COLLAB ELEMS (50). Resize 50%. Move it to right up and place it over the small white circle.

6. Open BIBIGOTHICPRINCESS COLLAB ELEMS (70). Resize 83%. Copy and paste as new layer. Move it to bottom. Open BIBIGOTHICPRINCESS COLLAB ELEMS (14). Resize 70%. Using Manual Color Correction change the color #c1226d to #ae191a. Copy and paste as new layer and move it to bottom.

7. Open BIBIGOTHICPRINCESS COLLAB ELEMS (45). Resize 50%. Using Manual Color Correction change the color #8a0b1f to #ae191a. Copy and paste as new layer. Move it to bottom right and place it over the book on its right page. Duplicate. Resize 70%. Move it a little down and to the right.

8. Click on wordart black layer. Open BIBIGOTHICPRINCESS COLLAB ELEMS (10). Resize 70%. Copy and paste as new layer. Move it up. Open your tube, resize it if needed. Copy and paste as new layer and move it to the left side of the tag. Add a suitable shadow.

--> Resize if wanted. Add your copyright info and license#. Add your name and save as PNG.


Black Magic ~ by Joanne Salgado


Tutorial written by Joanne Salgado on February 18th, 2015
for those who have a working knowledge of PSP.
Any resemblance to any other tutorial is coincidental.
Do not copy and paste this tutorial anywhere on the net.
If you want to translate please ask first. 

Tube: Black Magic by Graphfreaks - you can purchase here
Kit Black Magic by FwTags Creations - you can purchase here 
Template by Dee here 
Font: AR BERKLEY

Don't forget to save often.
At any point if you have doubts check my tag.

1. Open the template. Duplicate. Close original. Delete layers: font info, info, mistake black, mistake white, raster 17, biggest blue, biggest white, copy of raster 17, you look like (both layers), copy (2), pink star, pink star white, small white star, small blue star, black star, black stripe and bg.

2. Open element 'FwTagsBlackMagicELEMENT (62)' copy and paste as new layer. Resize 60%. Mirror. Arrange it to bottom. Move this layer bellow the pink rectangle layer.

3. Open paper 'FwTagsBlackMagicPAPER (1)' colorize the layer pink rectangle with it. Now open paper 'FwTagsBlackMagicPAPER (5)' colorize the layer blue rectangle. Now open paper 'FwTagsBlackMagicPAPER (2)' colorize the layer pink circle. With the same paper colorize the layer blue circle and center blue rectangle. Now open paper 'FwTagsBlackMagicPAPER (4)' colorize layers bottom black circle, top black circle and center pink rectangle.

4. Select layer pink circle, apply plugins/penta.com/jeans (amount 62/border width 4). Select layer blue circle, apply plugins/penta.com/color dot (value 90/distance 2/all three color 255).

5. Add noise with uniform/50/monochrome checked on layers pink circle back, blue circle back, bottom black circle back, top black circle back, center pink rectangle, center white rectangle.

6. Open element 'FwTagsBlackMagicELEMENT (83)' copy and paste as new layer. Resize 60%. Move this layer above the center blue rectangle.

7. Open element 'FwTagsBlackMagicELEMENT (78)' copy and paste as new layer. Resize 75%. 

8. Open element 'FwTagsBlackMagicELEMENT (21)' copy and paste as new layer. Resize 30%. Arrange it to the bottom left.

9. Open element 'FwTagsBlackMagicELEMENT (13)' copy and paste as new layer. Resize 30%. Arrange it to the bottom left. Duplicate. Arrange it to the bottom right.

10. Open element 'FwTagsBlackMagicELEMENT (75)' copy and paste as new layer. Resize 30%. Arrange it to the bottom right.

11. Open element 'FwTagsBlackMagicELEMENT (14)' copy and paste as new layer. Resize 60%. Arrange it to the upper right.

12. Open element 'FwTagsBlackMagicELEMENT (46)' copy and paste as new layer. Resize 50%. Arrange it to the upper left.

13. Open element 'FwTagsBlackMagicELEMENT (77)' copy and paste as new layer. Resize 40%. Arrange it to the bottom right.

14. Open element 'FwTagsBlackMagicELEMENT (73)' copy and paste as new layer. Resize 40%. Arrange it to the bottom left. Duplicate. Change blend mode to screen. Blur/Gaussian Blur 3. 

15. Open element 'FwTagsBlackMagicELEMENT (64)' copy and paste as new layer. Resize 15%. Arrange it to the left next the ball we just added.

16. Open element 'FwTagsBlackMagicELEMENT (43)' copy and paste as new layer. Resize 20%. Arrange it to the bottom left.

17. Open element 'FwTagsBlackMagicELEMENT (21)' copy and paste as new layer. Resize 30%. Arrange it to the bottom left.

18. Open element 'FwTagsBlackMagicELEMENT (39)' copy and paste as new layer. Resize 20%. Arrange it to the bottom left.

19. Open element 'FwTagsBlackMagicELEMENT (70)' copy and paste as new layer. Resize 15%. Arrange it to the bottom left.

20. Open your tube. I'm using Black Magic from Graphfreaks. Copy and paste as new layer. Resize as you prefer and arrange it to the right. 

21. Open element 'FwTagsBlackMagicELEMENT (42)' copy and paste as new layer. Resize 75%. Arrange it to bottom.

22. Open element 'FwTagsBlackMagicELEMENT (56)' copy and paste as new layer. Resize 75%. Arrange it to bottom.

23. Add shadow as you prefer. I used 1-1-65-2 black.

24. Add copyright.

25. Add name. I used: AR BERKLEY / size: 72

Save as PNG

Springtime ~ by Joanne Salgado


Tutorial written by Joanne Salgado on February 18th, 2015
for those who have a working knowledge of PSP.
Any resemblance to any other tutorial is coincidental.
Do not copy and paste this tutorial anywhere on the net.
If you want to translate please ask first. 

Tube + Kit Spring Fairytale Collab - you can purchase here 

or you can purchase the tube alone
Tube: Rosie Doll by Kelly Lynn - you can purchase here 
Font: Canter Bold

Don't forget to save often.
At any point if you have doubts check my tag.

1. Create a new image of 600x600. Open SPRINGFAIRYTALE_DBJ89. Copy and paste as new image. Select inside the frame. Expand > 4. Add a new layer. Open SF_DBJ-paper04. Copy and paste into selection. Move this layer below the frame. Deselect.

2. Open SPRINGFAIRYTALE_DBJ40. Resize 32%. Mirror. Copy and paste as new layer. Move it to right side, inside the frame. Open SPRINGFAIRYTALE_DBJ41. Resize 21%. Copy and paste as new layer. Move it to left side, inside the frame.

3. Open SPRINGFAIRYTALE_DBJ36. Resize 64%. Copy and paste as new layer. Move it upper far left. Arrange > Send to bottom. 

4. Click on first layer. Open SPRINGFAIRYTALE_DBJ71. Resize 51%. Copy and paste as new layer. Move it to right bottom, in front of frame. Duplicate mirror. Move it, if necessary to keep ot inside the tag space.

5. Open SPRINGFAIRYTALE_DBJ60. Resize 51%. Copy and paste as new layer. Move it bottom right, in front of the frame. Open SPRINGFAIRYTALE_DBJ-4. Resize 33%, Copy and paste as new layer. Move it bottom right. In front of purple flower.

6. Open SPRINGFAIRYTALE_DBJ73. Resize 51%. Copy and paste as new layer. Move it to upper right, over the frame opening. 

7. Open SPRINGFAIRYTALE_DBJ80. Resize 41%. Copy and paste as new layer. Move it to left side of the frame. Open SPRINGFAIRYTALE_DBJ82. Resize 33%. Copy and paste as new layer. Move it far left of the frame.

8. Open tweety's wordart WAPSP5Compatible. And pick the layer Spring Fairytale Repeat. Resize 85%. Copy and paste as mew layer. Move it over the frame top. Get another wirdart. Pick now the layer Fairytale. Copy and paste as new layer. Place it above the frame. 

9. Open SPRINGFAIRYTALE_DBJ67. Resize 64%. Copy and paste as new layer. Move it bottom left. Open SPRINGFAIRYTALE_DBJ75. Resize 41%. Copy and paste as new layer. Move it bottom left. 

10. OPen your tube. Resize if needed. Copy and paste as new layer. Move it to far left. 

11. Add shadow as you prefer. I used 1-1-65-2 with color #808080.

12. Add copyright.

13. Add name. I used: Canter Bold / size: 72

Save as PNG


March 28, 2015

Manual Color Correction Tool

MANUAL COLOR CORRECTION TUTORIAL

Tutorial written by Marcia Salgado on March 28th, 2015
for those who have a working knowledge of PSP.
Any resemblance to any other tutorial is coincidental.
Do not copy and paste this tutorial anywhere on the net.
If you want to translate please ask first. 

****************************************

Here's a simple tutorial to show where you can find
the Manual Color Correction Tool.
I'll use many images so you can really "see" it step-by-step.
After I show where you can find it in PSP 9 and in newer PSP versions, I also show how to use it. If you already know where it is but need to learn only how to use all you need to do is scroll the page down.

****************************************

PSP 9 VERSION

In this case find the tool is very easy.
All you have to do is:

1. Click on Adjust.

2. Click on Color Balance

3. Click on Manual Color Correction


****************************************

NEWER PSP VERSIONS

In this case you'll have to add the tool to your Standard Toolbar.
Here is what we'll do.


1. Click on View > Customize.


2. In Customize Window roll down Categories until the end and click on All Commands. In Commands options roll down until you find Manual Color Correction. It's in alphabetical order so it's easy to find. Click and drag it to the Standard Toolbar and release the button to fix it wherever you want it.


****************************************

HOW TO USE MANUAL COLOR CORRECTION TOOL

It's a very easy tool.


1. Click on Manual target color.

2. Set the colors you want to change.

**Be aware this tool works better with solid colors
and not so well with gradients or images with many shades of color**
  • In Source (1) you put the color you want to remove. Just click with the left mouse button on it OR click on the color square and add its HTML color, i.e. #000000
  • In Target (2) you put the new color you want to use. If the color already is in the image just click on it using the right mouse button OR click on the color square and add its HTML Color, i.e. #FFFFFF
3. Click OK


Elf in Love ~ by Joanne Salgado


Tutorial written by Joanne Salgado on February 18th, 2015
for those who have a working knowledge of PSP.
Any resemblance to any other tutorial is coincidental.
Do not copy and paste this tutorial anywhere on the net.
If you want to translate please ask first. 

Tube: CU/PU Elf In Love by Di Halim - you can purchase here
Kit Lovely Elfo by Bibi's Collection  - you can purchase here 
Font: AR HERMANN

Don't forget to save often.
At any point if you have doubts check my tag.

1. Open a new image 600x220

2. Open paper 'BIBI- LOVELY ELF PAPERS (7)' copy and paste as new layer. Arrange so the upper part of the paper appears.

3. Open element 'BIBI-LOVELY ELF ELEMS (27)' copy and paste a new layer. Resize 60%. Arrange it to the bottom left. Duplicate, arrange it a little to the side. Duplicate again and keep doing so until all bottom from the tag is filled.

4. Open element 'BIBI-LOVELY ELF ELEMS (103)' copy and paste as new layer. Resize 60%. Arrange it to the bottom left.

5. Open element 'BIBI-LOVELY ELF ELEMS (104)' copy and paste as new layer. Resize 60%. Arrange it to the bottom right.

6. Open element 'BIBI-LOVELY ELF ELEMS (75)' copy and paste as new layer. Resize 60%. Arrange it to the bottom left by the side of the other flower.

7. Open element 'BIBI-LOVELY ELF ELEMS (97)' copy and paste as new layer. Resize 60%. Arrange it to the bottom by the side of the last flower we added.

8. Open element 'BIBI-LOVELY ELF ELEMS (24)' copy and paste as new layer. Arrange it to the bottom right in the empty space between the two flowers.

9. Open element 'BIBI-LOVELY ELF ELEMS (57)' copy and paste as new layer. Resize 60%. Arrange it to the bottom left in front of the two red flowers.

10. Open element 'BIBI-LOVELY ELF ELEMS (54)' copy and paste as new layer. Arrange it to the bottom right.

11. Open element 'BIBI-LOVELY ELF ELEMS (106)' copy and paste as new layer. Mirror. 

12. Open your tube. I'm using CU/PU Elf In Love by Di Halim. Copy and paste as new layer. Resize as you prefer and arrange it to the left.

13. Open element 'BIBI-LOVELY ELF ELEMS (105)' copy and paste as new layer. Arrange it to the bottom.

14. Add a new layer. Select all. Flood fill with black. Contract 1. Flood fill with white. Add noise with uniform/50/monochrome checked. Contract 2. Hit delete on your keyboard. Select None.

15. Add shadow as you prefer. I didn't use any.

16. Add copyright.

17. Add name. I used: AR HERMANN / size 48.

Save as PNG

March 27, 2015

Summer's Last Song

SUMMER'S LAST SONG TUTORIAL


Tutorial written by Marcia Salgado on March 27th, 2015
for those who have a working knowledge of PSP.
Any resemblance to any other tutorial is coincidental.
Do not copy and paste this tutorial anywhere on the net.
If you want to translate please ask first. 

****************************************
Material:

Tube: Anna Liwanag, you can purchase it at CDO, here
do not use without the proper #license.
PTU Kit "Summer's Last Song" by Mellie Beans,
you can purchase it at Mystical Scraps, here
or at Heartbeatz Creationz, here
Mask: Dee's Mask, DD_PatrioticMask_3.jpg, here
Font: Crushed

****************************************

--> Remember to save often and use my tag as reference if necessary. Used the Drop Shadow: 1-1-50-5 in most layers. 

1. Open element e02. Resize 50%. Copy and paste as new image. Canvas size 1200x82 - Center. Duplicate twice. First copy. Offset: H=-400 V=0. Second copy. Offset: H=400 V=0. Merge all visible. Canvas size 1200x1200 - Center. Distortion Effects > Polar Coordinates: Rectangle to Polar - Transparent. Resize the frame 85%. With Deform Tool (or Pick) give an oval shape to the round frame. Reserve.  

2. Create a new image 700x700. Select All. Open paper pp02. Mirror. Flip. Copy. Paste into selection. Apply Dee's mask. Copy the reserved frame. Paste as new layer. Move it far bottom right. Open element e34. Resize 70%. Copy and paste as new layer. Move it upper left. Open element e25. Resize 98%. Copy and paste as new layer. Open element e38. Resize 80%. Copy and paste as new layer. Move it far left.

3. Click on frame layer. Select inside frame. Add new layer. Open paper pp10. Copy. Paste into selection. Move this layer below the frame layer. Keep selected. Copy the close up of your tube and paste as new layer. Invert selection. Delete. Deselect.

4. Click on frame layer. Duplicate twice. On first copy use: Blur > Gaussian Blur: 4 and change Blend Mode to Multiply. On second copy use the same Blur but change the Blend Mode to Soft Light. Click on original frame layer. Add a Drop Shadow: 1-1-85-2-#163548.

5. Click on first layer. Open element e03. Resize 40%. Mirror. Copy and paste as new layer. Move it fat bottom right, in front of the frame. Open element e12. Resize 40%. Place it in front of the flower. Open element e01. Resize 30%. Copy and paste as new layer. Move it bottom middle. Duplicate. Resize 67%. Move it a little to left. 

6. Open element e11. Resize 30%. Copy and paste as new layer. Move it to bottom, in front of previous elements. Open element e28. Resize 40%. Move it up and place it on top left side of the frame.

--> Resize is needed. Add your copyright and license#. Add your name and save as PNG.


Suzie ~ by Joanne Salgado


Tutorial written by Joanne Salgado on February 18th, 2015
for those who have a working knowledge of PSP.
Any resemblance to any other tutorial is coincidental.
Do not copy and paste this tutorial anywhere on the net.
If you want to translate please ask first. 

Tube: Suzie by Ishika Chowdhury - you can purchase here 
Kit Suzie by Design by Joan - you can purchase here 
Font: Dancing Script

Don't forget to save often.
At any point if you have doubts check my tag.

1. Open a new image 500x500

2. Open element 'SUZIE_DBJ10' copy and paste as new layer. Resize 45%.

3. Open element 'SUZIE_DBJ87' copy and paste as new layer. Resize 65%. Move this layer bellow frame layer.

4. Open element 'SUZIE_DBJ31' copy and paste as new layer. Arrange it to the top left. Duplicate. Mirror/Flip.

5. Open element 'SUZIE_DBJ15' copy and paste as new layer. Resize 50%. Arrange it to the top right. 

6. Open element 'SUZIE_DBJ36' copy and paste as new layer. Resize 50%. Arrange it to the top right.

7. Open paper 'DBJ-SUZIE-Paper 8' copy and paste as new layer. Resize 50%. Select frame layer. With magic wand select inside it. Expand 3. Invert. Select paper layer. Hit delete on your keyboard. Selections None.

8. Open your tube. I'm using Suzie by Ishika Chowdhury. Copy and paste as new layer. Resize as you prefer and arrange it inside the frame. Move this layer above the frame and clean the lower part so it looks like the tube is coming from inside the frame.

9. Open element 'SUZIE_DBJ68' copy and paste as new layer. Resize 50%. Arrange it to the bottom left.

10. Open element 'SUZIE_DBJ56' copy and paste as new layer. Resize 80%. Mirror. Arrange it to the bottom left.

11. Open element 'SUZIE_DBJ27' copy and paste as new layer. Resize 50%. Arrange it to the left.

12. Open element 'SUZIE_DBJ88' copy and paste as new layer. Resize 70%. Arrange it to the bottom right.

13. Add shadow as you prefer. I used 1-1-65-2 black.

14. Add copyright.

15. Add name. I used: Dancing Script / size: 60

Save as PNG

Easter Dress ~ by Joanne Salgado


Tutorial written by Joanne Salgado on February 18th, 2015
for those who have a working knowledge of PSP.
Any resemblance to any other tutorial is coincidental.
Do not copy and paste this tutorial anywhere on the net.
If you want to translate please ask first. 

Tube: Easter Dress by Danny Lee - you can purchase here 
Kit Easter Dress by FwTags Creations - you can purchase here 
Font: AR BLANCA

Don't forget to save often.
At any point if you have doubts check my tag.

1. Open a new image 500x500.

2. Open element 'FwTagsEasterDressELEMENT (37)' copy and paste as new layer. Resize 50%. Arrange it to bottom.

3. Open frame 'FwTagsEasterDressFRAME (4)' copy and paste as new layer. Resize 50%.

4. Open element 'FwTagsEasterDressELEMENT (17)' copy and paste as new layer. Resize 50%. Arrange it to top right. Move this layer bellow frame layer.

5. Open element 'FwTagsEasterDressELEMENT (5)' copy and paste as new layer. Resize 50%. Flip. Arrange it to top.

6. Open paper 'FwTagsEasterDressPAPER (5)' copy and paste as new layer. Resize 50%. Select frame layer. With magic wand select inside it. Expand 3. Invert. Select paper layer. Hit delete on your keyboard. Selections None.

7. Open your tube. I'm using Easter Dress by Danny Lee. Copy and paste as new layer. Resize as you prefer and arrange it inside the frame. Move this layer above the frame and clean the lower part so it looks like the tube is coming from inside the frame.

8. Open element 'FwTagsEasterDressELEMENT (61)' copy and paste as new layer. Resize 40%. Arrange it to the bottom right.

9. Open element 'FwTagsEasterDressELEMENT (42)' copy and paste as new layer. Resize 40%. Arrange it to the bottom left.

10. Add shadow as you prefer. I used 1-1-65-2 black.

11. Add copyright.

12. Add name. I used: AR BLANCA / size: 60

Save as PNG

March 26, 2015

Wicked Red Queen

RED QUEEN TUTORIAL


Tutorial written by Marcia Salgado on March 26th, 2015
for those who have a working knowledge of PSP.
Any resemblance to any other tutorial is coincidental.
Do not copy and paste this tutorial anywhere on the net.
If you want to translate please ask first. 

****************************************
Material:

Tube: Wicked Red Queen by GraphFreaks,
info on how to purchase her tubes can be found at her blog
PTU Kit "Wicked Red Queen" by Michelle's Myths,
you can purchase it here
Font: Alice in Wonderland

****************************************

--> Remember to save often and use my tag as reference if necessary. Used the Drop Shadow: 1-1-50-5 in most layers. 

1. Create a new image of 700x700. Open Frame (7). Copy and paste as new layer. Select inside the frame. Add a new layer. Open Paper  (6). Copy. Paste into selection. Move this layer down. Keep selected. Copy your tube close up and paste as new layer. Invert selection. Delete. Deselect. Change Blend Mode to Luminance (Legacy); Duplicate the layer. Gaussian Blur: 4. Change Blend Mode to Soft Light.  

2. Open Wicked Red Queen (77). Copy and paste as new layer. Move it up. Send the layer down, below all layers. Open Wicked Red Queen (17). Mirror. Copy and paste as new layer. Move it to left. Behind the frame. Open Wicked Red Queen (65). Resize 25%. Copy and paste as new layer. Move it to bottom. Open Wicked Red Queen (23). Resize 70%. Copy and paste as new layer. Move it up. Duplicate. Move it down left. Duplicate. Mirror.

3. Click on first layer. Open Wicked Red Queen (78). Resize 40%. Copy and paste as new layer. Move it to left, over the frame. Open Wicked Red Queen (25). Resize 30%. Copy and paste as new layer. Move it to bottom right, in front of the frame. Duplicate resize 70%. Mirror. Move it above the first rose and a layer below.

4. Open Wicked Red Queen (71). Resize 50%. Mirror. Copy and paste as new layer. Move it down left. Open Wicked Red Queen (62). Mirror. Copy and paste as new layer. Move it to left, over the grass. Open Wicked Red Queen (61). Resize 50%. Copy and paste as new layer. Move it center down. Open Wicked Red Queen (74). Resize 50%. Mirror. Copy and paste as new layer. Move it up left over the top chain.

--> Resize if needed. Add your copyright info. Add your name. Save as PNG.