Showing posts with label Paci Peroni Designs. Show all posts

April 5, 2015

Fairy and Black Bird

SLEEPING BEAUTY TUTORIAL


Tutorial written by Marcia Salgado on April 5th, 2015
for those who have a working knowledge of PSP.
Any resemblance to any other tutorial is coincidental.
Do not copy and paste this tutorial anywhere on the net.
If you want to translate please ask first. 

****************************************
Material:

Tube:"Fairy and Black Bird" Paci Peroni Designs,
you can purchase it at S&Co., here
do not use without the proper #license.
PTU Kit "Ravens (Kit)" by DnScraps,
you can purchase it at S&Co., here
Mask: Vix_BigMask018.jpg, here
Font: Bleeding Cowboys

****************************************

--> Remember to save often and use my tag as reference if necessary. Used the Drop Shadow: 1-1-50-5 in most layers.

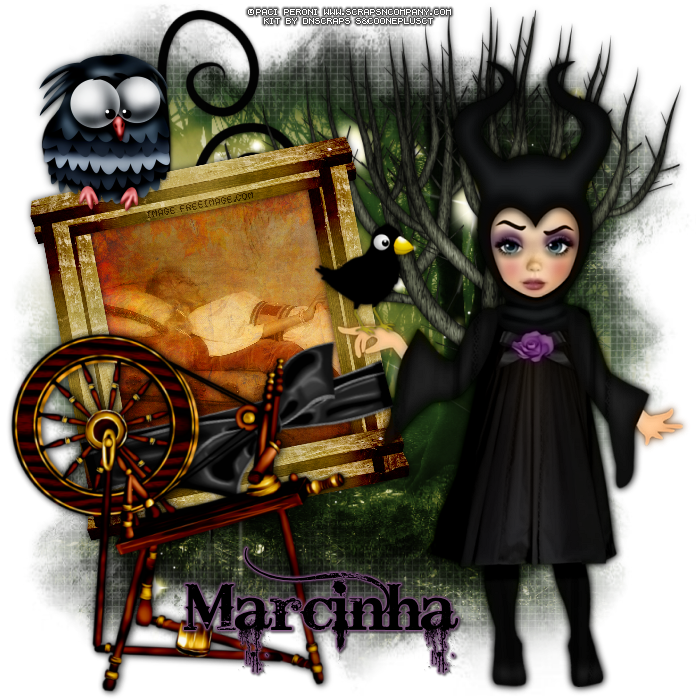
1. Create a new image 700x700. Add a new layer. Select all. Open Fairy forest (came with the tube). Copy and paste into selection. Apply Vix's mask. 

2. Open Ravenskitpudnlightss. Resize 80%. Copy and paste as new layer. Open Ravenskitpudndoodle2. Resize 70%. Copy and paste as new layer. Move it left a little up. 

3. Open Ravenskitpudndarktree. Resize 70%. Copy and paste as new layer. Move it to right a little up. 

4. Open Ravenskitpudnwoodframe. Resize 50%. Copy and paste as new layer. Move it to left. Select inside the frame, add a new layer. Open Ravenskitdnpupaper6. Copy. Paste into selection. Add a new layer. Here I went to FreeImage.com and search for an image to use inside the frame. Crop the part I want to use, copy and paste into selection. Change the Blend Mode to Luminance (Legacy) and low the opacity to 66. 

5. Click on first layer (should be the frame layer). Open Ravenskitpudnribbonbow. Resize 50%. Free Rotate: Left-15. Copy and paste as new layer. Move it over the bottom of the frame.

6. Open Ravenskitpudnwheel. Resize 50%. Copy and paste as new layer. Move it to bottom left. Open Ravenskitpudnowls. Resize 20%. Copy and paste as new layer. Move it over the top frame border.

7. Open your tube, I'm using "Paci Fairy and Black Bird", so I chose Fairy1 and then I added the Cute crow too. I resizes to fit to the tag size and added a suitable shadow.

--> Add the copyright and license#. Add your name and save as PNG.


March 31, 2015

Poisoned Apple

MIRROR MIRROR TUTORIAL


Tutorial written by Marcia Salgado on March 31th, 2015
for those who have a working knowledge of PSP.
Any resemblance to any other tutorial is coincidental.
Do not copy and paste this tutorial anywhere on the net.
If you want to translate please ask first. 

****************************************
Material:

Tube: "Poisoned Apple" by Paci, you can purchase it at S&Co, here
do not use without the proper #license.
PTU Kit "Mirror Mirror" by Bibi's Collections Scraps,
you can purchase it at S&Co, here
Template: by me, mar2015_template06, here
Font: Janda Elegant Handwriting

****************************************

--> Remember to save often and use my tag as reference if necessary. Used the Drop Shadow: 1-1-50-5 in most layers. 

1. Open my template. Duplicate and close the original. Image > Canvas size > 600x600 - on top use 250 - Ok. Click on bg layer. Open BIBI-MIRRORMIRROR ELEM (151). Copy and paste as new layer.

2.Open BIBI-MIRRORMIRROR ELEM (89). Resize 50%. Copy and paste as new layer. Move it up. Open BIBI-MIRRORMIRROR ELEM (141). Resize 30%. Move it to left. Open BIBI-MIRRORMIRROR ELEM (130). Copy and paste as new layer. Move it to right. Open BIBI-MIRRORMIRROR ELEM (38). Resize 70%. Copy and paste s new layer. Move it to right, in front of black leaves. Open BIBI-MIRRORMIRROR ELEM (166). Resize 50%. Copy and paste as new layer. Move it to right. 

3. Click on frame bg layer. Select it. Open BIBI-MIRROR MIRROR PAPERS (34). Resize 60%. Copy and paste as new layer. Move it down a little to show the trees in the middle of the frame. Invert selection. Delete. Keep selected. Open BIBI-MIRRORMIRROR ELEM (22). Resize 50%. Copy and paste as new layer. Move it down to better fit inside the frame. Delete. Keep selected.

4. Open your tube and resize if needed. Copy and paste as new layer. Move it to right side of frame. Duplicate and let the copy invisible for now. Click on original tube layer and delete. Deselect. Turn the copy visible again. With the Freehand Selection Tool > Point to Point create a selection around the part of the tube you want to show outside the frame. Invert selection. Delete. Arrange it above the frame layer.

5. This step is optional, only if you will use the same tube. Open BIBI-MIRRORMIRROR ELEM (73). Resize 30%. Copy and paste as new layer. Move it above the spell glow.

6. Click on frame layer. Select inside the frame. Expand > 2. Invert selection. Add a new layer. Drop shadow: 0-0-70-10-Black. Deselect and move this layer below frame layer. Click on frame layer again. Add Noise: Uniform-100-Monochrome. 

7. Open BIBI-MIRRORMIRROR ELEM (239). Resize 70%. Copy and paste as new layer. Move it far right. Open BIBI-MIRRORMIRROR ELEM (29). Resize 32%. Mirror. Copy and paste as new layer. Move it bottom left corner. Open BIBI-MIRRORMIRROR ELEM (37). Resize 40%. Mirror. Copy and paste as new layer. Move it to bottom left corner. Arrange this layer bellow apple layer. 

--> Add your copyright info and license#. Add your name and save it as PNG.