Showing posts with label Martin Abel. Show all posts

February 1, 2016

Dark Romance

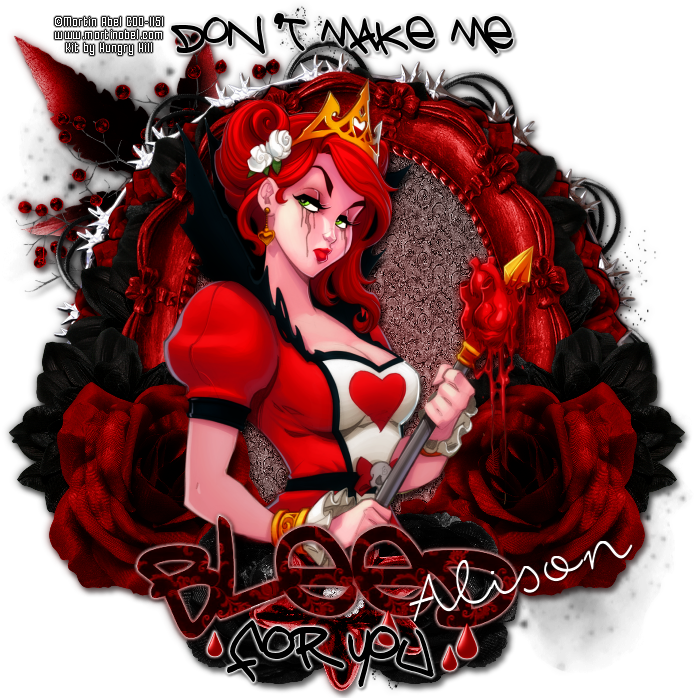
BLEEDING LOVE TUTORIAL


Tutorial written by Marcia Salgado on February 1st, 2016
for those who have a working knowledge of PSP.
I'm using PSP9 to create my tuts.
Any resemblance to any other tutorial is coincidental.
Do not copy and paste this tutorial anywhere on the net.
If you want to translate please ask first. 

****************************************
Material:

Tube: "Individual Tube 45-2" by Martin Abel, you can purchase it here,
do not use without the proper #license.
PTU Kit "Dark Romance" by Hungry Hill,
you can purchase it here
Plugin: MuRa's Meister
Font: fox in the snow 

****************************************

--> Remember to save often and use my tag as reference if necessary. Use a drop shadow of your preference on layers.

1. Create a new image 700x700.

2. Open doodle-mist-3. Resize 90%. Copy and paste as new layer.

3. Open foliage-3. Resize 65%. Copy and paste as new layer. Move it up and to left.

4. Open berries. Resize 45%. Mirror. Copy and paste as new layer. Move it up and to left.

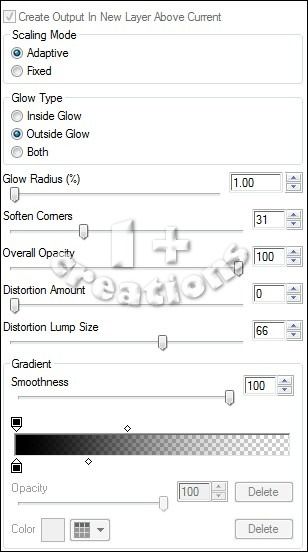
5. Open deco-1. Resize 35%. Copy and paste as new layer. Apply MuRa's Meister > Copies > Encircle with the following settings:


6. Open frame-4. Resize 75%. Copy and paste as new layer.

7. OPen fabric-flower-3. Resize 30%. Copy and paste as new layer. Apply MuRa's Meister > Copies > Encircle with the settings bellow:


8. Open frame-1. Resize 70%. Copy and áste as new layer.

9. Select inside the frame. Expand > 5. Add a new layer and move it below frame layer. Open Paper-4; Copy and paste into selection. Keep selected. Add a new layer. Create a gradient with the colors: #1b1b1b and #ad2323. Fill the selection and change the blend mode to Soft Light.

10. Click on first layer. Open fabric-flower-3. Resize 30%. Copy and paste as new layr. Move it to right and a little down. Duplicate. Mirror. Merge down.

11. Open fabric-flower-1. Resize 35%. Copy and paste as new layer. Move it to right and down. Duplicate. Mirror. Merge down.

12. Open fabric-flower-2. Resize 25%. Copy and paste as new layer. Move it down and a little to left. Duplicate. Mirror. Merge down.

13. Open jewelled-pin. Resize 45%. Copy and paste as new layer. Move it down and place between the black flowers.

14. Open your tube. Resize if needed. Copy and paste as new layer. Clean the bottom area that is outside the frame.

15. OPTIONAL - Open WA-2. With the freehand selection tool select and promote to layer the wordart lines. The word bleed I resize 75%. Add a white border to them and see my tag for placement.


--> Resize it if wanted. Add your copyright info and license#. Add your name and save as PNG.

February 28, 2015

IB Kit - Martin Abel 45-2

QUEEN OF HEARTS TUTORIAL


Tutorial written by Marcia Salgado on January 28th, 2015
for those who have a working knowledge of PSP.
Any resemblance to any other tutorial is coincidental.
Do not copy and paste this tutorial anywhere on the net.
If you want to translate please ask first. 

****************************************
Material:

Tube: Martin Abel, you can purchase it here at CDO 
do not use without the proper #license.
PTU Kit 'ScrapMonti_IB-MartinAbel-45-2' by Monti, 
you can purchase it  here  at CDO 
My template here 
Plugins:
Eye Candy 6 > Gradient Glow
Penta.com > Jeans and Color Dot
Font: KG This Is Not Goodbye

****************************************

--> Remember to save often and use my tag as reference always its necessary.

1. Open my template. Duplicate. Close original. Delete © layer. Click on back layer. Open ScrapMonti_IB-MartinAbel-45-2-Element39. Resize 80%. Copy and paste as new layer. Move it to the right. Drop Shadow: 1-1-50-2. Open ScrapMonti_IB-MartinAbel-45-2-Element38. Mirror. Place in front of first tree, a little to left. Same shadow.

2. Click on square left layer. Select the shape. Add a new layer. Open ScrapMonti_IB-MartinAbel-45-2-Paper6. In material Palette  chose pattern and look for the paper with this settings: Angle=0 Scale=50. Fill the selection. Deselect. Apply Eye Candy > Gradient Glow, using color black. Settings below. Add same shadow. Delete square left layer.


3. Click on doodle left layer. Add same shadow. Open ScrapMonti_IB-MartinAbel-45-2-Element1. Resize 50%. Copy and paste as new layer. Move it over upper square at left. Same shadow. Click on square right layer. Apply same paper. Deselect. Use same gradient glow and same shadow as did before. Delete square right layer. Click on doodle right layer. Same drop shadow. 

4. Click on big oval layer. Select the shape. Add a new layer. Open ScrapMonti_IB-MartinAbel-45-2-Paper2. Use it as pattern with this settings: Angle=0 Scale=80. Fill the selection. Deselect. Apply the gradient glow and use same shadow. Delete big oval layer. Click on heart layer. Select the shape. Add new layer. open ScrapMonti_IB-MartinAbel-45-2-Paper8. Use as pattern with this settings: Angle=0 Scale=50. Fill the selection. Keep selected. Copy the close up of your tube and paste as new layer. Place it over the heart. Selections > Invert. Delete. Deselect. Change Blend Mode to Luminance (Legacy) and low the opacity to 40. Duplicate. Adjust > Blur > Gaussian Blur: 3. Change Blend Mode to Soft Light (or any other that suits your tube best). Delete hearts layer. Click on heart paper layer. Apply the Gradient Glow, just change color to white. Same shadow.

5. Click on swirl layer. Same drop shadow. Click on circle back. Apply filter Penta.com > Jeans > Default (62,4). Apply same Gradient Glow (white color). Same shadow. Open ScrapMonti_IB-MartinAbel-45-2-Element12. Resize 35%. Free Rotate: Left-20. Copy and paste as new layer. Move it to top of black circle. Same shadow. Click on circle dark grey layer. Select and change the color to black. Apply filter Penta.com > Color Dots > Default (90,2,255,255,255). Same Gradient Glow (white) and same shadow.

6. Open ScrapMonti_IB-MartinAbel-45-2-Element28. Resize 35%. Copy and paste as new layer. Move it to top of the dotted circle at right. Same shadow. Open ScrapMonti_IB-MartinAbel-45-2-Element29. Resize 35%. Copy and paste as new layer. Move it to left of first rose and move it a little down. Click on lil square up layer. Select and change the color to #f29900. Blinds: Width=2 Opacity=25 Color=Black Horizontal marked. Gradient Glow using black color. Same shadow. Click on little square bottom layer. Select and change color to #f29900. Blinds: Width=2 Opacity=25 Color=Black Horizontal NOT marked. Same gradient Glow and same shadow.

7. Click on swirl dots layer. Same shadow. Copy and paste your tube. Resize it if needed. Apply a suitable shadow. Open follow elements and do the action: ScrapMonti_IB-MartinAbel-45-2-Element19. Resize 45%. Mirror. ScrapMonti_IB-MartinAbel-45-2-Element20. Resize 45%. Mirror. ScrapMonti_IB-MartinAbel-45-2-Element21. Resize 45%. ScrapMonti_IB-MartinAbel-45-2-Element22. Resize 45%. Now copy and paste each of one and paste as new layer on the tag. Place them at bottom left. Arranje them as you please or look to my tag as reference. Apply same shadow on every one. Open ScrapMonti_IB-MartinAbel-45-2-Element37. Mirror. Merge down. Resize 40%. Copy and place as new layer. Use it as ground for the cards. Duplicate as much as you need and place betwen cards.

8. Open ScrapMonti_IB-MartinAbel-45-2-Element5. Resize 20%. Free Rotate: Left-20. Copy and paste as new layer. Place it over the heart at its right side.

--> Resize if you want. Add your copyright info and #license. Add your name. Save as PNG.


Steampunk Beauty


== NEW PTU DANCE IN THE RAIN CT TAG ==

Featuring "Steampunk Beauty" Kit by Dance In The Rain at Smiley Creation Shop.

Dance In The Rain's beautiful kit with 177 elements and 30 papers for you to play with.

Dance In The Rain kit can be found at:

-> Smiley Creation Shop, here