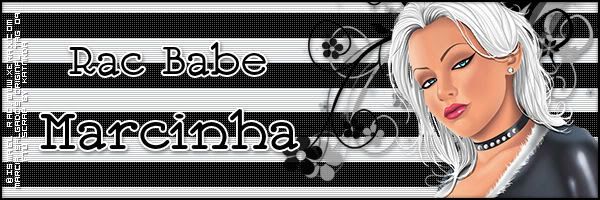
STRIPED TAG TUTORIAL
Tutorial written by Marcia Salgado
for those who have a working knowledge of PSP.
Any resemblance to any other tutorial is coincidental.
Do not copy and paste this tutorial anywhere on the net.
If you want to translate please ask first.
It's one of my first Forum Style Tutorial, it's a very old tag
I created when I was in Rac's Forum.
****************************************
Material:
Tube: ©Ismael Rac (a free one no longer available)
you can find many more great ones at his site www.xeracx.com/,
remember to follow the artist TOU.
you can find many more great ones at his site www.xeracx.com/,
remember to follow the artist TOU.
Do not use it without the #license.
Filter: Penta.com > ColorDot
Gradient by me, here
A doodle, used one from a FTU Kit Inked created by Kat,
no longer available, you can use a Dingbat font - one good: SLSquiggles.
no longer available, you can use a Dingbat font - one good: SLSquiggles.
Font:ITC Jeepers
****************************************
*~* First - Tag. *~*
1. Put the gradient in your gradient folder (My PSP Files > Gradients). If you downloaded the free kit Inked, open element27, duplicate it (Shift+D) and close the original. Open the tube, duplicate and close the original.
2. Choose 2 colors from your tube. Open the gradient 2masa and use: Angle=0 Repeat=7. Open a new canvas of 600 x 200 and fill with your gradient.
3. Select the lighter color strips with the Magic Wandt and apply Effects > Texture Effects > Blinds, with the follow: Widht=3, Opacity=60, Horizontal marked and color #C0C0C0. Selections > Select None.
4. Select the darker color strips and apply Penta.com filter, preset Color Dot (Effects > Plugins > penta.com > color dot), using: 60-2-255-255-255. Selections > Select None.
5. Use the element27 from FTU Kit Inked criated by Kat - NKDigitAlart OR any other doodle OR even a dingbat. Colorize it to go with your tube if necessary (Adjust > Hue and Saturation > Colorize). Apply a shadow, I used: H=2, V=1, Opacity=55, Blur=5 and the color black.
6. Add your tube and put it wherever you want it, remember to leave space to your name. Apply the same shadow used before. Select the Crop tool. At Tools Options use Widht=600 and Height=200 and apply it.
7. Add a new Raster Layer, move it over your tube layer. Selections > Select All. Selections > Modify > Select Borders with: Both, Width=2 and Antialias marked. Fill this selection with the darker color and apply a shadow, I used: V-H=0, Opacity=40, Blur=10 Color: Black.
8. Add a new Raster Layer. Add Copyright info needed.
9. Add a new Raster Layer to your name. Apply same shadow. Save as JPG or PNG.
*~* Second - Avatar *~*
1. Open a new canvas of 150 x 150. (When this tut was written the forum avatar was 150x120)
2. Now is very simple, leave the name, the copyright and the frame layers invisible, with Selection tool, Rectangle shape, draw a selection around your tube and doodle (see mine for example). Edit > Copy > Copy Merged.
3. Click on canvas of 150 x 150, Selections > Select All. Edit > Paste Into Selection. Repeat step 7 to recreate the frame. Add a new layer to add Copyright info and another one for your name or just your initials. Save as JPG or PNG.

