
THE ZONE PROUD MEMBER TAG


Tutorial written by Marcia Salgado on September 4th, 2014
for those who have a working knowledge of PSP.
Any resemblance to any other tutorial is coincidental.
Do not copy and paste this tutorial anywhere on the net.
If you want to translate please ask first.
****************************************
Material:
Tube: FTU Artist - Burkhard Niebert - www.kunstmaler-niebert.de
The Zone Groups forum has the artist permission, do not use it
unless you have the same permission of usage.
Fonte: BankGothic Lt BT
Plugin: Alien Skin Eye Candy 5 Impact - Glass
(if you do not have it you can use a Inner Bevel or nothing)
My Materials: Template, Filter Settings and Gradient here
(To install the EC5 Settings just click twice on the MS_TheZoneTemplate.f1s
and move the MS_TheZoneTemplate.jgd inside your gradient folder)
****************************************
--> Remember to save often and use my tag as reference if necessary.
1. Open the The Zone Template, duplicate and close the original. Delete the © info layer.
2. Activate the zone layer. Selections > Select All. Selections > Float. Selections > Defloat. Add a new layer. Fill with a gradient of your choice. I used MS_TheZoneTemplate Gradient - Angle: 45 - Repeats: 3 - Style: Linear. Keep selected. Effects > Edge Effects > Enhance More
3. Effects > Distortion Effects > Pixelate > Symmetric Marked and Block Width/Height: 25.
4. Effects > Edge Effects > Enhance. Duplicate this layer, change the Layer Blend Mode to Overlay and leave it invisible for now.
5. Click on the zone layer to activate it. Add as a new layer the tubes or elements or image you want to use inside the text to fill it.
6. Arrange the tubes as you wish. Leave only the tubes layers visible. Layers > Merge > Merge Visible. Selections > Invert. Press the Delete key from your keyboard.
7. Selections > Select All. Selections > Clip to Canvas. Image > Crop to Selection. Change the Layer Blend Mode to Luminance (L).
8. Activate the Copy of the zone layer. Selections > Select All. Selections > Float. Selections > Defloat and add a new layer.
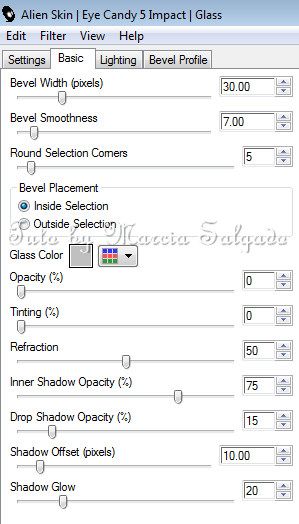
9. Apply the Alien Skin Eye Candy 5 Impact Glass preset I provide or use the Settings below.
10. Activate the Only Wh Border and use Adjust > Add/Remove Noise > Add Noise > Gaussian - Monochrome - Noise: 100. Add this same effect again. Effects > 3D Effects > Drop Shadow > V/H: 1 - Opacity: 85 - Blur: 2 - Color: Black.
11. Activate the Proud Member Layer. Selections > Select All. Selections > Float. Selections > Defloat. Add a new layer. Selections > Modify > Expand 2 and fill it with white color. Move it below the Proud Member Layer. Deselect. Apply the same Drop Shadow above.
12. Add your copyright and name (same Drop Shadow as before) and save it as PNG.
** The Avatar template is used the same way just
change the EC5 Impact Glass - Bevel Width to 15. **