Showing posts with label Devilish Dezines. Show all posts

January 30, 2016

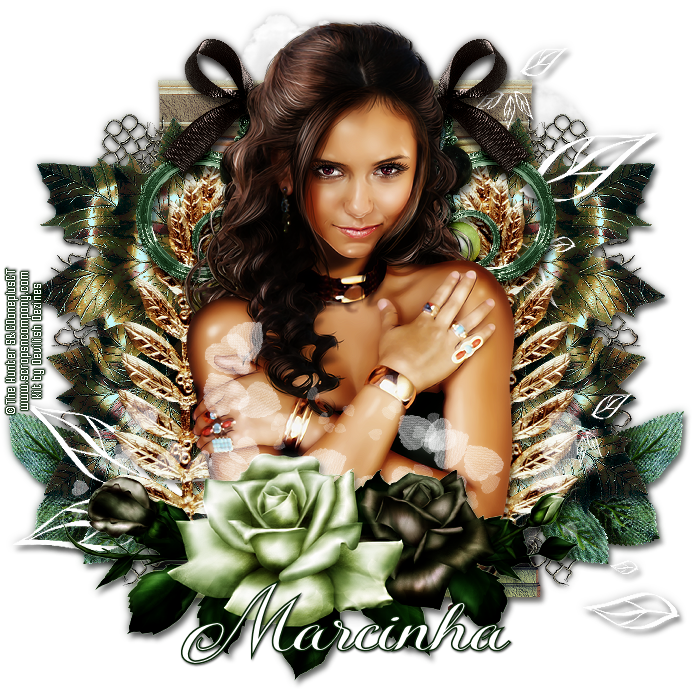
Katherina

MISTERIOSA TUTORIAL


Tutorial written by Marcia Salgado on January 30th, 2016
for those who have a working knowledge of PSP.
I'm using PSP9 to create my tuts.
Any resemblance to any other tutorial is coincidental.
Do not copy and paste this tutorial anywhere on the net.
If you want to translate please ask first. 

****************************************
Material:

Tube: "Katherina" by The Hunter, you can purchase it here
do not use without the proper #license.
PTU Kit "Katherina" by Devilish Dezines, you can purchase it here
Font: Kazincbarcika Script

****************************************

--> Remember to save often and use my tag as reference if necessary. Use a Drop Shadow of your preference on layers. 

1. Create a new image 700x700. 

2. Open element19. Resize 65%. Copy and paste as new layer. Move it up.

3. Open element7. Resize 65%. Copy and paste as new layer. 

4. Open element35. Resize 60%. Copy and paste as new layer. Move it to right and place it over the column. Duplicate. Mirror. Merge down.

5. Open element17. Resize 30%. Copy and paste as new layer. Move it down and to left. Duplicate. Mirror. Merge down.

6. Open element6. Resize 60%. Copy and paste as new layer. Move it to right. Duplicate, Mirror, Merge down.

7. Open element39. Resize 85%. Copy and paste as new layer.

8. Open element15, Resize 65%. Copy and paste as new layer. Move it to left. Duplicate. Mirror. Merge down.

9. Open element23. Resize 50%. Copy and paste as new layer. Move it up and to left. Duplicate. Mirror. Merge down.

10. Open your tube closeup. Resize if needed. Copy and paste as new layer. 

11. Open element9. Resize 65%. Copy and paste as a new layer. Move it down.

12. Open element2. Resize 65%. Copy and paste as new layer. Move it down. Erase the parts showing below tis elements in other layers: tube and white hearts, for example.


--> Add your copyright info and license#. Add your name and save as PNG.


December 14, 2015

Death Lover

PURPLE DEATH TUTORIAL


Tutorial written by Marcia Salgado on November 17th, 2015
for those who have a working knowledge of PSP.
Any resemblance to any other tutorial is coincidental.
Do not copy and paste this tutorial anywhere on the net.
If you want to translate please ask first. 

****************************************
Material:

Tube: "Death Lover" by Di-Halim, you can purchase it here
do not use without the proper #license.
PTU Kit "Dead Lover" by Devilish Dezines, you can purchase it here
Font: Sepian

****************************************

--> Remember to save often and use my tag as reference if necessary. Use a Drop Shadow of your preference on layers. 

1. Create a new image 700x700.

2. Open element29. Resize 80%. Copy and paste as new layer. Move it up and to left.

3. Open element17. Resize 85%. Copy and paste as new layer. Move it up and to right.

4. Open frame1. Resize 65%. Free Rotate: Right-70. Copy and paste as new layer. Move it down and a little to right. Select inside the frame. Expand > 5. Add a new layer and move this layer below frame layer.

5. Open paper4. Copy and paste into selection. Keep selected.

6. Open your tube close up. Resize if needed. Copy and paste as new layer. Position it inside the frame. Invert selection. Delete. Select all. Clip to canvas. Crop to selection. Blend Mode: Luminance Legacy. Low the layer opacity to 45. Duplicate. Change the belnd mode to Soft Light. Increase the layer opacity to 75.

7. Open element19. Resize 70%. Copy and paste as new layer. Move it to right.

8. Open element34. Resize 55%. Copy and paste as new layer. Move it to right.

9. Open element13. Resize 40%. Mirror. Copy and paste as new layer. Move it down and to right.

10. Open your tube. Resize if needed. I mirrored mine. Copy and paste as new layer.

--> Add your copyright info and license#. Add your name and save as PNG.
July 23, 2015

Piratka with Pirate Skull

MOST WANTED TUTORIAL


Tutorial written by Marcia Salgado on July 23th, 2015
for those who have a working knowledge of PSP.
Any resemblance to any other tutorial is coincidental.
Do not copy and paste this tutorial anywhere on the net.
If you want to translate please ask first. 

****************************************
Material:

Tube: "Piratka" by Natalia NZ, you can purchase it here
do not use without the proper #license.
PTU Kit "Pirate Skull" by Devilish Dezines, you can purchase it here
Font: CK Pirate Hand

****************************************

--> Remember to save often and use my tag as reference if necessary. Use a Drop Shadow of your like. 

1. Create a new image 700x700.

2. Open element24. Resize 85%. Copy and paste as new layer. 

3. Open element40. Resize 87%. Copy and paste as new layer.

4. Open element31. Resize 89%. Copy and paste as new layer.

5. Open element10. Resize 70%. Flip. Copy and paste as new layer. Move it down left. Duplicate, leave it in same place. Duplicate again and move it to right.

6. Open element21. Resize 40%. Mirror. Copy and paste as new layer. Move it down right.

7. Open frame2. Resize 75%. Copy and paste as new layer. Select inside the frame. Expand > 5. Add a new layer. Move it under the frame layer.

8. Open paper2. Copy and paste into selection. Keep selected.

9. Open paper4. Copy and paste into selection. Blend Mode: Overlay. Keep selected.

10. Open your tube, resize if needed. Copy and paste as new layer. Place it inside the frame. Invert the selection. Hit delete. Select all. Selections > Clip to canvas. Image > Crop to selection.

11. Click on first layer, should be the frame layer. Open element32. Resize 60%. Copy and paste as new layer. Move it to right.

12. Open element18. Resize 10%. Mirror. Free Rotate: Left-25. Copy and paste as new layer. Place it over the tree. Duplicate. Mirror. Move it to another place on tree.

13. Open element42. Resize 40%. Copy and paste as new layer. Move it down right. Duplicate. Mirror. Place it over the first one a little down.

14. Open element43. Resize 30%. Copy and paste as new layer. Move it down right.

15. Open element14. Resize 35%. Copy and paste as new layer. Move it up left. Place it over the frame border.

16. Open element3. Resize 40%. Copy and paste as new layer. Move it down left.

17. Open element27. Resize 50%. Free Rotate: Right-90. Copy and paste as new layer. Move it down left.

18. Open element41. Resize 20%, Copy and paste as new layer. Move it down right. Place it over the stones.


19. Open element11. Resize 35%. Copy and paste as new layer. Move it down a little to right.

--> I made an extra step. Create a rectangle at the very bottom of the tag, click on follow elements layers and click delete to clean: element24, element40 and element31.

--> Resize if wanted. Add your copyright info and license#. Add your name and save as PNG. 

May 26, 2015

Unspoken ~ by Joanne Salgado


Tutorial written by Joanne Salgado on May 26th, 2015
for those who have a working knowledge of PSP.
Any resemblance to any other tutorial is coincidental.
Do not copy and paste this tutorial anywhere on the net.
If you want to translate please ask first. 

Tube: The Unspoken by Graphfreaks - you can purchase here
Kit The Unspoken by Devilish Dezines - you can purchase here
Font: BankGothic Lt BT

Don't forget to save often.
At any point if you have doubts check my tag.

1. Open a new image 600x500

2. Open element 'frame2' copy and paste as new layer. Resize 60%.

3. Open element 'element3' copy and paste as new layer. Resize 75%. Move this below the frame layer. Arrange it to the top.

4. Open element 'element22' copy and paste as new layer. Resize 60%. Arrange it to the right. Duplicate. Mirror. Arrange it a little lower to the left and clean the parts that show at the bottom.

5. Open paper 'paper4' copy and paste as new layer. Resize 50%. Clean the parts that appears outside the frame.

6. Open your close up tube. Copy and paste as new layer. Arrange it inside the frame and clean the parts that appears outside it. Hue and Saturation both with 0. Lower opacity to 30.

7. Open element 'element31' copy and paste as new layer. Resize 30%. Arrange it to the bottom right. Duplicate.

8. Open element 'element48' copy and paste as new layer. Resize 60%. Arrange it to the bottom left.

9. Open element 'element41' copy and paste as new layer. Resize 60%. Arrange it to the top right.

10. Open element 'element42' copy and paste as new layer. Resize 60%. Arrange it to the right.

11. Open element 'element49' copy and paste as new layer. Resize 30%. Mirror. Arrange it to the bottom right.

12. Open element 'element30' copy and paste as new layer. Resize 60%. Arrange it to the top left.

13. Open element 'element16' copy and paste as new layer. Resize 30%. Arrange it to the bottom left.

14. Open element 'element32' select the corner right mouse. Copy and paste as new layer. Resize 30%. Mirror. Arrange it to bottom.

15. Open your tube. Copy and paste as new layer. Resize as you prefer and arrange it to the left.

16. Add shadow. I used: 1-1-65-2 black.

17. Add copyright.

18. Add name. I used: BankGothic Lt BT / size: 30

Save as PNG

May 13, 2015

Bloody ~ by Joanne Salgado


Tutorial written by Joanne Salgado on May 13th, 2015
for those who have a working knowledge of PSP.
Any resemblance to any other tutorial is coincidental.
Do not copy and paste this tutorial anywhere on the net.
If you want to translate please ask first. 

Tube: Boo 1 by Ladymishka Dolls - you can purchase here 
Kit Lady Heart by Devilish Dezines - you can purchase here 
Font: Zombie Holocaust

Don't forget to save often.
At any point if you have doubts check my tag.

1. Open a new image 500x500

2. Open element 'element8' copy and paste as new layer. Resize 50%.

3. Open element 'element45' copy and paste as new layer. Resize 64%. Move this layer below the frame layer.

4. Open element 'element43' copy and paste as new layer. Resize 60%. Arrange it to the top right of the frame. Duplicate. Mirror. Duplicate. Flip. Duplicate. Mirror.

5. Open element 'element23' copy and paste as new layer. Resize 50%. Arrange it to the bottom.

6. Open paper 'paper6' copy and paste as new layer. Resize 40%. Mirror. Arrange it inside the frame and clean the parts that appears outside it.

7. Open element 'element24' copy and paste as new layer. Resize 20%. Move this layer above the frame layer. Arrange it to the top left.

8. Open your tube. Copy and paste as new layer. Resize as you prefer and arrange it to the right.

9. Add shadow. I used: 1-1-65-2 black.

10. Add copyright.

11. Add name. I used: Zombie Holocaust / size: 48

Save as PNG

April 26, 2015

Ellie Mae Blue ~ by Joanne Salgado


Tutorial written by Joanne Salgado on April 26th, 2015
for those who have a working knowledge of PSP.
Any resemblance to any other tutorial is coincidental.
Do not copy and paste this tutorial anywhere on the net.
If you want to translate please ask first. 

Tube: Ellie Mae by Toriya - you can purchase here 
Kit Ellie~Mae by Devilish Dezines - you can purchase here 
Font: BankGothic Lt BT

Don't forget to save often.
At any point if you have doubts check my tag.

1. Open a new image 500x500

2. Open element 'element22' copy and paste as new layer. Resize 60%. Arrange it to the top.

3. Open element 'element46' copy and paste as new layer. Resize 60%.

4. Open element 'element7' copy and paste as new layer. Resize 40%. Arrange it to the bottom left. Duplicate, mirror.

5. Open element 'element31' copy and paste as new layer. Resize 40%. Arrange it to the bottom between the two blue flowers.

6. Open element 'element38' copy and paste as new layer. Resize 40%. Arrange it to the bottom.

7. Open element 'element32' copy and paste as new layer. Resize 20%. Free rotate right-25. Arrange it to the bottom right.

8. Open element 'element9' copy and paste as new layer. Resize 20%. Arrange it to the top right.

9. Open your tube. Copy and paste as new layer. Resize as you prefer and arrange it to the bottom center.

10. Add shadow as you prefer. I used: 1-1-65-2 black.

11. Add copyright.

12. Add name. I used: BankGothic Lt BT / size: 48

Save as PNG.

March 12, 2015

Lady Heart

LADY HEART TUTORIAL


Tutorial written by Marcia Salgado on March 12th, 2015
for those who have a working knowledge of PSP.
Any resemblance to any other tutorial is coincidental.
Do not copy and paste this tutorial anywhere on the net.
If you want to translate please ask first. 

****************************************
Material:

Tube: Andy Cooper, you can purchase it at S&Co. here,
do not use without the proper #license.
PTU Kit "Lady Heart" by Devilish Dezines, you can purchase it at S&Co. here
Selection: My ms_queenofhearts with an Alpha Selection, here
Font: Brayden Script

****************************************

--> Remember to save often and use my tag as reference if necessary. Used the Drop Shadow: 1-1-50-5 in most layers. 

1. Open my psp ms_queenofhearts. Duplicate. Close the original. Delete © layer. Click on back layer. Open element45. Resize 80%. Copy and paste as new layer. Open element44. Resize 80%. Copy and paste as new layer. Move it a little up. 

2. Click on alphachannel layer. Open frame1. Resize 80%. Copy and paste as new layer. Add white to your foreground color and #400707 to your background color. Create a gradient: Style=Radial Angle=0 Repeats=1. Click again in alphachannel layer. Selections > Load/Save Selection > Load Selection From Alpha Channel > Load. Fill the selection with the gradient. Keep selected. Add a new layer. Open paper2. Copy and paste into selection. Edge Effects > Enhance. Change blend mode to Overlay. Deselect.

3. Open element18. Resize 64%. Copy and paste as new layer. Move it to right. Arrange the layer below the gradient layer. Open element34. Resize 51%. Copy and paste as new layer. Move it way to rignt. Below the right side of the frame. Open element15. Resize 64%. Copy and paste as new layer. Move it to left. 

4. Click on frame layer (should be the first layer). Open element12. Resize 33%. Copy and paste as new layer. Arrange this layer below frame layer and move the element to right, inside the frame. Rename this layer CASTLE. Open element21. Resize 66%. Copy and paste as new layer. Move it to bottom inside the frame. Rename it BUSHES. Some parts will be outside, no problem. Click on frame layer. Open element7. Resize 41%. Copy and paste as new layer. Arrange the layer below the frame. Move it to way left inside the frame. Rename this layer to PENDANT. Here too some pasrts will be outside the frame. Load again the selection from Alpha Channel. Invert. Delete. Click on CASTLE layer. Delete. Click on PENSANT layer. Delete. Deselect.

5. Click on frame layer. Open element31. Resize 26%. Free Rotate: Right-35. Copy and paste as new layer. Move it to upper right and place it on top of the frame. Open element41. Resize 33%. Copy and paste as new layer. Move it to bottom right. Place it over the frame.

6. Open your tube. Resize if needed. Copy and paste as new layer. Move it to left. Apply a suitable shadow. Using the Crop Tool, on Toolbar  Options click on Snap crop rectangle to: Merged Opaque. Apply. 

--> Add your copyright info and #license. Add your name. Save as PNG.