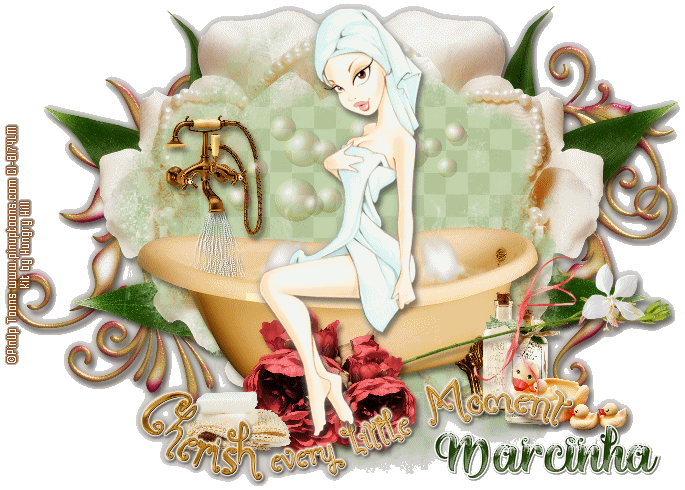
Showing posts with label PinUp Toons. Show all posts

April 26, 2016

Little Moments

BATH TIME TUTORIAL


Tutorial written by Marcia Salgado on April 26th, 2016
for those who have a working knowledge of PSP.
I'm using PSP9 to create my tuts.
Any resemblance to any other tutorial is coincidental.
Do not copy and paste this tutorial anywhere on the net.
If you want to translate please ask first. 

****************************************
Material:

Tube: "Individual Tube 44-2" by PinUp Toons, now you can purchase it here - CDO,
do not use without the proper #license.
PTU Kit "Little Moments" by Hungry Hill,
you can purchase it here 
Font: Brigent Script  

****************************************

--> Remember to save often and use my tag as reference if necessary. Use a drop shadow of your preference on layers.

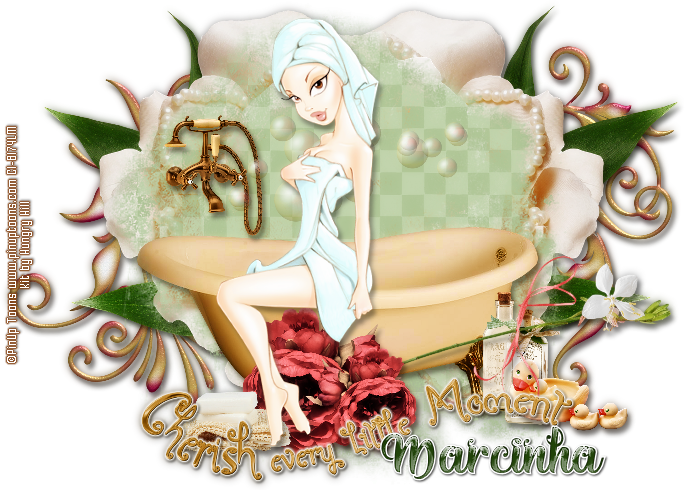
1. Create a new image 750x500. Later you will remove unused spaces.

2. Open tile-bkg. Resize 55%. Copy and paste as new layer.

3. Open deco-2. Resize 45%. Copy and paste as new layer. Move it to left. Arrange this layer below tile-bkg layer.

4. Open deco-1. Resize 45%. Copy and paste as new layer. Move it to right.

5. Open greenery-2. Resize 45%. Copy and paste as new layer. Move it to left. Duplicate. Mirror. Maybe it will need a little place adjustment. Merge down.

6. Open flower-2. Resize 50%. Copy and paste as new layer. Move it to right. Duplicate. Mirror. Maybe it will need a little place adjustment. Merge down.

7. Click on first layer (tile background layer). Open bathtub. Resize 50%. Copy and paste as new layer. Move it a little down.

8. Open bottle-1. Resize 15%. Copy and paste as new layer. Move it down and to right. Place it near the bathtube.

9. Open bottle-2. Resize 15%. Copy and paste as new layer. Move it down and to right. Place it on right side of the previous bottle.

10. Open duckies. Resize 15%. Copy and paste as new layer. Move it down and to right. Place it near the bottles.

11. Open stem. Resize 50%. Copy and paste as new layer. Move it down and a little to right. 

12. Open flower-1. Resize 20%. Copy and paste as new layer. Move it down and a little to left. Duplicate, mirror and resize 70%. Place it on right side of bigger flower.

13. Open soap. Resize 15%. Copy and paste as new layer. Move it down and to left. Place it near the bathtube.

14. Open faucets. Resize 15%. Copy and paste as new layer. Move it a little up and to left. 

15. Open bubbles-2. Resize 30%. Copy and paste as new layer. Move it a very little up.

16. Open WordArt. Resize 55%. Copy and paste as new layer. Move it down and a little to right.

17. Use Crop > Merged Opaque to get rid of all extra spaces.


--> Resize it if wanted. Add your copyright info and license#. Add your name and save as PNG.


----------------------------------------------------------------

Showing Off of Animated Tag - animations made by me


February 22, 2016

Autumn Harvest

AUTUMN MUSIC TUTORIAL


Tutorial written by Marcia Salgado on February 22th, 2016
for those who have a working knowledge of PSP.
Any resemblance to any other tutorial is coincidental.
Do not copy and paste this tutorial anywhere on the net.
If you want to translate please ask first. 

****************************************
Material:

Tube: "Skirt Boots" by PinUp Toons, you can purchase it here 
do not use without the proper #license.
PTU Kit "Autumn Harvest" by Creative Scraps by Crys, you can purchase it here  
Font: Symphony

****************************************

--> Remember to save often and use my tag as reference if necessary. Use a Drop Shadow of your choice. 


1. Create a new image 700x550,

2. Open AH_Frame_3. Resize 70%. Copy and paste as new layer. Select inside the frame. Expand > 10. Add a new layer and move it below the frame layer. Open AH_Paper_1. Copy and paste into selection. Deselect.

3. Add a suitable shadow on the frame and merge visible. Duplicate. Resize 85%. Free Rotate: Left-25. Move it a little up and way to left. Duplicate. Mirror. Move this layer below the bigger frame. Apply Histogram Adjustments (Adjust > Brightness and Contrast), with the following settings:


4. Open AH_Element_6. Resize 75%. Copy and paste as new layer . Move it up and to right.

5. Open AH_Element_32. Resize 55%. Copy and paste as new layer. Move it fdown and to left.

6. Open AH_Element_37. Resize 70%. Mirror. Copy and paste as new layer. Move it to left and place it right behind the frme's left border.

7. Open AH_Element_5. Resize 70%. Copy and paste as new layer. Move it down and to right. 

8. Open AH_Element_21. Resize 60%. Copy and paste as new layer. Move it down and way right. Duplicate. Mirror. Adjust it of left side of the frame. Merge down.

9. Open AH_Element_14. Resize 70%. Copy and paste as new layer. Move it to left and place over the right bigger frame border.

10. Click on first layer, should be the big frame. Open AH_Element_16. Resize 60%. Copy and paste as new layer. Duplicate. Blend Mode: Multiply.

11. Open AH_Element_28. Resize 30%. Copy and paste as new layer. Place it on bigger frame left bottom corner.

12. Open AH_Element_20. Resize 45%. Copy and paste as new layer. Move it down and to right.

13. Open AH_Element_34. Resize 50%. Copy and paste as new layer. Place it over the bigger frame on top.

14. Open AH_Element_55. Resize 25%. Copy and paste as new layer. Move it down and to right. Place it in foront of bigger frame's bottom right corner.

15. Open your tube. Resize if needed. Copy and paste as new layer. Move it a little down and to right.

16. Open the elements AH_Element_42, AH_Element_43 and AH_Element_44. Resize 25%. Copy and paste as new layer. Placethem around the bottom of the tag. Place some below the fox element. Some above the bench element. Have fun with it.

17. Use Crop > Merged Opaque to get rid of all extra space.


--> Add your copyright info and license#. Add your name and save as PNG.


February 21, 2016

IB-CaronVinson-66-1

GOTHIC LOVE TUTORIAL


Tutorial written by Marcia Salgado on February 21th, 2016
for those who have a working knowledge of PSP.
I'm using PSP9 to create my tuts.
Any resemblance to any other tutorial is coincidental.
Do not copy and paste this tutorial anywhere on the net.
If you want to translate please ask first. 

****************************************
Material:

Tube: "Go Go Boots" by PinUp Toons, you can purchase it here,
do not use without the proper #license.
PTU Kit "IB-CaronVinson-66-1" by Gimptastic Scraps,
you can purchase it here 
Plugin: Eye Candy 6
Material: Wordart and flame by me. Just click and save.


Font: steady

****************************************

--> Remember to save often and use my tag as reference if necessary. Use a drop shadow of your preference on layers.

1. Create a new image 700x550.

2. Open GS-Vinson_66-1_frame2. Resize 75%. Copy and paste as new layer. Move it to left. Use Eye Candy > Gradient Glow to add a thin border with the color #c1407c. Use the settings below:


3. Click on the bottom layer. Open GS-Vinson_66-1_ele21. Copy and paste as new layer. Move it down and to right. Place it behind the bottom right corner of the square frame.

4. Open GS-Vinson_66-1_frame1. Resize 45%. Copy and paste as new layer. Add the same border using Eye Candy 6 > Gradient Glow. Move it down and to right.

5. Click on square frame layer. Select inside. Expand > 5. Add a new layer and move it below the frame layer. Open GS-Vinson_66-1_paper6. Copy and paste into selection. Invert selection. Open your tube close up. Resize if needed. Copy and paste as new layer. position it inside the frame. Delete. Deselect. Duplicate. Let the copy invisible for now. Back on original tube layer. Colorize: 0-0. Low the layer opacity to 66. Tur the tube copy visible. Blend Mode: Soft Light.

6. Select all. Clip to canvas. Crop to selection.

7. Click on square frame layer. Open GS-Vinson_66-1_ele22. Resize 70%. Mirror. Move it to bottom and place it in front of the square frame base.

8. Open GS-Vinson_66-1_ele18. Resize 70%. Copy and paste as new layer. Place it in front of the square frame right border.

9. Open GS-Vinson_66-1_ele20. Resize 50%. Free Rotate: Right-90. Copy and paste as new layer. Place it on the bottom, in front of the previous element.

10. Open GS-Vinson_66-1_ele9. Copy and paste as new layer. Copy and paste as new layer. Move it down and way to left.

11. Open GS-Vinson_66-1_ele6. Resize 50%. Copy and paste as new layer. Add the same border using Eye Candy 6 > Gradient Glow. Move it to right and a little up.

12. Open your tube. Resize if needed. Copy and paste as new layer. Move it to the right. Duplicate. Leave the copy invisible for now. Click on original tube layer.

13. Open GS-Vinson_66-1_ele7. Resize 50%. Mirror. Copy and paste as new layer. Place it on the tube's hand. Turn visible the layer of the tube copy and erase a part of her hips (what is over the bomb). 

14. Open GS-Vinson_66-1_ele13. Resize 50%. Copy and paste as new layer. Place it over the top right side of the vase.

15. Open the flame I made, copy and paste as new layer and place it on the bomb's fuse.

16. Open my wordart. Copy and paste as new layer. Place it where you want and add the border using Eye Candy > Gradient Glow with same settings used before.


--> Resize it if wanted. Add your copyright info and license#. Add your name and save as PNG.


January 14, 2016

A Green Desire


== NEW CT HUNGRY HILL PTU TAG ==

Featuring "A Green Desire" Kit by HUNGRY HILL at Creative Design Outlet - CDO


The elements are full of magic and beauty.
It has 12 papers, 60 elements, 4 frames and 2 wordart so you can play with it.

Kit can be found exclusively at:

-> Creative Design Outlet - CDO, here

Don't forget to visit her blog:

October 2, 2015

IB-PinUpToons-223-2 - CT Show Off


== NEW CT MELLIE BEANS PTU TAG ==

Featuring "IB-PinUpToons-223-2" by Mellie Beans at CDO - Creative Design Outlet.

Mellie Bean's kit has 20 elements, 3 frames, 1 wordart and 6 papers. The colors are romantic and soft. The style is a little vintage so you can create awesome tags with it.
It is inspired by the PinUp Toons tube 223-2, and you can find it here
*This scrap kit may be used with any artists work. Please follow CDO's TOU's for your tubes.*

Kit can be found at:

-> CDO - Creative Design Outlet, here

Visit her blog:


May 13, 2015

Pieces of April

MEMORIES TUTORIAL


Tutorial written by Marcia Salgado on May 5th, 2015
for those who have a working knowledge of PSP.
Any resemblance to any other tutorial is coincidental.
Do not copy and paste this tutorial anywhere on the net.
If you want to translate please ask first. 

****************************************
Material:

Tube: "Skirt Boots" by PinUp Toons, you can purchase it here
do not use without the proper #license.
PTU Kit "Pieces of April" by Hungry Hill,
you can purchase it here
Font: Slackey

****************************************

--> Remember to save often and use my tag as reference if necessary. Used the Drop Shadow: 1-1-50-5 or 1-1-65-2 #404040 in most layers.


1. Open a new image 700x700

2. Open element 'circles' copy and paste as new layer. Resize 50%.

3. Open wordart 'WordArt-1' copy and paste as new layer. Resize 90%.

4. Open paper 'paper-2' copy and paste as new layer. Resize 50%. Move this layer below the circles layer. Clean the parts that appears outside the circles.

5. Open your tube. Copy and paste as new layer. Move this layer above the wordart layer. Resize as you prefer and arrange it inside the circles. Clean the lower parts of the tube that appears outside the circles.

6. Open element 'chair' copy and paste as new layer. Resize 50%. Arrange it to the bottom left.

7. Open element 'flower-3' copy and paste as new layer. Resize 30%. Mirror. Move this layer below the chair layer. Arrange it to the right of the chair.

8. Open element 'flower-6' copy and paste as new layer. Resize 30%. Arrange it to the right of the chair.

9. Open element 'flower-2' copy and paste as new layer. Resize 30%. Arrange it to the right of the chair.

10. Open element 'postcards' copy and paste as new layer. Resize 30%. Arrange it to the right of the chair.

11. Open element 'teddy' copy and paste as new layer. Resize 30%. Move this layer above the chair layer. Arrange it above the chair.

12. Open element 'telephone' copy and paste as new layer. Resize 25%. Arrange it to the bottom left.

13. Open element 'Kiki' copy and paste as new layer. Resize 30%. Arrange it to the bottom of the chair.


--> Resize it if wanted. Add your copyright info and license#. Add your name and save as PNG.

April 6, 2015

Reflections


== NEW CT HUNGRY HILL PTU FB COVER ==

Featuring "Reflections" Kit by HUNGRY HILL
at Creative Design Outlet - CDO

The elements are full of magic and beauty. 
It has 12 papers, 45 elements, 4 frames and 2 wordart 
so you can play with it.

Kit can be found exclusively at:

-> Creative Design Outlet - CDO, here


Don't forget to visit her blog:


March 19, 2015

Tuesday Afternoon - Show Off


*Click to see original size*


== NEW CT HUNGRY HILL PTU TUTORIAL ==

Featuring "Tuesday Afternoon" Kit by HUNGRY HILL 
at Creative Design Outlet - CDO

Kit with a fantastic spring or gardening theme. 
The elements are full of magic and beauty. 
It has 12 papers, 60 elements, 5 frames and 2 wordart 
so you can play with it.

Kit can be found exclusively at:

-> Creative Design Outlet - CDO, here

Don't forget to visit her blog:


Tuesday Afternoon

TUESDAY AFTERNOON TUTORIAL

*Click to see original size*

Tutorial written by Marcia Salgado on March 19th, 2015
for those who have a working knowledge of PSP.
Any resemblance to any other tutorial is coincidental.
Do not copy and paste this tutorial anywhere on the net.
If you want to translate please ask first. 

****************************************
Material:

Tube: PinUp Toons - Pack with 3 tubes, you can purchase it at CDO, here
do not use without the proper #license.
PTU Kit "Tuesday Afternoon" by Hungry Hill,
you can purchase it hat CDO, here
Font: Alice and the Wicked Monster

****************************************

--> Remember to save often and use my tag as reference if necessary. Used the Drop Shadow: 1-1-50-5 in most layers. 

1. Create a new image 783x500. Open frame-line. Copy and paste as new layer. With magic wand select inside the frames. Expand > 4. Add a new layer . Open paper-5. Mirror. Copy. Paste into selection. Move this layer below the frame. Keep seleceted. Open your tube - I'm using 3 from the same artist. Copy and paste as new layer. Move it inside the frames. Invert selection and delete. Select all. Selections > Clip to canvas. Image > Crop to selection - to get rid of any extra pixel. Add a suitable shadow to the tubes and frame. Merge visible. 

2. Open element stem. Resize 38%. Copy and paste as new layer. Move it way to the left. Place it under the rope. Open element cloud. Resize 64%. Copy and paste as new layer. Move it to top right. Open element vine. Free Rotate: Right-90. Place it under the rope. 

3. Click on first layer, should me the merged one. OPen element blossoms-1. Resize 22%. Mirror. Copy and paste as new layer. Move it way left, over the rope. OPen element snail. Resize 15%. Copy and paste as new layer. Move it way to the right and place it over the rope. Open WA-2. Resize 78%. Copy and paste as new layer. Place it over the rope, where fits you better.

4. OPen element flutterby. Resize 14%; Free Rotate: Right-20. Move it over last frame left top. Open toy-plane. Resize 17%. Free Rotate: Left-20. Move it over first frame bottom right.Open water-drops. Resize 38%. Copy and paste as new layer and move it over the middle frame on its right side. 

5. Crop Tool - Snap crop rectangle to: Merged Opaque. Apply. Add yout copyright info and #license. Add your name. Save as PNG.


March 9, 2015

IB-AnnaMarine-14-1

CLOVER TUTORIAL


Tutorial written by Marcia Salgado on March 9th, 2015
for those who have a working knowledge of PSP.
Any resemblance to any other tutorial is coincidental.
Do not copy and paste this tutorial anywhere on the net.
If you want to translate please ask first. 

****************************************
Material:

Tube: PinUp Toons, you can purchase it at CDO, here 
PTU Kit "ScrapMonti_IB-AnnaMarine-14-1" by Monti's Scraps, 
you can purchase it at CDO, here 
Simone (Lorraine) Animation SimoneAni313 at Scrappy Bit Of Fun, here.
Plugin: Mura's Meister > Copies > Tiling (Angle)
Font: Neuropol X Rg and Pixelette for text layer.

****************************************

--> Remember to save often and use my tag as reference if necessary. Used the Drop Shadow: 1-1-50-5 in most layers. In this tutorial I'm only showing how to use Simone's animation not the noise.

1. Open a new image 600x300.Add a new layer. Use the color #33bca8 as foreground color and #a5efd8 as background color. Create a gradient: Style=Linear Angle=130 Repeats=0 and fill the layer. Open ScrapMonti_IB-AnnaMarine-14-1-Paper2 Copy and paste as new layer. Move it down until shows some clovers at right side of the tag. Change blend mode to Overlay.

2. Using Pixelette font or another pixel font, write a quote, I used St. Patrick's Day - in white, size 6 (works for pixelette). Objects > Align > Center in canvas. Apply Mura's Meister > Copies > Tiling (Angle) > Only change Tile Gap to 2. Shadow: 1-0-65-2-Black. Change blend mode to Overlay.

3. Open ScrapMonti_IB-AnnaMarine-14-1-Element8.Resize 65%. Free Rotate: Right-30. Copy and paste as new layer. Move it far away top at middle. Duplicate and let the copy invisible. Apply a drop shadow on original element. Merge Visible. Rename the layer BACKGROUND.

4. Open ScrapMonti_IB-AnnaMarine-14-1-Element1. Flip. Resize 35%. Free Rotate: Right-25. Copy and paste as new layer. Move it tp middle down. Drop Shadow. Open ScrapMonti_IB-AnnaMarine-14-1-Element15. Resize 65%. Copy and paste as new layer. Move a little to left. Drop shadow.Open ScrapMonti_IB-AnnaMarine-14-1-Element3. Resize 44%. Free Rotate: Right-10. Copy and paste as new layer. Move it way down, keave out only the clovers.

5. Open ScrapMonti_IB-AnnaMarine-14-1-Paper6. Copy and paste as a new layer. Select all. Selections > Clip to Canvas. Image > Crop to Selection. Select all. Selections > Modify > Contract > 5. Delete. Add a close up of your tube. Move it to left. Add a suitable shadow. 

6. Open ScrapMonti_IB-AnnaMarine-14-1-Element4. Resize 9%. Free Rotate: Left-90. Copy and paste as new layer. I'm using the ladybug over the tube hand, if your tube is different you can use it over the flower or the clovers.

7. Open ScrapMonti_IB-AnnaMarine-14-1-Element18. Resize 20%. Mirror. Flip. Again, I'm using this clover on the hat of my tube. You can use it elsewhere or not use it at all.

--> Add your copyright info and # license. Add your name. I'm using Neuropol X Rg, the size depends of the lenght of the name.


ANIMATION PART

1. Click on background layer and copĂ˝. In Animation Shop paste as new animation and duplicate until you get 19 frames in total. Select all.

2. Open the animation SimoneAni313. Select all and copy. Paste into slected frame. Place it with top clover of animation over the clover of the element. Keep all frames selected.

3. Back to PSP. Leave BACKGROUND invisible. Open the copy of the lucky bag. Copy merged. Paste as new animation and copy. Edit > Propagate Paste. Paste into Selected frame. Cover the lucky bag with the copy that is with the frame. Save.