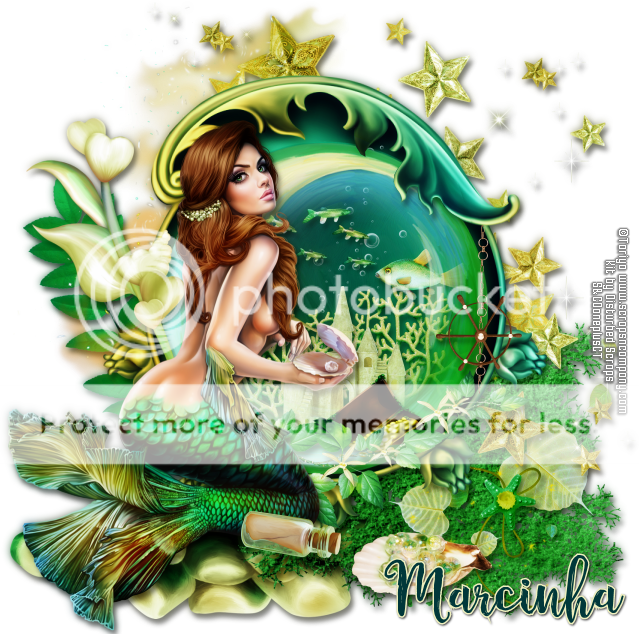
MERMAID'S AQUARIUM TUTORIAL
Tutorial written by Marcia Salgado on July 10th, 2016
for those who have a working knowledge of PSP.
I'm using PSP9 to create my tuts.
Any resemblance to any other tutorial is coincidental.
Do not copy and paste this tutorial anywhere on the net.
If you want to translate please ask first.
****************************************
Material:
Tube: "My Sweet Mermaid" by Toriya, you can purchase it here
do not use without the proper #license.
PTU Kit "My Sweet Mermaid" by Bibi's Collection, you can purchase it here
Font: Fairytales Script
****************************************
--> Remember to save often and use my tag as reference if necessary. Use a Drop Shadow of your preference on layers.
1. Create a new image 650X650.
2. Open BIBI-MY SWEETMERMAID ELEMS (100). Resize 60%. Copy and paste as new layer.
3. Select around the curved points on upper right. After had selected all parts, promote selection to a layer. Rename it TOP and let it invisible.
4. Click on original layer. Open BIBI-MY SWEETMERMAID ELEMS (46). Resize 45%. Flip. Copy and paste as new layer. Move it down and to left. Send this layer to bottom.
5. Open BIBI-MY SWEETMERMAID ELEMS (52). Resize 40%. Copy and paste as new layer. Move it down and to right.
6. Open BIBI-MY SWEETMERMAID ELEMS (87). Resize 50%. Mirror. Copy and paste as new layer. Place it over the previous element.
7. Open BIBI-MY SWEETMERMAID ELEMS (57). Resize 35%. Copy and paste as new layer. Again place it over the algae. Duplicate.
8. Open BIBI-MY SWEETMERMAID ELEMS (72). Resize 35%. Mirror. Copy and paste as new layer. Place it also over the algae.
9. Open BIBI-MY SWEETMERMAID ELEMS (95). Resize 45%. Mirror. Copy and paste as new layer. Move it a little down and to left.
10. Open BIBI-MY SWEETMERMAID ELEMS (30). Resize 50%. Copy and paste as new layer. Move it up and to right.
11. Open BIBI-MY SWEETMERMAID ELEMS (17). Resize 35%. Copy and paste as new layer. Move it up and to left.
12. Click on first visible layer (should be the second layer).
--> The next elements need to be placed inside the inner circle of the green element.
13. Open BIBI-MY SWEETMERMAID ELEMS (12). Resize 35%. Copy and paste as new layer. Place it a little up and a little to right. Duplicate. Mirror. Place it on right side of previous bubbles, a little mor up and a little more to right.
14. Open BIBI-MY SWEETMERMAID ELEMS (49). Resize 15%. Copy and paste as new layer. Place it on the bottom a little to left. Duplicate. Move it up and to right.
15. Open BIBI-MY SWEETMERMAID ELEMS (128). Resize 20%. Copy and paste as new layer. Place it on bottom and a very little to right.
16. Open BIBI-MY SWEETMERMAID ELEMS (73). Resize 20%. Copy and paste as new layer. Move it a little up.
17. Open BIBI-MY SWEETMERMAID ELEMS (7). Resize 15%. Mirror. Copy and paste as new layer. Move it to right.
18. Open BIBI-MY SWEETMERMAID ELEMS (15). Resize 70%. Copy and paste as new layer.
19. Click on TOP layer and turn it visible.
20. Open BIBI-MY SWEETMERMAID ELEMS (60). Resize 20%. Copy and paste as new layer.Move it down and to right, keep it over the glass at bottom.
21. Open BIBI-MY SWEETMERMAID ELEMS (24). Resize 45%. Copy and paste as new layer. Move it to left.
22. Open BIBI-MY SWEETMERMAID ELEMS (111). Resize 35%. Copy and paste as new layer. Move it down and place it over the glass at bottom.
23. Open BIBI-MY SWEETMERMAID ELEMS (93). Resize 15%. Copy and paste as new layer. Place it over the branch. Duplicate. Move it to another point on the branch. Duplicate. Resize 70%. Move it to another place still over the branch.
24. Open BIBI-MY SWEETMERMAID ELEMS (76). Resize 25%. Copy and paste as new layer. Move it to right. Place like it hanging on the curved part of the base frame.
25. Open BIBI-MY SWEETMERMAID ELEMS (75). Resize 25%. Copy and paste as new layer. Move it down and a little to right.
26. Open your tube. Resize. Copy and paste as new layer. I mirrored mine. Move it to left and place it over the stones. You may want to re-arrange some elements to better suit your tube.
27. Open BIBI-MY SWEETMERMAID ELEMS (16). Resize 20%. Copy and paste as new layer. Place it on the right side of the tube.
28. Use Crop > Merged Opaque to get rid of all extra spaces.
--> Add your copyright info and license#. Add your name and save as PNG.


