
INTO THE NIGHT TUTORIAL

Tutorial written by Marcia Salgado on March 27th, 2016
for those who have a working knowledge of PSP.
I'm using PSP9 to create my tuts.
Any resemblance to any other tutorial is coincidental.
Do not copy and paste this tutorial anywhere on the net.
If you want to translate please ask first.
****************************************
Material:
Tube: "Aurika Lovely", by Toriya, you can purchase it here
do not use without the proper #license.
PTU Kit "Aurika" by Bibis Collection, you can purchase it here
Mask: Dee's mask, DD_NFM_2015_3, here
Plugin: MuRa's Meister
Font: Esplanade Script PERSONAL USE
****************************************
--> Remember to save often and use my tag as reference if necessary. Use a Drop Shadow of your preference on layers.
1. Create a new image 650x650.
2. Add a new layer. Fill with #c5c5c5. Apply Dee's mask. Merge group.
3. Open BIBI-AURIKA ELEMS (8). Resize 80%. Copy and paste as new layer.
4. Open BIBI-AURIKA ELEMS (63). Copy and paste as new layer. Apply MuRa's Meister > Copies > Encircle as shown below.

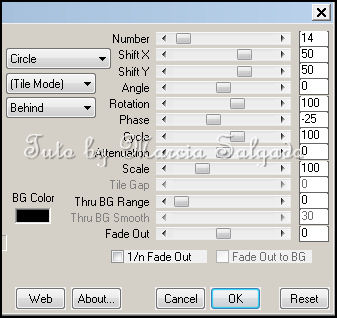
5. Open BIBI-AURIKA ELEMS (35). Resize 75%. Copy and paste as new layer. Apply MuRa's Meister > Copies > Encircle with the following settings:

6. Open BIBI-AURIKA ELEMS (13). Copy and paste as new layer.
7. Open BIBI-AURIKA ELEMS (9). Copy and paste as new layer.
8. Select inside the frame and expand > 16. Add a new layer and move it below the frame layer. open BIBI-AURIKA PAPERS (6). Copy and paste into selection. Keep selected.
9. Add a new layer and fill it with White. Low the layer opacity to 40. Apply Blinds with the follow options marked and invert the selection:

10. Open your tube and resize a little (or use a closeup). Copy and paste as new layer. Place it inside the frame and delete. Blend Mode: Luminance (L). Low the layer opacity to 26. Duplicate. Gaussian Blur: 4. Blend Mode: Soft Light. Increase the layer opacity to 100. Keep selected.
11. Open BIBI-AURIKA ELEMS (66). Resize 50%. Copy and paste as new layer. Place it inside the frame on its bottom right portion. When satisfied with placing hit delete. Keep selected.
12. Open BIBI-AURIKA ELEMS (43). Resize 25%. Copy and paste as new layer. Move it up and keep it inside the frame. Delete. Keep selected.
13. OPen BIBI-AURIKA ELEMS (82). Resize 40%. Copy and paste as new layer. Move it down and keep it inside the frame. Delete. Deselect.
14. Click on first layer (should be the black frame. Open BIBI-AURIKA ELEMS (61). Resize 15%. Copy and paste as new layer. Apply MuRa's Meister > Copies > Encircle with follow settings:
15. Open BIBI-AURIKA ELEMS (36). Resize 70%. Free Rotate: Left-45. Copy and paste as new layer. Move it down and to left. Place it over the frame bottom right border. Duplicate. Mirror. Place it on the bottom right side of the original flower.
16. Open BIBI-AURIKA ELEMS (23). Resize 50%. Move it down and a little to right. Place this leaf layer between the previous flowers layer. (Move it down one layer, then click on first layer to continue).
17. Open BIBI-AURIKA ELEMS (86). Resize 15%. Place it over the flowers.
18. Open your tube and resize it. Copy and paste as new layer. I mirrorred mine and move it to the left.
19. Select all. Clip to canvas. Crop to selection, to clean lost pixels from the closeup layer.
--> Add your copyright info and license#. Add your name and save as PNG.