
BLUE ANGEL TUTORIAL
Tutorial written by Marcia Salgado on February 19th, 2016
for those who have a working knowledge of PSP.
I'm using PSP9 to create my tuts.
Any resemblance to any other tutorial is coincidental.
Do not copy and paste this tutorial anywhere on the net.
If you want to translate please ask first.
****************************************
Material:
Tube: "Lola" by Alehandra Vanhek, you can purchase it here
do not use without the proper #license.
PTU Kit "Lola in White" by Chili Designz, you can purchase it here
Font: Nightamore
****************************************
--> Remember to save often and use my tag as reference if necessary. Use a Drop Shadow of your preference on layers.
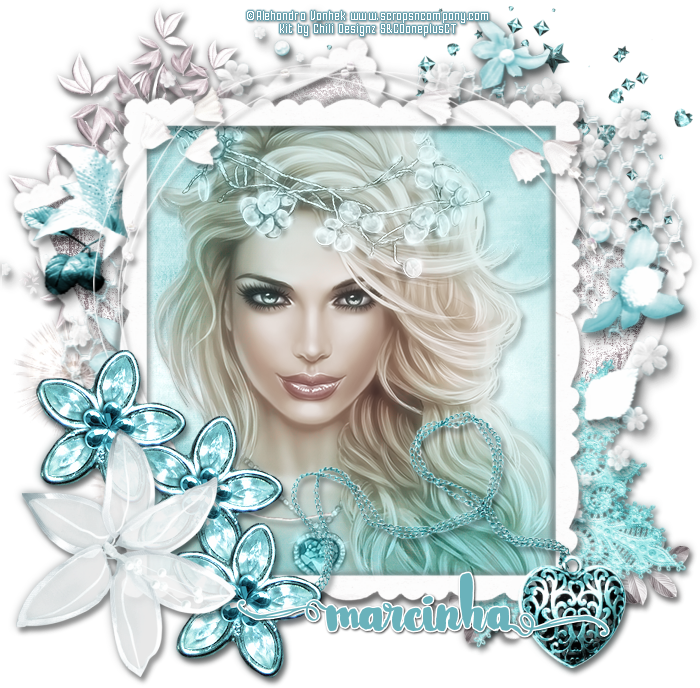
1. Create a new image 700x700.
2. Open CHILI_DESIGNZ_LolainWhite_frame2. Resize 70%. Copy and paste as new layer. Rename this layer FRAME. Duplicate. Resize 85%. Free Rotate: Left-25.
3. Select inside the copy of the frame. Expand > 5. Add a new layer and move it below copy of the frame layer. Open CHILI_DESIGNZ_LolainWhite_paper10. Copy and paste into selection. Add a shadow to copy of the frame and merge down. Move it a little up. Rename this layer F1. Duplicate. Mirror. Move it a little down. Rename this layer F2.
4. Click on layer FRAME and bring it up.
5. Click on very bottom layer. Open CHILI_DESIGNZ_LolainWhite_tree. Resize 60%. Erase the tree trunk. Copy and paste as new layer. Move it up and to left.
6. Open CHILI_DESIGNZ_LolainWhite_bling2. Resize 60%. Copy and paste as new layer. Move it up and to right.
7. Click on F1 layer. Open CHILI_DESIGNZ_LolainWhite_deco9. Resize 85%. Copy and paste as new layer. Move it to left and a little down.
8. Click on F2 layer. Open CHILI_DESIGNZ_LolainWhite_leaves6. Resize 65%. Flip. Copy and paste as new layer. Move it down and to right.
9. Open CHILI_DESIGNZ_LolainWhite_lace2. Resize 55%. Free Rotate: Right-25. Copy and paste as new layer. Move it down and to right. Place over the grey leaves.
10. Open CHILI_DESIGNZ_LolainWhite_wreath; Resize 85. Copy and paste as new layer. Move it up and to right.
11. Cçick on FRAME layer. Select nside the frame. Expand > 5. Add a new layer and move it below the FRAME layer. Open CHILI_DESIGNZ_LolainWhite_paper. Cpoy and paste into selected frame. Keep selected.
12. Invert the selection. Open your tube. Resize if needed. Copy and paste as new layer. Position it inside your frame. Delete. Select all. Clip to canvas. Crop to selection. Blend Mode: Luminace (Legacy). Low the layer opacity to 70. Duplicate. Gaussian Blur: 4. Blend Mode: Soft Light. Increase the layer opacity to 100.
13. Open CHILI_DESIGNZ_LolainWhite_deco3, Resize 75%. Copy and paste as new layer. Move it a little up and a little right.
14. Open CHILI_DESIGNZ_LolainWhite_heart. Resize 75%. Copy and paste as new layer. Move it down and to right.
15. Open CHILI_DESIGNZ_LolainWhite_gem4. Copy and paste as new layer. Duplicate it twice. With the 3 flower layers create a semi circle over the left bottom corner of the frame.
16. Open CHILI_DESIGNZ_LolainWhite_flower. Resize 55%. Copy and paste as new layer. Place it over the left bottom corner of the frame.
--> Add your copyright info and license#. Add your name and save as PNG.