
PINK SEA TUTORIAL
Tutorial written by Marcia Salgado on June 18th, 2015
for those who have a working knowledge of PSP.
Any resemblance to any other tutorial is coincidental.
Do not copy and paste this tutorial anywhere on the net.
If you want to translate please ask first.
****************************************
Material:
Tube: "Helena Mermaid" by Elias Chatzoudis, you can purchase it here
do not use without the proper #license.
the license used is from former MPT tube company
PTU Kit "Pink Beach Party" by Michelle's Myths,
you can purchase it Smiley Creations Shop or PFD
Mask: dmsk0670 made by Diana Todd - she is no longer online - here
Font: BlackJack
****************************************
--> Remember to save often and use my tag as reference if necessary. Used the Drop Shadow: 1-1-50-5 16 or 1-1-65-2 #404040 in most layers.
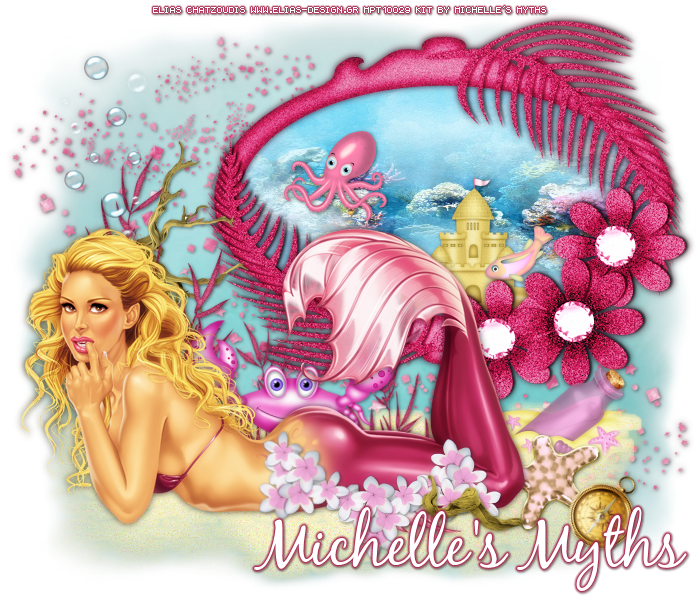
1. Create a new image 700x600. Open PinkBeachParty_MM_Paper (10). Copy and paste as new layer. Apply Diana's mask. Merge group.
2. Open PinkBeachParty_MM_Element (101). Copy and paste as new layer. Move it to top left corner. Duplicate. Mirror. Flip. Merge down.
3. Open PinkBeachParty_MM_Element (78). Move it down. Apply Diana's mask again. Merge group.
4. Open PinkBeachParty_MM_Element (24). Copy and paste as new layer. Move it upper right.
5. Create an oval selection using Freehand Selection. Add a new layer and move it below the frame layer. Open PinkBeachParty_MM_Paper (7). Copy and paste into selection. Deselect.
6. Open PinkBeachParty_MM_Element (46). Resize 30%. Copy and paste as new layer. Move it to right bottom inside the frame.
7. Open PinkBeachParty_MM_Element (33). Resize 20%. Copy and paste as new layer. Move it to bottom right inside the frame and place it over the castle, on its right middle part.
8. Open PinkBeachParty_MM_Element (49). Resize 20%. Copy and paste as new layer. Move it to left inside the frame.
9. Click on first layer (should be the frame layer). Open PinkBeachParty_MM_Element (23). Resize 50%. Copy and paste as new layer. Move it to left. Duplicate and move it a little to right and down. Repeat and merge these three layers together.
10. Open PinkBeachParty_MM_Element (9). Resize 50%. Copy and paste as new layer. Move it to left. Place it over the first pink branch (first from left).
11. Open PinkBeachParty_MM_Element (42). Resize 60%. Copy and paste as new layer. Move it a bit to left and down.
12. Open PinkBeachParty_MM_Element (85). Resize 60%. Copy and paste as new layer. Move it way left.
13. Open PinkBeachParty_MM_Element (43). Resize 30%. Copy and paste as new layer. Move it to right and down.
14. Open PinkBeachParty_MM_Element (30). Resize 40%. Copy and paste as new layer. Move it to right and down.
15. Open PinkBeachParty_MM_Element (4). Resize 20%. Copy and paste as new layer. Move it to right and down.
16. Open your tube. Resize it if needed. Copy and paste as new layer. Move it down. Add a suitable shadow.
17. Open PinkBeachParty_MM_Element (68). Resize 50%. Copy and paste as new layer. Move it down and place it in front of your tube. Duplicate it twice and using mirror and flip arrange them in a line. Merge this three layer together.
18. Open PinkBeachParty_MM_Element (13). Resize 30%. Copy and paste as new layer. Move it down and place it in front of the flowers. Rearrange all elements to fit better your tube.
--> Resize it if wanted. Add your copyright info and license#. Add your name and save as PNG.