AMANDA TUTORIAL
Tutorial written by Marcia Salgado on March 7th, 2015
for those who have a working knowledge of PSP.
Any resemblance to any other tutorial is coincidental.
Do not copy and paste this tutorial anywhere on the net.
If you want to translate please ask first.
****************************************
Material:
Tube: Souldesigner, you can purchase it here
PTU Kit "Amanda" by Kizzed By Kelz Kits, you can purchase it here
Template by Divine Intentionz here
Filter: AP Lines
Font: Oxida
****************************************
--> Remember to save often and use my tag as reference if necessary.
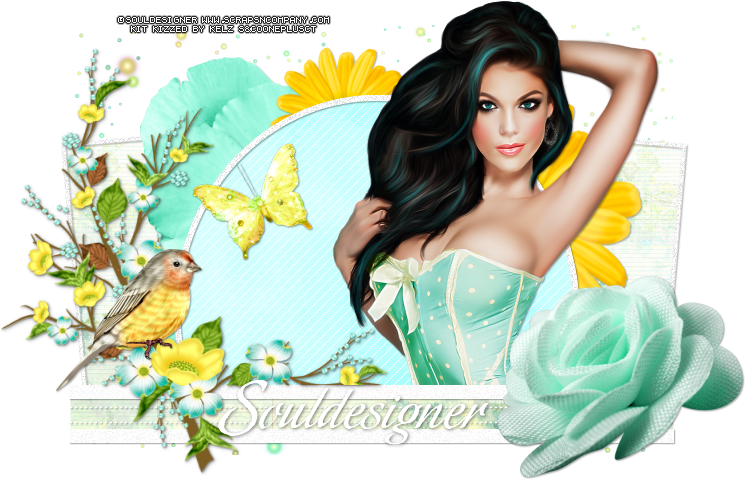
1. Open template. Duplicate. Close original. Delete layers: by missy, words and raster 1. Open element 'KBK_Amanda (132)'. Copy and paste as new layer. Layers > arrange > send to bottom. Open element 'KBK_Amanda (35)'. Copy and paste as new layer. Resize 70%. Move it to the right. Duplicate. Mirror.
2. Open paper 'KBK_Amanda (29)'. Go to your Material Palette and change the foreground color to pattern. Look for the paper. Change match mode to RGB Value. Select square1 layer and fill it. Select square 2 layer and do the same. Select thin rectangle1 layer and repeat.
3. Select 'frame1' layer. Add Noise > Uniform-30-Monochrome. Drop Shadow: 1-1-35-2 black. Select 'frame2' layer. Add Noise > Uniform-30-Monochrome. Same shadow. Open element 'KBK_Amanda (60)'. Copy and paste as new layer. Resize 50%. Move it to the left, around the circle border. Duplicate. Mirror. Move it a little bellow the first petals we added. Same shadow.
4. Open element 'KBK_Amanda (62)'. Copy and paste as new layer. Duplicate. On the original layer > Resize 60%. Arrange it to the right around the circle border. Add shadow 1-1-35-2 black. On the duplicated layer > Resize 30%. Arrange it to the upper part of the circle border next to the petals we added. Same shadow.
5. Open paper 'KBK_Amanda (20)' with the flood fill tool change to pattern. Find the paper. Change match mode to RGB Value. Select layer 'circle' and fill it. Plugins > AP [Lines] > SilverLining > Breaks - change the three color[R] to 255 - create lines not gaps checked.
6. Select 'frame3' layer. Adjust > Color Balance > Manual Color Correction > First square color: #fec5d8 Second square color: #ffffff. Add Noise > Uniform-30-Monochrome. Same shadow.
7. Open your tube. Copy and paste as new layer. Resize as you like. Arrange it to the right. With the eraser tool clean the parts of the tube that appears under the bottom rectangles. Add a suitable shadow.
8. Select 'thin rectangle2' layer. Manual Color Correction > First square color: #fec5d8 Second square color: #ffffff. Add Noise > Uniform-10-Monochrome. Drop shadow 1-1-35-2 black. Select 'thin rectangle3' layer. Manual Color Correction > First square color: #fec5d8 Second square color: #ffffff. Add Noise > Uniform-10-Monochrome. Same shadow.
9. Select 'dotted line1' layer. Manual Color Correction > First square color: #fec5d8 Second square color: #ffffff). Same shadow. Select 'dotted line2' layer. Manual Color Correction > First square color: #fec5d8 Second square color: #ffffff. Same shadow.
10. Open element 'KBK_Amanda (6)'. Copy and paste as new layer. Resize 80%. Move it to the left. Same shadow. Open element 'KBK_Amanda (69)'. Copy and paste as new layer. Resize 50%. Mirror. Move it to the bottom right of the rectangle. Same shadow.
11. Open element 'KBK_Amanda (15)'. Select the yellow butterfly. Copy and paste as new layer. Resize 50%. Free Rotate: Left-25. Move it to the left, inside the circle. Same shadow. Open element 'KBK_Amanda (9)'. Copy and paste as new layer. Resize 30%. Move it to the left above the branch.
--> Resize if wanted. Add your copyright and # license. Add your name. I used Oxida/Size: 48. Save as PNG.

