NATURAL LIFE TUTORIAL
Tutorial written by Marcia Salgado on June 14th, 2016
for those who have a working knowledge of PSP.
I'm using PSP9 to create my tuts.
Any resemblance to any other tutorial is coincidental.
Do not copy and paste this tutorial anywhere on the net.
If you want to translate please ask first.
****************************************
Material:
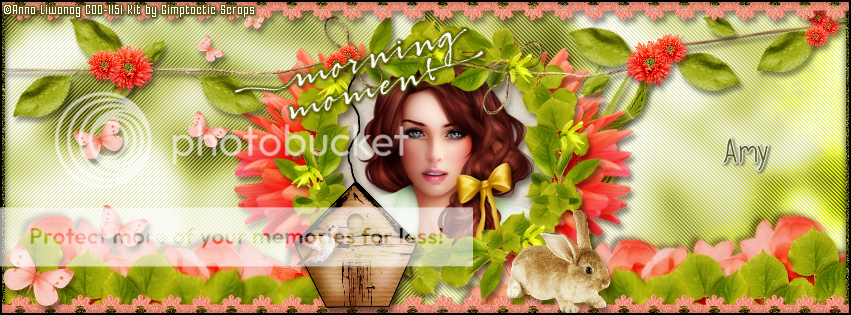
Tube: "Individual Tube 70-2" by Anna Liwanag, you can purchase it here,
do not use without the proper #license.
PTU Kit "Morning Moment" by Gimptastic Scraps,
you can purchase it here
Plugin: MuRa's Meister, Penta.com and Eye Candy 6
Font: AppleJaxPro
****************************************
--> Remember to save often and use my tag as reference if necessary. Use a drop shadow of your preference on layers.
1. Create a new image 851x315.
2. Open GS-MorningMoment_paper4. Copy and paste as new layer. Move the paper to chose the area you want to show.
3. Open your tube. Copy and paste as new lyer. Apply MuRa's Meister > Copies > Wall Paper (rotate) with default settings. Use Penta.com > Jeans also with default settings. Custom Selection: Top-0, Right-425, Bottom-315 and Left-0. Mirror. Deselect. Blend Mode: Luminance (or chose other).
4. Open GS-MorningMoment_ele28. Copy and paste as new layer. Select tiny part of the stem at the right side, as I show below. Promote selection to layer. Using Deform Tool stretch it all the way to right. If needed fix the placement. Do the same on left side. Merge this 3 layers together.

5. Open GS-MorningMoment_ele18. Resize 65%. Copy and paste as new layer.With Deform Tool (or Pick in PSP new versions) rotate the element to right. Move it below the frme layer and to right.
6. Open GS-MorningMoment_ele21. Resize 55%. Copy and paste as new layer. Rotate it to right with same way you did before. Place it over the previous grass.
7. Open GS-MorningMoment_ele24. Resize 55%. Copy and paste as new layer. Move it down. Duplicate and using Mirror, rotate, flip create a line at the bottom. Merge all roses layer after the line is done.
8. Open GS-MorningMoment_ele15. Resize 35%. Flip. Copy and paste as new layer. Do the same you did with the roses with the leaves. Create a line at bottom.
9. Open GS-MorningMoment_ele30. Copy and paste as new layer. Move it to left a liitle. Duplicate. Mirror, may need to move it a little more to right.
10. Click on frame layer and select it inside (use freehand selection and not the magic wand). Add a new layer and move it below the frame layer. Open GS-MorningMoment_paper6. Copy and paste into selection. Invert selection.
11. Open your tube. Resize if needed. Copy and paste as new layer. Place it inside the frame. Delete. Select all. Clip to canvas. Crop to selection.
12. Click on frame layer again. Open GS-MorningMoment_ele32. Resize 25%. Copy and paste as new layer. Use the Deform Tool (Pick on PSP newer versions) to rotate it a little to left or eight. Place it on frame stem. Duplicate. Use Mirror or Flip and Deform Tool again to add some leaves to the stem.
13. Open GS-MorningMoment_ele30. Resize 20%. Copy and paste as new layer. Do the same with the flowers and use her on some places over the stem.
14. Add a new layer. Select all and fill it with #505503. Contract > 5. Delete. Deselect. Use Noise 55 - Random - Monochrome.
15. Open GS-MorningMoment_ele37. Copy and paste as new layer. Move it way up. Duplicate. Flip. Merge down.
16. Open GS-MorningMoment_ele2. Resize 35%. Copy and paste as new layer. Move it down and to left. Place on the right side of the frame.
17. Open GS-MorningMoment_ele23. Resize 50%. Copy and paste as new layer. Move it a little down and to left. Place it over the frame border.
18. Open GS-MorningMoment_wordart. Resize 50%. Copy and paste as new layer. Rotate it to left and place it over the framer on left at the top. Using Eye Candy 6 > Gradient Glow and color #505503 add a thin border to the wordart.
19. Open GS-MorningMoment_ele40. Resize 65%. Mirror. Copy and paste as new layer. Move it to left.
20. Open GS-MorningMoment_ele34. Resize 20%. Mirror. Copy and paste as new layer. Move it down. Place it near the birdhouse door.
--> Add your copyright info (no URL by Facebook TOU) and license#. Add your name. Save as PNG.
--> Sometimes I had to change my Timeline size to 846x313 because when I add it to Facebook the image has extra pixels and do not fit perfectly. So try this size if the same is happening to you.
-------------------------------------------------------------
My idea for the FB Picture Profile