
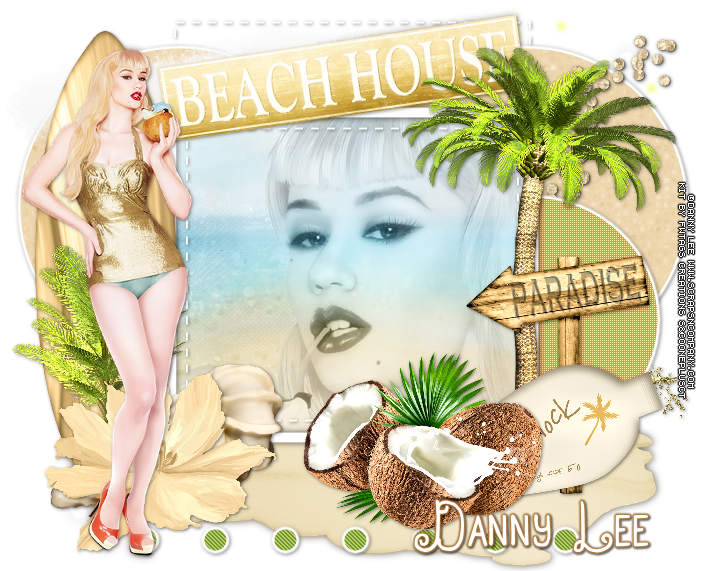
COCO FLASH TUTORIAL
Tutorial written by Marcia Salgado on March 5th, 2015
for those who have a working knowledge of PSP.
Any resemblance to any other tutorial is coincidental.
Do not copy and paste this tutorial anywhere on the net.
If you want to translate please ask first.
****************************************
Material:
do not use without the proper #license.
PTU Kit 'Coco Flash' by FwTags Creations,
My Template, here.
Plugins: Penta.com > Jeans and Color Dot
Eye Candy > Gradient Glow
Font: DJB Holly Enchanted
****************************************
--> Remember to save often, use my tag as reference for elements placement.
1. Open my template. Duplicate and close the original. Delete the © layer. Click on back layer. Open FwTagsCocoFlashELEMENT (24). Resize 70%. Copy and paste as new layer. Move it to top right. Duplicate. Mirror. Flip. Merge Down. Click on dotted rectangle. Drop Shadow: 1-1-85-2-Black.
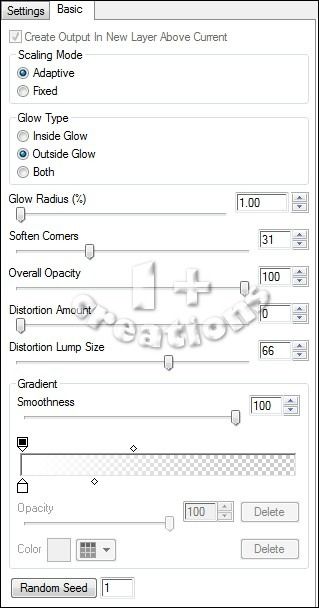
2. Click on big circle right layer. Merge down. Select both circles. Open FwTagsCocoFlashPAPER (4). Resize 80%. Copy and paste as new layer. Invert selections and delete. Apply Eye Candy > Gradient Glow -> twice. Settings below. Drop Shadow: 1-1-50-5-Black. Delete big circle left layer.
3. Open FwTagsCocoFlashELEMENT (34). Resize 50%. Copy and paste as new layer. Move it in front the upper left circle. Open FwTagsCocoFlashELEMENT (13). Resize 40%. Mirror. Copy and paste as new layer. Move it to upper right, in front of right big circle. Same shadow. Click on small circle right later. Merge dowm. Change the color to #d79952. Apply Penta.com > Color Dot > Default (90,2,255,255,255). Use the Eye Candy > Gradient Glow. Same drop shadow.
4. Click on big rectangle layer. Open FwTagsCocoFlashELEMENT (18). Resize 65%. Copy and paste as new layer. Move it middle bottom, in front of the black rectangle. Drop Shadow: 0-1-35-10-Black. Delete big rectangle layer. Open FwTagsCocoFlashPAPER (1). Copy. Click on big square layer. Select it. Paste Into Selection. Invert selection. Copy and paste as new later the close up of your tube. Delete. Deselect. Hue and Saturation > 0,0. Change blend mode to Luminance (Legacy) and low layer opacity > 58. Click on line circle frame and change the color to #76932b. Apply Penta.com > Jeans > Default (62,4). Drop Shadow: 1-1-50-5-Black. Click in dotted frame layer. Same drop shadow. Click on frame layer. Drop Shadow: 0-0-70-10-Black.
5. Open FwTagsCocoFlashELEMENT (36). Resize 40%. Free Rotate: Left-8. Copy and paste as new layer. Move it middle top of white frame. Drop Shadow: 1-1-50-5-Black. Open FwTagsCocoFlashELEMENT (2). Resize 50%. Copy and paste as new layer. Move it to far left. Same shadow. Open FwTagsCocoFlashELEMENT (17). Resize 30%. Copy and paste as new layer. Place it in front of the surfboard. Same shadow. Open FwTagsCocoFlashELEMENT (43). Resize 30%. Mirror. Copy and paste as new layer. Leave it in front of the little tree at the bottom. Open FwTagsCocoFlashELEMENT (59). Resize 30%. Copy and paste as new layer. Move it to bottom, in front of the seashell.
6. Open FwTagsCocoFlashELEMENT (15). Resize 45%. Copy and paste as new layer. and place it on the right side of the frame. Same shadow. Open FwTagsCocoFlashELEMENT (45). Resize 30%. Mirror. Copy and paste as new layer. Move it to right side of the palm tree. Same shadow. I added a word to the sign. Open FwTagsCocoFlashELEMENT (48). Resize 30%. Copy and paste as new layer. Move it in front of the palm tree at bottom. Same shadow. Open FwTagsCocoFlashELEMENT (63). Resize 30%. Copy and paste as new layer. Place it almost in the bottom middle. Same shadow.
7. Place your tube on the left side. Adjust some elements to better fit your tube. Add a suitable shadow. Resize if wanted. Add copyright info and proper # license. Add your name. Save as PNG.