
ANYA TUTORIAL
Tutorial written by Marcia Salgado on March 22th, 2015
for those who have a working knowledge of PSP.
Any resemblance to any other tutorial is coincidental.
Do not copy and paste this tutorial anywhere on the net.
If you want to translate please ask first.
****************************************
Material:
Tube: Vi Nina, you can purchase it here,
do not use without the proper #license.
PTU Kit "Dreams" by Bibi's Collection Scraps, you can purchase it here
Font: OlgaCTT
****************************************
--> Remember to save often and use my tag as reference if necessary. Used the Drop Shadow: 1-1-50-5 in most layers.
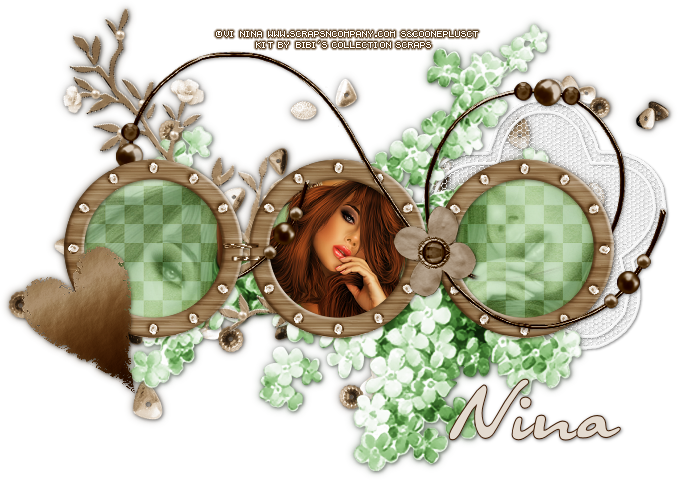
1. Create a new image 700x500. Open BIBIDREAMS ELEMS (12). Resize 75%. Cpoy and paste as new layer. Open BIBIDREAMS ELEMS (51). Resize 45%. Copy and paste as new layer. Move it to upper right.
2. Open BIBIDREAMS ELEMS (83). Copy and paste as new layer.Open BIBIDREAMS ELEMS (41). Resize 60%. Free Rotate: Left-35.
3. Open BIBIDREAMS ELEMS (38). Copy and paste as new layer. With the magic wand select inside the frames. Expand > 4. Invert selection. Open BIBIDREAMS PAPERS (1). Resize 45% Copy and paste as new layer. Delete. Keep Selected. Move thsi layer below frame layer. Open BIBIDREAMS PAPERS (9). Resize 45%. Copy and paste as new layer. Delete. Change Blend mode to Soft Light. Keep selected.
4. Open your tube close up. Copy and paste as new layer. Move it over left frame to show only a part of the tube. Delete. Keep selected. PAste the close up once more. Move it over right frame and show another part of the tube. Delete. Keep selected. Merge down and move it under the plaid paper. Colorize: 0,0. Change Blend Mode to Luminance (Legacy). Decide here if you want to low the layer opacity.
5. Click on frame layer. Resize your tube. Copy and paste as new layer. Move it over the center frame. Delete. Deselect now. Move it under the frame layer. Select All. Selections > Clip To Canvas. Image > Crop To Selection. Apply a suitable shadow.
6. Click on first layer. Open BIBIDREAMS ELEMS (40). Copy and paste as new layer. Move it over the frames until the flower of element is between right frame and middle frame. Duplicate. Move this layer to bottom. Click on first layer and erase the part os over the right and left frames. The copy will civer any eraser mistake, so no worry.
7. Open BIBIDREAMS ELEMS (43). Resize 45%. Mirror. Copy and paste as new layer. Move it far left over the frame.
--> Add your copyright info and #license. Add your name and save as PNG.