
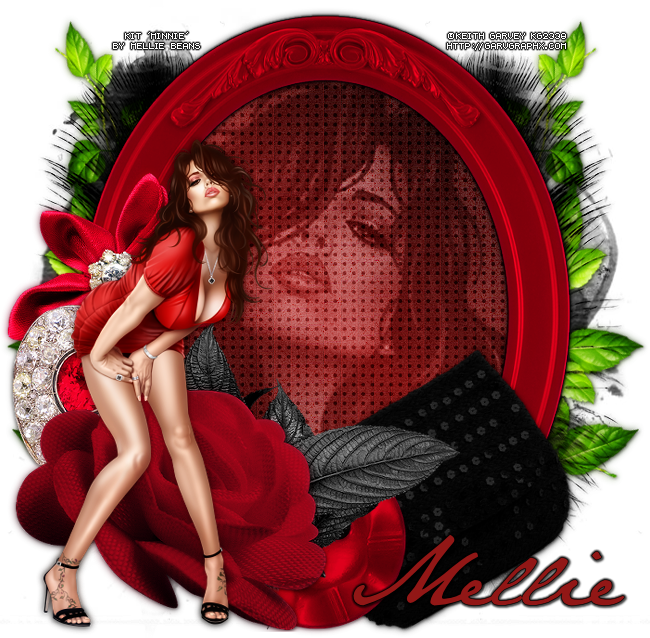
GLAMMED UP TUTORIAL
Tutorial written by Marcia Salgado on January 18th, 2015
for those who have a working knowledge of PSP.
Any resemblance to any other tutorial is coincidental.
Do not copy and paste this tutorial anywhere on the net.
If you want to translate please ask first.
**********************************
Materials:
Tube: Used Keith Garvey - you can purchase it here ,
use it with a proper #license
PTU Kit 'Glammed Up' by Mellie Beans you can purchase it here
Eye Candy 6 - Gradient Glow (click twice to install my preset)
PSP Effects
Font: Jane Austen
**********************************
--> I changed the blend mode of some elements to increase the red color, you can jump this step if you don't want to do the same.
**********************************
1. Open a new image of 700x700. Open the paper pp10. Copy and paste as new layer. Selection > Select All. Selections > Clip to Canvas. Image > Crop to Selection. Apply Dee's mask. Layers > Merge > Merge Group.
2. Pick 2 colors from your tube - a dark and a light one - use your dark color as foreground color and the light as background color. Create a Gradient: Style= linear Angle= 45 Repeats= 1. Open the frame e17 and copy and paste as new layer. Resize it 80%. Leave it at the center of the image. Rename it FRAME. Click inside the frame with the magic wand - Selections > Modify > Expand= 2. Add a new layer and move it below the FRAME layer. Fill it with the gradient. Effects > Distortion Effects > Pixelate > Block width= 18 Block height= 1. Effects > Edge Effects > Enhance More. Adjust > Add/Remove Noise > Add Noise > Gaussian Noise= 11% Monochrome marked. Open the paper pp07. Resize it 20%. Change your foreground color to pattern and look for the paper. Add a new layer and fill it with the paper using your Flood Fill Tool. Change the blend mode to Soft Light Opacity= 66.
3. Keep selected. Open your Tube Close-Up and copy and paste it as new layer. Move it where you want it inside the frame. Selections > Invert. Press delete on your keyboard. Selection > Select None. Adjust > Hue and Saturation > Colorize > Hue= 0 Saturation= 0. Blend mode = Soft Light. Drop Shadow: H-V= 0 Opacity= 70 Blur= 10 Color= Black.
3. Duplicate FRAME layer. Change the Blend mode to Soft Light. Click on orinal frame layer Eye Candy 6 > Gradient Glow and use my Lust Border preset. Add a Drop Shadow > H-V= 0 Opacity= 70 Blur= 10 Color= Black.
4. Click on first layer. Open the element e49. Copy and paste as new layer. Image > Rotate > Free Rotate > Direction= Right Degree= 30 - All layers and Rotate single layer not marked. Move it to the right edge of the frame (see my tag for reference). Duplicate. Image > Mirror. Layers > Merge > Merge Down. Move this layer below FRAME layer. Drop Shadow: H-V= 1 Opacity= 55 Blur=5 Color= Black.
5. Click on first layer again. Open the element e40 and move it to the right edge of the frame, not too much, see my tag as reference . Duplicate. Image > Mirror. Layers > Merge > Merge Down. Move this layer below FRAME layer. Mine is darker because I duplicated the layer. Drop Shadow: H-V= 1 Opacity= 55 Blur=5 Color= Black.
6.Open the element e15. Resize 34%. Copy and paste as new layer and move it to the middle of the frame at the left side. Duplicate. Blend mode > Soft light. Click on original layer. Drop Shadow: H-V= 1 Opacity= 55 Blur=5 Color= Black.
7. Open the element e24. Resize 55%. Copy and paste as new layer and place it over the flower at the left side if the frame. Duplicate. Blend mode > Soft light. Click on original layer. Drop Shadow: H-V= 1 Opacity= 55 Blur=5 Color= Black.
8. Open element e18. Resize 52%. Copy and paste as new layer and place it on middle at the bottom of the frame. Duplicate. Blend mode > Soft light. Click on original layer. Drop Shadow: H-V= 1 Opacity= 55 Blur=5 Color= Black.
8. Open element e10. Resize 52%. Copy and paste as new layer and place it on the left bottom side of the frame. Over the heart jewel and button. Duplicate. Blend mode > Soft light. Click on original layer. Drop Shadow: H-V= 1 Opacity= 55 Blur=5 Color= Black.
9. Open element e16. Resize 64%. Copy and paste as new layer and place it between the rose and the button. After you are satisfied with the leaves' placement, erase the parts shown at the bottom of the rose. Drop Shadow: H-V= 1 Opacity= 55 Blur=5 Color= Black.
10. Open element e32. Resize 52%. Copay and paste it as new layer and move it below the button layer at the right side of the frame. Image > Rotate > Free Rotate > Direction= Left Degree= 30 - All layers and Rotate single layer not marked.
11. Click on first layer. Add your tube and place it at the left side of the tag. After I finished my tag I resized all layers to Width: 650 px. Add the copyright info and your name. Save it as PNG format.