
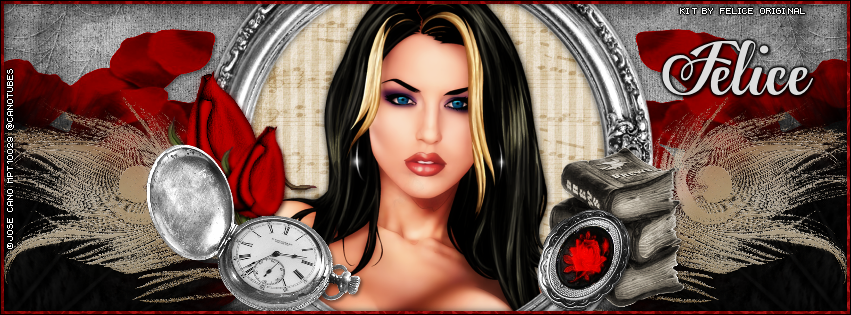
BLOODY ROSES FB TIMELINE

*Click on image to see the original size*
Tutorial written by Marcia Salgado on January 20th, 2015
for those who have a working knowledge of PSP.
Any resemblance to any other tutorial is coincidental.
Do not copy and paste this tutorial anywhere on the net.
If you want to translate please ask first.
****************************************
Material:
Tube: Jose Cano, you can purchase it here
do not use without the proper #license.
I'm using my MPT license.
I'm using my MPT license.
Font: Egregio Script Demo
****************************************
PROFILE COVER
1. Open a new image 851x315. Open the paper FOBlRo9. Go to your material palette and change the foreground color to pattern, look for the paper we open now and use the settings: Angle= 0 Scale= 50. Add a new layer and fill it with the pattern.
2. Open FOCobweb2. Resize 40%. Copy and paste as new layer. Move it to right side. Leave only half of web showing. Diplicate and mirror. Merge down. Drop Shadow: H-V= 1 Opacity= 85 Blur= 2 Color= Black. Change Blend Mode to Soft Light.
2. Open FOFeatherFan. Copy and paste it as new layer. Move it to the bottom right of the image. Only 1/4 of the fan showing. See my image as reference. Duplicate and mirror. Merge down.
3. Open FORosePetals1. Resize it 50%. Copy and paste as new layer and move under the left side fan. Duplicate and mirror. Merge down. Drop Shadow: H-V= 2 Opacity= 50 Blur= 5 Color: Black.
4. Open FOFrameCirclePic. Resize 80%. Copy and paste as new layer.
5. With the magic wand click inside the circle frame. Selections > Modify > Expand > 5. Add a new layer and move it below frame layer. Open paper FOBlRo7 and use it as pattern with the same settings of step 1. Fill the selection. Add a new layer, open paper FOBlRo10 and use it as patter as before and fill the layer. Change the blend mode to Soft Light. Keep selected.
6. Add your tube close up, place it where you want it. Slection > Invert. Delete. Section > Select None. Add same drop shadow on tube and frame: H-V= 0 Opacity= 70 Blur= 10 Color= Black.
7. Open FOPeacockFeather. Resize 25%. Copy and paste as new layer and place it to the left size of the frame. Move the layer below the circle frame layer. Duplicate and mirror. Merge down.
8. Click on the frame layer. Open FOPocketWatch. Resize 45%. Copy and paste as new layer. Move it to left side of the frame. Drop Shadow: H-V= 1 Opacity= 85 Blur= 2 Color= Black.
9. OPen FORoseBud. Resize 40%. Mirror. Copy and paste as new layer. Move it under the pocket watch and place it behind it, move it upward a little. Duplicate. Resize 80%. Image > Rotate > Free Rotate > Right-25. Arrange it over the first rose. See my image as reference. Merge down. Drop Shadow: H-V= 1 Opacity= 85 Blur= 2 Color= Black.
10. Open FOSpellBooks. Resize 40%. Copy and paste as new layer. Move it to the right side of the frame. Drop Shadow: H-V= 1 Opacity= 85 Blur= 2 Color= Black.
11. Open FOLocket. Resize 50%. Copy and paste as new layer. Erase the chain off. Place it over the books. Drop Shadow: H-V= 1 Opacity= 85 Blur= 2 Color= Black.
12. Add a new layer. Open paper FOBlRo4. Use it as pattern and fill the layer. Select all. Selections > Modify > Contract > 4. Delete. Drop Shadow: H-V= 0 Opacity= 70 Blur= 10 Color= Black. Add a new layer, fill it with black. Select all. Selections > Modify > Contract > 1. Delete.
--> Add your copyright and name.
PROFILE PICTURE
1. Open a new image 180x180. Open paper FOBlRo9, copy and paste as new layer.
2. Open FOFeatherFan. Image > Rotate > Free Rotate > 90. Resize 30%. Copy and paste as new layer and move it to the left. Leave a piece of background showing.
3. Open FORosePetals1. Resize 40%. Copy and paste and move it to tthe left.
4. Open your tube. Copy and paste as new layer. Resize it to fit the image. Drop Shadow: H-V= 0 Opacity= 70 Blur= 10 Color= Black.
5. Open paper FOBlRo4. Copy and paste as new layer. Select all. Selections > Modify > Contract > 4. Delete. Drop Shadow: H-V= 0 Opacity= 70 Blur= 10 Color= Black. Add a new layer, fill it with black. Select all. Selections > Modify > Contract > 1. Delete.
--> Add your copyright and inicial.