Showing posts with label Facebook Cover. Show all posts

December 4, 2016

Ice kit


**Click to see original size**


== NEW PTU TAG TINY TURTLE DESIGNS CT ==


Featuring "Ice", Tiny Turtle Design kit at TinyTurtleDesign Store.

Tiny Turtle Design kit has 34 papers and 114 elements so you can play with it. 

Tiny Turtle Design kit can be found  at:
-> TinyTurtleDesign Store, here 


November 30, 2016

Hunni Bear

HONEY BEAR TUTORIAL

**Click to see original size**

Tutorial written by Marcia Salgado on November 30th, 2016
for those who have a working knowledge of PSP.
I'm using PSP9 to create my tuts.
Any resemblance to any other tutorial is coincidental.
Do not copy and paste this tutorial anywhere on the net.
If you want to translate please ask first. 

****************************************
Material:

PTU Kit "Hunni Bear" by Hungry Hill,
you can purchase it here 
Plugin: MuRa's Meister > Cloud
Font: Cherry Swash 

****************************************

--> Remember to save often and use my tag as reference if necessary. Use a drop shadow of your preference on layers.

1. Create a new image 851x315.

2. Add new layer and fill with #c0c0c0.

3. Add a new layer and use MuRa's Meister > Cloud with #3790c8 as foreground color and white as background colors with following settings:


4. Open bush. Resize 30%. Copy and paste as new layer.Move it down and midway to left. Duplicate and wove it to right.

5. Open flower-bush. Resize 30%. Copy and paste as new layer. Move it down and place on left side of the previous plant. Duplicate and do the same on right side.

6. Open curvy-branch. Resize 70%. Copy and paste as new layer.

7. Select inside the frames. Add a new layer. Expand > 5. Move this layer below frame layer. Open paper 2. Copy and paste into selection. Deselect.

8. Open flower-4. Resize 30%. Copy and paste as new layer. Move it way down.

9. Open bear-1. Resize 50%. Copy and paste as new layer. Place it inside the middle frame. Erase all unwanted parts. 

10. Open bear-2. Resize 45%. Copy and paste as new layer. Place it inside the right frame. Erase all unwanted parts. Duplicate. Mirror. Resize 85%. Place it inside the left frame.

11. Select all. Clip to canvas. Crop to selection.

12. Click on frame layer. Open vine-circle. Resize 50%. Copy and paste as new layer. Move it way to left. Show only half circle. Duplicate. Mirror.

13. Select left frame. Open paper 1. Select pattern on foreground. Size 50%. Fill only left side frame. Deselect. Duplicate. Mirror.

14. Open flower-1. Resize 30%. Copy and paste as new layer. Place inside the left big frame. Duplicate. Mirror.

14. Click on first layer. Open bumblybee-1. Resize 30%. Copy and paste as new layer. Move it a little to left.

15. Open bumblybee-2. Resize 30%. Copy and paste as new layer. Move it to right.

16. Open WordArt. Resize 85%. Copy and paste as new layer. Add border using color #3d2a22. Move it down and to right.

17. Open flutterby. Resize 15%. Free Rotate: Left-25. Copy and paste as new layer. Move it up and to right. Duplicate. Mirror. Place over the triple frame on left. Duplicate. Resize 85%. Free Rotate: Right-25. Move it up and to left.

18. Add new layer. Fill with black. Contract > 2. Delete. Deselect.


-> Add your copyright info (no URL by Facebook TOU) and license#. 
Add your name or initials. Save as PNG.

--> Sometimes I had to change my Timeline size to 846x313 because when I add it to Facebook the image has extra pixels and do not fit perfectly. So try this size if the same is happening to you.


****************************************

A Picture Profile example made by me:


November 20, 2016

The Dreaming Meadow


**Click to see original size**

== NEW CT HUNGRY HILL PTU SHOWOFF ==

Featuring "The Dreaming Meadow" Kit by HUNGRY HILL at Creative Design Outlet - CDO


It has 6 papers, 32 elements, 3 frames and 2 wordart so you can play with it.

Kit can be found exclusively at:

-> Creative Design Outlet - CDO, here

Don't forget to visit her blog:


October 24, 2016

Blaze kit with Andreea Cernestean Tube 2-1

HARVEST TIME TUTORIAL

**Click to see original size**

Tutorial written by Marcia Salgado on October 20th, 2016
for those who have a working knowledge of PSP.
I'm using PSP9 to create my tuts.
Any resemblance to any other tutorial is coincidental.
Do not copy and paste this tutorial anywhere on the net.
If you want to translate please ask first. 

****************************************
Material:

Tube: "Individual Tube 2-1" by Andreea Cernestean, you can purchase it here,
do not use without the proper #license.
PTU Kit "Blaze" by Hungry Hill,
you can purchase it here 
Plugin: MuRa's Meister
Font: Cherry Swash 

****************************************

--> Remember to save often and use my tag as reference if necessary. Use a drop shadow of your preference on layers.


1. Open paper-7. Stretch on both sides to fit the background. 

2. Add a new layer. Select all. Contract > 7. Fill it with White. Contract > 2. Delete.

3. Open your tube. Copy and paste as new layer. Apply MuRa's Meister > Copies > WallPaper (Rotate) > Default. Enhance More. Motion Blur with settings below:


4. Select all. Clip to Canvas. Crop to selection. 

5. Select all. Contract > 15. Invert selection. Delete. Invert selection. Add a new layer. Fill with White. Keep selected. Low the layer opacity to 32. Add Noise: Uniform - Monochrome - 45. Add a new layer. Fill with White. Contract > 2. Delete. Deselect.

6. Click on White/noise background. Open vine_border. Resize 70%. Copy and paste as new layer. Move it way to left and place it inside the white background on top. Duplicate. Mirror. Move it to right to create a border. Create a joint as perfect as you can. Merge down. Select all. Clip to canvas. Contract > 15. Invert selection. Delete. Deselect. Duplicate. Flip. Merge down.

7. Open heart-stitches. Resize 65%. Copy and paste as new layer. Move it midway to left.

8. Open chrysanthemum. Resize 30%. Copy and paste as new layer. Move it up and to left.

9. Open twine-star. Resize 50%. Copy and paste as new layer. Move it very little to right.

10. Open turning-leaves. Resize 65%. Fre Rotate: Right-45. Copy and paste as new layer. Move it a little up and a little to right.

11. OPen cluster_1. Resize 40%. Copy and pasteas new layer. Move it way down and to right.

12. Open leaf-4. Resize 50%. Copy and paste as new layer. Move it down and a little to left.

13. Open wreath. Resize 50%. Copy and paste as new layer. Move it down and to left.

14. Open your tube. Resize. Copy and paste as new layer. I mirrored mine. Move it to left. After your tube placement you may want to re-arrange some previous elements to better fit your tube.

15. Add a new layer. Select all. Fill with Black. Contract > 2. Delete. Deselect.


-> Add your copyright info (no URL by Facebook TOU) and license#. 
Add your name or initials. Save as PNG.

--> Sometimes I had to change my Timeline size to 846x313 because when I add it to Facebook the image has extra pixels and do not fit perfectly. So try this size if the same is happening to you.

-------------------------------------

My idea for the Picture Profile


October 20, 2016

Carmela

BE BRIGHT AND SHINY TUTORIAL

**Click to see original size**

Tutorial written by Marcia Salgado on October 20th, 2016
for those who have a working knowledge of PSP.
I'm using PSP9 to create my tuts.
Any resemblance to any other tutorial is coincidental.
Do not copy and paste this tutorial anywhere on the net.
If you want to translate please ask first. 

****************************************
Material:

Tube: "Carmela" by Selisan Al-Gaib, you can purchase it here
do not use without the proper #license.
PTU Kit "Carmela" by Kizzed By Kelz, you can purchase it here 
Font: Wytherness

****************************************

--> Remember to save often and use my tag as reference if necessary. Use a Drop Shadow of your preference on layers. 


1. Create a new image 851x315.

2. Open 'paper' KBK_Carmela (12). Resize 65%. Copy and paste as new layer. Move it way to left and down to show the lights. Duplicate. Mirror. Move it below the original paper layer. Click on original layer. Erase a little the right side of the paper to better fit the paper below.

3. Open KBK_Carmela (42). Resize 70%. Copy and paste as new layer. Move it to left.

4. Open KBK_Carmela (16). Resize 45%. Free Rotate: Left-45. Copy and paste as new layer. Move it way to left.

5. Open KBK_Carmela (62). Resize 65%. Free Rotate: Right-90. Copy and paste as new layer. Place it over the frame right corner. 

6. Open KBK_Carmela (54). Resize 35%. Free Rotate: Left-25. Copy and paste as new layer. Place it over the previous flower.

7. Open KBK_Carmela (95). Resize 70%. Mirror. Copy and paste as new layer. Move it way to left.

8. Open KBK_Carmela (19). Resize 60%. Mirror. Copy and paste as new layer. 

9. Open KBK_Carmela (40). Resize 70%. Mirror. Flip. Copy and paste as new layer. 

10. Open KBK_Carmela (43). Resize 65%. Copy and paste as new layer. Move it way down and to right.

11. Open KBK_Carmela (28). Resize 40%. Copy and paste as new layer. Move it down and to left.

12. Add a new layer. Select all. Fill with #b3c0e2. Contract > 5. Delete. Keep selected. Fill with Black. Contract > 1. Delete. Deselect.

13. Open KBK_Carmela (94). Copy and paste as new layer. Move it way down. Dulicate. Mirror. Move the copy layer below the original element layer. Move it until you like the position.

14. Open your tube. Resize. Move it to right. You may want to re-arrange some elements to better fit your tube.

15. Add a new layer. Fill with Black. Contract > 2. Delete. Deselect.


-> Add your copyright info (no URL by Facebook TOU) and license#. 
Add your name or initials. Save as PNG.

--> Sometimes I had to change my Timeline size to 846x313 because when I add it to Facebook the image has extra pixels and do not fit perfectly. So try this size if the same is happening to you.

-----------------------------------------------------------------------

An idea for a Picture Profile


Annaleise Autumn kit with Jacqueline tube


**Click to see original size**


== NEW PTU TAG TINY TURTLE DESIGNS CT ==
AND THE ART OF ALEHANDRA VANHEK

Featuring "Jacqueline", an Alehandra Vanhek tube and
 "Annaleise Autumn", Tiny Turtle Design kit at TinyTurtleDesign Store.

Tiny Turtle Design kit has 34 papers and 96 elements so you can play with it. 

Alehandra Vanhek's tube can be found  at:
-> TinyTurtleDesign Store, here

Tiny Turtle Design kit can be found  at:
-> TinyTurtleDesign Store, here 


October 14, 2016

Witch tube with PumpKin Babe kit

TREAT GOODIES TUTORIAL

 **Click to see original size**

Tutorial written by Marcia Salgado on October 14th, 2016
for those who have a working knowledge of PSP.
I'm using PSP9 to create my tuts.
Any resemblance to any other tutorial is coincidental.
Do not copy and paste this tutorial anywhere on the net.
If you want to translate please ask first. 

****************************************
Material:

Tube: "Witch" by Fiodorova Maria, you can purchase it here 
do not use without the proper #license.
PTU Kit "PumpKin Babe" by Bibi's Collection, you can purchase it here 
Font: kg pdx bridgetown

****************************************

--> Remember to save often and use my tag as reference if necessary. Use a Drop Shadow of your preference on layers. 


1. Create a new image 851x315.

2. Open BIBI-PUMPKIN BABE PAPER (5). Copy and paste as new layer.

3. Open BIBI-PUMPKIN BABE PAPER (10). Copy and paste as new layer. Blend Mode: Luminance (L).

4. Open BIBI-PUMPKIN BABE ELEMS (71). Copy and paste as new layer. Move it way up and way to left. Duplicate and move it way to right.

5. Add a new layer. Select all. Fill with Black. Contract > 5. Delete.

6. Open BIBI-PUMPKIN BABE ELEMS (78). Resize 45%. Copy and paste as new layer. Move it down and to right.

7. Open BIBI-PUMPKIN BABE ELEMS (90). Resize 40%. Copy and paste as new layer. Move it down and to left.

8. Open BIBI-PUMPKIN BABE ELEMS (20). Resize 40%. Copy and paste as new layer. Move it a little to right.

9. Open BIBI-PUMPKIN BABE ELEMS (10). Resize 35%. Copy and paste as new layer. Move it way to left.

10. Open BIBI-PUMPKIN BABE ELEMS (37). Resize 30%. Copy and paste as new layer. Move it a little up and midway to left.

11. Open BIBI-PUMPKIN BABE ELEMS (19). Resize 25%. Copy and paste as new layer. Place it over the previous element.

12. Open BIBI-PUMPKIN BABE ELEMS (65). Resize 25%. Copy and paste as new layer. Move it down and way to left.

13. Open BIBI-PUMPKIN BABE ELEMS (58). Resize 30%. Copy and paste as new layer. Place it on right side of the previous pumpkin at the bottom.

14. Open BIBI-PUMPKIN BABE ELEMS (2). Resize 25%. Copy and paste as new layer. Place it inside the empty pumpking.

15. Open BIBI-PUMPKIN BABE ELEMS (114). Resize 30%. Free Rotate: Left-30. Copy and paste as new layer. Move it down and to right.

16. Open BIBI-PUMPKIN BABE ELEMS (113). Resize 30%. Copy and paste as new layer. Move it down and way to right.

17. Open BIBI-PUMPKIN BABE ELEMS (86). Resize 25%. Copy and paste as new layer. Place it over the vase of the previous element.

18. Open BIBI-PUMPKIN BABE ELEMS (118). Resize 25%. Mirror. Copy and paste as new layer. Move it up and way to right.

19. Add anew layer. Select all. Fill with White. Contract > 2. Add Noise: Gaussian-Monochrome-100 twice.

20. Open your tube. Resize. Mirror. Move it to right. You may want to re-arrange some elements to better fit your tube.

21. Add a new layer. Select all. Fill with Black. Contract > 1. Delete.


-> Add your copyright info (no URL by Facebook TOU) and license#. 
Add your name or initials. Save as PNG.

--> Sometimes I had to change my Timeline size to 846x313 because when I add it to Facebook the image has extra pixels and do not fit perfectly. So try this size if the same is happening to you.


---------------------------------------------------------------------------------

My idea for a simple FB Profile Picture


October 13, 2016

Alice in Zombieland


== NEW CT CREATIVE SCRAPS 
BY CRYS PTU SHOWOFF ==


Featuring "Alice in Zombieland" Kit by Creative Scraps by Crys.


Yikes.... Wonderland has been invaded by Zombies!!! 
Grab your ax and off with their heads!!! 
The Queen and Alice are going to have to work together to fix this! 
 Help them out with this kit!  
Alice in Zombieland has 80 Elements and 18 Papers. 
Using Dee's WA4b wordart that you can find HERE  and one of her geo masks.

Kit can be found at:

-> Mystical Scraps here

Don't forget to visit her blog:


October 12, 2016

Big Bad Wolf kit with Ying tube


**Click to see original size**


== NEW PTU TAG TINY TURTLE DESIGNS CT ==
AND THE ART OF SELISAN AL-GAIB

Featuring "Ying", a Selisan Al-Gaib tube and
 "Big Bad Wolf", Tiny Turtle Design kit at TinyTurtleDesign Store.

Tiny Turtle Design kit has 50 papers and 330 elements so you can play with it. 

Selisan Al-Gaib's tube can be found  at:
-> TinyTurtleDesign Store, here 

Tiny Turtle Design kit can be found  at:
-> TinyTurtleDesign Store, here 


October 1, 2016

Alana


**Click to see original size**


== NEW PTU TAG TINY TURTLE DESIGNS CT ==

Featuring "Alana", Tiny Turtle Design kit at TinyTurtleDesign Store.


Tiny Turtle Design kit has 50 papers and 127 elements so you can play with it. 
Tag using the Anna Liwanag's art from MPT, on my blog the license is more visible.

Tiny Turtle Design kit can be found  at:
-> TinyTurtleDesign Store, here 


September 18, 2016

CDO 2016 HALLOWEEN STORE COLLAB

HAPPY SPOOK! TUTORIAL

**Click to see original size**

Tutorial written by Marcia Salgado on September 18th, 2016
for those who have a working knowledge of PSP.
I'm using PSP9 to create my tuts.
Any resemblance to any other tutorial is coincidental.
Do not copy and paste this tutorial anywhere on the net.
If you want to translate please ask first. 

****************************************
Material:

CDO 2016 HALLOWEEN STORE COLLAB
PTU Kit "Halloween Collab Kit - 2016" by Hungry Hill,
you can found the STORE COLLAB here 
Don't miss out, as it goes away forever at 10pm PST 30th September 2016.
Font: Vampyr Bats (Dingbat Font) and  2Peas Mister Giggles

****************************************

--> Remember to save often and use my tag as reference if necessary. Use a drop shadow of your preference on layers.

1. Create a new image 851x315.

2. Open paper-3. Copy and paste as new layer.

3. Open moon. Resize 45%. Copy and paste as new layer.

4. Open leaf-mist. Copy and paste as new layer. Move it way down and to left.

5. Open web. Resize 35%. Copy and paste as new layer. Move it up and way to left.

6. Open broom. Resize 40%. Free Rotate: Left-15. Copy and paste as new layer. Move it way to left.

7. Open spider. Resize 10%. Mirror. Copy and paste as new layer. Move it up and place it over the web.

8. Open ghostie-1. Resize 40%. Copy and paste as new layer. Move it up and to left. Place it on the left side of the web.

9. Open ghostie-2. Resize 40%. Copy and paste as new layer. Move it a little down and move to left. Place it on left side of first ghost.

10. Open bone-jar. Resize 15%. Copy and paste as new layer. Move it down and place between the ghosts.

11. Open WordArt. Resize 75%. Copy and paste as new layer. Move it down.

12. Open dry-leaves. Resize 40%. Copy and paste as new layer. Move it way left and way down. Duplicate it twice and create a bottom line with it. Merge the 3 layers together.

13. Open eyeballs. Resize 13%. Copy and paste as new layer. Move it down and place it between the two "L" letters of the wordart.

14. Open kitty. Resize 15%. Copy and paste as new layer. Move it down and place it between the two "E" letter of the wordart.

15. Select all. Add a new layer. Fill it with white. Contract > 8. Delete. Keep selected. Fill with black. Contract > 1. Delete. Deselect. Low the layer opacity to 50. Use blinds as shown below:


15. Open branch-2. Resize 45%. Free Rotate: Left-90. Copy and paste asnew layer and move it way to right.

16. Open jack-o-lantern-1. Resize 15%. Mirror. Copy and paste as new layer. Move it down and way to right.

17. Open jack-o-lantern-2. Resize 10%. Copy and paste as new layer. Place it over the "N" letter of the wordart.

18. Open owl. Resize 10%. Copy and place as new layer. Place it over the "W" letter of the wordart on left.

19. Use the following letters of the dingbat font "d" (size 28), "E" (size 36), "c" (size 36) and "r" (size 30) and place them over the moon.

20. Select all. Add a new layer. Fill with black. Contract > 1. Delete. Deselect.


--> Add your copyright info (no URL by Facebook TOU) and license#. 
Add your name or initials. Save as PNG.

--> Sometimes I had to change my Timeline size to 846x313 because when I add it to Facebook the image has extra pixels and do not fit perfectly. So try this size if the same is happening to you.


July 9, 2016

Store Collab SHADE OF BROWN

WORLD TRAVELER TUTORIAL


Tutorial written by Marcia Salgado on July 9th, 2016
for those who have a working knowledge of PSP.
I'm using PSP9 to create my tuts.
Any resemblance to any other tutorial is coincidental.
Do not copy and paste this tutorial anywhere on the net.
If you want to translate please ask first. 

****************************************
Material:

Store Collab SHADE OF BROWN - Free Gift with a purchase
Tube used "Shade of Brown" by Mariel and 
PTU Kit used "Past Memories" by Disturbed Scraps
do not use without the proper #license, you can found it here
Commercial Use Element: "Shade Of Brown CU" by CSDesigns,
you can found it here
Wordart: made by me, just click and save.
Font: KG Adipose Unicase

****************************************

--> Remember to save often and use my tag as reference if necessary. Use a Drop Shadow of your preference on layers.


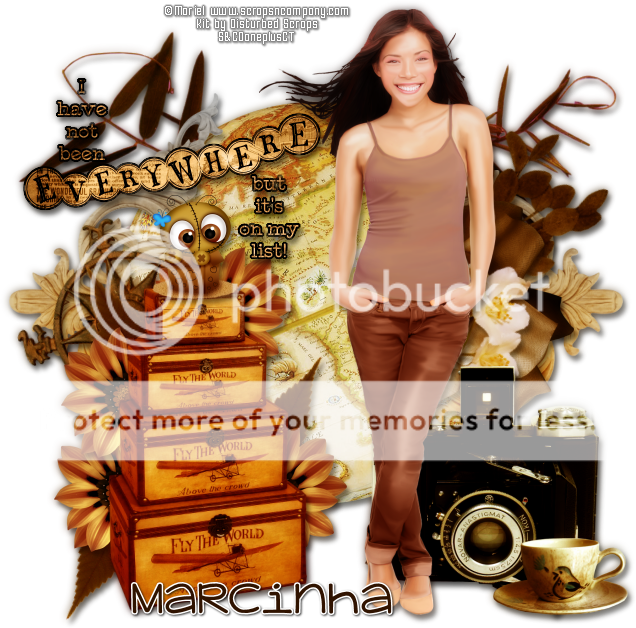
1. Create a new image 650x650.

2. Open DS - PM Element (18). Copy and paste as new layer. Move it up.

3. Open DS - PM Element (44). Copy and paste as new layer.

4. Open DS - PM Element (69). Resize 70%. Free rotate: Right-90. Duplicate. Mirror. Click on original layer. Use Offset as shown below:


5. Click on copy layer and use Offset again, just change to -200. Merge down.

6. Open DS - PM Element (58). Resize 50%. Free Rotate: Left-15. Copy and paste as new layer. Move it to left.

7. Open DS - PM Element (12). Resize 60%. Free Rotate: Right-15. Copy and paste as new layer. Move it a little up and to right.

8. Open DS - PM Element (1). Resize 55%. Mirror. Copy and paste as new layer. Move it to right. Place it over the previous branch a litle down.

9. Open DS - PM Element (17). Resize 55%. Free Rotate: Right-15. Copy and paste as new layer. Place it over the rose, a very little down and to left.

10. Open DS - PM Element (28). Resize 65%. Copy and paste as new layer. Move it down and to left.

11. Open DS - PM Element (3). Resize 35%. Copy and paste as new layer. Send it below the suitcases layer and place it on the side. Duplicate and place around the suitcases.

12. Open DS - PM Element (22). Resize 35%. Free Rotate: Left-35. Copy and paste as new layer. Send this layer below the flower layer. Move it to the left side of the suitcases. Duplicate and use mirror and flip to place some leaves around the flowers.

13. Click on the suitcases layer.Open DS - PM Element (37). Resize 55%. Copy and paste as new layer. Move it down and to right.

14. Open DS - PM Element (26). Resize 360%. Copy and paste as new layer. Move it down and way to right.

15. Open my wordart. Open DS - PM Paper 7. Resize 50%. Fill my wordart with it. To do it, go to Layers and Unlock Transparency (looks like a padlock). Use the Flood Fill Tool. Lock Transparency again. Add a thin black border. Copy and paste as new layer. Move it up and to left.

16. Open your tube. Resize. Copy and paste as new layer. Move it to right. Now you may want to re-arrange some elements to better fit your tube.

17. OPTIONAL - Open CSDesigns- ShadeOfBrown CU. Resize 10%. Copy and paste as new layer. Place it above the suitcases.

18. Use Crop > Merged Opaque to get rid of all extra spaces.


--> Add your copyright info and license#, Add your name and save as PNG.


-----------------------------------------------------------------------------

== SHADE OF BROWN STORE COLLAB ==


**Click to see original size**


== NEW PTU S&CO. CT  TIMELINE SHOW OFF ==
DISTURBED SCRAPS WITH CU BY CSDESIGNS

Featuring "Past Memories", Disturbed Scraps and
 a "Shade of Brown CU" by CSDesigns  at Scraps N Company - S&Co.

The Store Collab and the CU Element are "free gift" with a purchase. 
Gorgeous Collab Collection with awesome products created for you.

Store Collab SHADES OF BROWN can be found  at:
-> Scraps N Company - S&Co., here

Shade of Brown CU by CSDesigns can be found  at:
-> Scraps N Company - S&Co., here 


June 29, 2016

Afrobeach with Jamaican Beach

IN THE BEACH TUTORIAL

**Click to see original size**

Tutorial written by Marcia Salgado on June 25th, 2016
for those who have a working knowledge of PSP.
I'm using PSP9 to create my tuts.
Any resemblance to any other tutorial is coincidental.
Do not copy and paste this tutorial anywhere on the net.
If you want to translate please ask first. 

****************************************
Material:

Tube: "Afrobeach" by Andy Cooper, you can purchase it here 
do not use without the proper #license.
PTU Kit "Jamaican Beach" by Lil Mz's Brainstorms, you can purchase it here 
Plugin: MuRa's Meister
Font: SNF Metro

****************************************

--> Remember to save often and use my tag as reference if necessary. Use a Drop Shadow of your preference on layers. 


1. Create a new image 851x315.

2. Add anew layer. Use MuRa's Meister > Cloud with colors #76d7d9 and white as foreground and background colors.


3. Open LMB_JamaicanBeach_Element (105). Copy and paste as new layer. Move it way to left. Duplicate. Mirror. Fix the position moving the copy to right. Merge down.

4. Open LMB_JamaicanBeach_Element (106). Copy and paste as new layer. Move it way to left. Duplicate. Mirror. Fix the position moving the copy to right. Merge down.

5. Open LMB_JamaicanBeach_Element (46). Copy and paste as new layer. Move it a little up and to left.

6. Open LMB_JamaicanBeach_Element (35). Resize 50%. Copy and paste as new layer. Apply MuRa's Meister as shown below. Move it down.


7. Open LMB_JamaicanBeach_Element (24). Resize 20%. Copy and paste as new layer. Place it on the fence.

8. Open LMB_JamaicanBeach_Element (17). Resize 40%. Copy and paste as new layer. Duplicate and place it on the fence on 2 different places. Merge these 2 layers together.

9. Open LMB_JamaicanBeach_Element (18). Resize 40%. Copy and paste as new layer. Duplicate it twice and place it over the fence. Merge these 3 layers together.

10. Open LMB_JamaicanBeach_Element (75). Resize 20%. Copy and paste as new layer. Place it on the fence at the middle.

11. Open LMB_JamaicanBeach_Element (39). Resize 20%. Mirror. Copy and paste as new layer. Place it below the plaque.

12. Open LMB_JamaicanBeach_Element (8). Resize 40%. Copy and paste as new layer. Duplicate it twice. Place it on the fence. Merge these 3 layers together.

13. Open LMB_JamaicanBeach_Element (9). Resize 25%. Copy and paste as new layer. Duplicate and place it on the fence. Try to alternate this one with the previous element.

14. Open LMB_JamaicanBeach_Element (89). Resize 75%. Copy and paste as new layer. Move it way to the right. Duplicate and turn the copy invisible. Click on original layer to continue.

15. Open LMB_JamaicanBeach_Element (43). Resize 30%. Mirror. Copy and paste as new layer.

16. Open LMB_JamaicanBeach_Element. Copy and paste as new layer.

17. Open your tube. Resize. Copy and paste as new layer. Move it way to right.

18. Turn the copy visible again. Select the part that is over the tube head. Invert selection. Delete.

19. Open LMB_JamaicanBeach_Element (44). Resize 25%. Mirror. Copy and paste as new layer.

20. Open LMB_JamaicanBeach_Element (42). Resize 50%. Copy and paste as new layer.

21. Open LMB_JamaicanBeach_Element (29). Resize 25%. Copy and paste as new layer.

22. Open LMB_JamaicanBeach_Element (59). Resize 25%. Copy and paste as new layer.

23. Open LMB_JamaicanBeach_Element (27). Resize 20%. Copy and paste as new layer.

24. Add a new layer. Select all. Fill it with #76d7d9. Contract > 5. Delete. Deselect. Add noise > Uniform - 60 - Monochrome.

25. Add a new layer. Select all. Fill with black. Contract > 1. Delete. Deselect.


--> Add your copyright info (no URL by Facebook TOU) and license#. 
Add your name or initials. Save as PNG.

--> Sometimes I had to change my Timeline size to 846x313 because when I add it to Facebook the image has extra pixels and do not fit perfectly. So try this size if the same is happening to you.


------------------------------------------------------------------------

Here the Picture Profile I made for this Timeline.