Showing posts with label CSDesigns. Show all posts

July 9, 2016

Store Collab SHADE OF BROWN

WORLD TRAVELER TUTORIAL
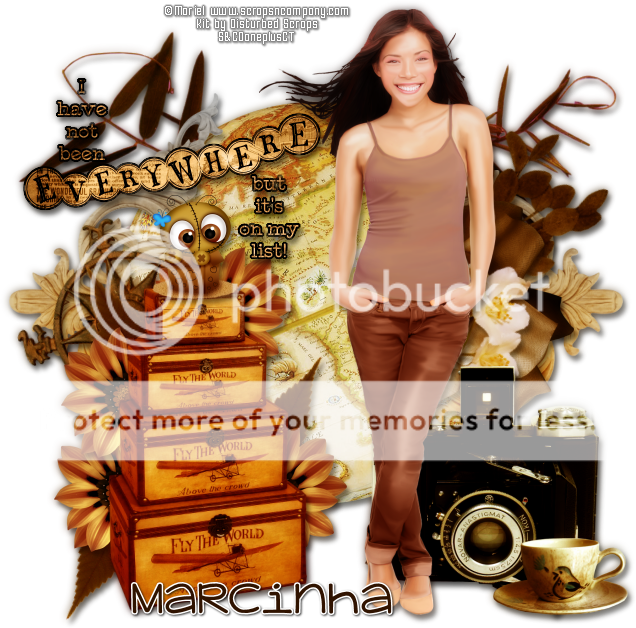


Tutorial written by Marcia Salgado on July 9th, 2016
for those who have a working knowledge of PSP.
I'm using PSP9 to create my tuts.
Any resemblance to any other tutorial is coincidental.
Do not copy and paste this tutorial anywhere on the net.
If you want to translate please ask first. 

****************************************
Material:

Store Collab SHADE OF BROWN - Free Gift with a purchase
Tube used "Shade of Brown" by Mariel and 
PTU Kit used "Past Memories" by Disturbed Scraps
do not use without the proper #license, you can found it here
Commercial Use Element: "Shade Of Brown CU" by CSDesigns,
you can found it here
Wordart: made by me, just click and save.
Font: KG Adipose Unicase

****************************************

--> Remember to save often and use my tag as reference if necessary. Use a Drop Shadow of your preference on layers.


1. Create a new image 650x650.

2. Open DS - PM Element (18). Copy and paste as new layer. Move it up.

3. Open DS - PM Element (44). Copy and paste as new layer.

4. Open DS - PM Element (69). Resize 70%. Free rotate: Right-90. Duplicate. Mirror. Click on original layer. Use Offset as shown below:


5. Click on copy layer and use Offset again, just change to -200. Merge down.

6. Open DS - PM Element (58). Resize 50%. Free Rotate: Left-15. Copy and paste as new layer. Move it to left.

7. Open DS - PM Element (12). Resize 60%. Free Rotate: Right-15. Copy and paste as new layer. Move it a little up and to right.

8. Open DS - PM Element (1). Resize 55%. Mirror. Copy and paste as new layer. Move it to right. Place it over the previous branch a litle down.

9. Open DS - PM Element (17). Resize 55%. Free Rotate: Right-15. Copy and paste as new layer. Place it over the rose, a very little down and to left.

10. Open DS - PM Element (28). Resize 65%. Copy and paste as new layer. Move it down and to left.

11. Open DS - PM Element (3). Resize 35%. Copy and paste as new layer. Send it below the suitcases layer and place it on the side. Duplicate and place around the suitcases.

12. Open DS - PM Element (22). Resize 35%. Free Rotate: Left-35. Copy and paste as new layer. Send this layer below the flower layer. Move it to the left side of the suitcases. Duplicate and use mirror and flip to place some leaves around the flowers.

13. Click on the suitcases layer.Open DS - PM Element (37). Resize 55%. Copy and paste as new layer. Move it down and to right.

14. Open DS - PM Element (26). Resize 360%. Copy and paste as new layer. Move it down and way to right.

15. Open my wordart. Open DS - PM Paper 7. Resize 50%. Fill my wordart with it. To do it, go to Layers and Unlock Transparency (looks like a padlock). Use the Flood Fill Tool. Lock Transparency again. Add a thin black border. Copy and paste as new layer. Move it up and to left.

16. Open your tube. Resize. Copy and paste as new layer. Move it to right. Now you may want to re-arrange some elements to better fit your tube.

17. OPTIONAL - Open CSDesigns- ShadeOfBrown CU. Resize 10%. Copy and paste as new layer. Place it above the suitcases.

18. Use Crop > Merged Opaque to get rid of all extra spaces.


--> Add your copyright info and license#, Add your name and save as PNG.


-----------------------------------------------------------------------------

== SHADE OF BROWN STORE COLLAB ==


**Click to see original size**


== NEW PTU S&CO. CT  TIMELINE SHOW OFF ==
DISTURBED SCRAPS WITH CU BY CSDESIGNS

Featuring "Past Memories", Disturbed Scraps and
 a "Shade of Brown CU" by CSDesigns  at Scraps N Company - S&Co.

The Store Collab and the CU Element are "free gift" with a purchase. 
Gorgeous Collab Collection with awesome products created for you.

Store Collab SHADES OF BROWN can be found  at:
-> Scraps N Company - S&Co., here

Shade of Brown CU by CSDesigns can be found  at:
-> Scraps N Company - S&Co., here 


March 22, 2016

Black Rabbit ~ by Joanne Salgado


Tutorial written by Joanne Salgado on March 22th, 2016
for those who have a working knowledge of PSP.
Any resemblance to any other tutorial is coincidental.
Do not copy and paste this tutorial anywhere on the net.
If you want to translate please ask first. 

Tube: Black Rabbit by Danny Lee - you can purchase here
Kit Black Rabbit by CSDesigns - you can purchase here
Font: Segoe Script

Don't forget to save often.
At any point if you have doubts check my tag.

1. Open a new image 650x550

2. Open element 'CSD-El 49' copy and paste as new layer.

3. Open element 'CSD-El 27' copy and paste as new layer. Move this layer below the frame layer. Arrange it to the top.

4. Open element 'CSD-El 41' copy and paste as new layer. Arrange it to the top right. The bubbles should appear above the flowers.

5. Open element 'CSD-El 42' copy and paste a new layer. Resize 70%. Arrange it to the top left.

6. Open element 'CSD-El 57' copy and paste as new layer. Arrange it to the top right. It will be above the flowers.

7. Open element 'CSD-El 40' copy and paste as new layer. Resize 70%. Arrange it to the top.

8. Open element 'CSD-El 48' copy and paste as new layer. Arrange it to the right.

9. Open element 'CSD-El 44' copy and paste as new layer. Resize 40%. Arrange it to the top left.

10. Open element 'CSD-El 29' copy and paste as new layer. Arrange it to the top.

11. Open paper 'CSD-PP 05' copy and paste as new layer. Resize 65%. Clean the parts that appears outside the frame.

12. Open element 'CSD-El 43' copy and paste as new layer. Resize 20%. Move this layer above the frame layer. Arrange it to the top to the last stripe from the frame before the end of it.

13. Open element 'CSD-El 30' copy and paste as new layer. Resize 40%. Arrange it to the bottom left.

14. Open your tube. Copy and paste as new layer. Resize as needed and arrange it to the bottom.

15. Open element 'CSD-El 28' copy and paste as new layer. Arrange it to bottom. It will cover a bit of your tube.

16. Open element 'CSD-El 37' copy and paste as new layer. Resize 40%. Arrange it to the bottom right.

17. Open element 'CSD-El 53' copy and paste as new layer. Resize 70%. Arrange it to the top right.

18. Open element 'CSD-El 51' copy and paste as new layer. Resize 30%. Mirror. Arrange it to bottom, a little above the grass.

19. Add shadow as you prefer.

20. Add copyright. Add name. Save as PNG.

May 14, 2015

Dark Night ~ by Joanne Salgado


Tutorial written by Joanne Salgado on May 14th, 2015
for those who have a working knowledge of PSP.
Any resemblance to any other tutorial is coincidental.
Do not copy and paste this tutorial anywhere on the net.
If you want to translate please ask first. 

Tube: Seriously Punk 1 by LadyMishka Dolls - you can purchase here
Kit Black Magic by CSDesigns - you can purchase here
Font: Bodoni MT Poster Compressed

Don't forget to save often.
At any point if you have doubts check my tag.

1. Open a new image 500x500

2. Open element 'CSD-El 14' copy and paste as new layer. Resize 50%. Arrange it to the bottom.

3. Open element 'CSD-El 08' copy and paste as new layer. Resize 45%.

4. Open paper 'CSD-PP 06' copy and paste as new layer. Resize 70%. Move this layer below the frame layer. Arrange it inside the frame and clean the parts of the paper that appears outside the frame.

5. Open element 'CSD-El 33' copy and paste as new layer. Resize 20%. Arrange it to the bottom right of the frame.

6. Open element 'CSD-El 49' copy and paste as new layer. Resize 20%. Mirror. Move this layer below the frame layer. Arrange it to the left above the tombstone.

7. Open your tube. Copy and paste as new layer. Resize as you prefer and arrange it to the right.

8. Open element 'CSD-El 26' copy and paste as new layer. Resize 25%. Arrange it to the bottom left of the tube.

9. Open element 'CSD-El 30' copy and paste as new layer. Resize 15%. Mirror. Arrange it to the top left of the frame.

10. Add shadow. I used 1-1-65-2 black.

11. Add copyright.

12. Add name. I used: Bodoni MT Poster Compressed / size: 48

Save as PNG

April 5, 2015

Sun Umbrella ~ by Joanne Salgado


Tutorial written by Joanne Salgado on April 05th, 2015
for those who have a working knowledge of PSP.
Any resemblance to any other tutorial is coincidental.
Do not copy and paste this tutorial anywhere on the net.
If you want to translate please ask first. 

Tube: Sun Umbrella by Danny Lee - you can purchase here 
Kit Sun Umbrella by CSDesigns - you can purchase here 
Mask 'DD_VMask_7_zpshp5bfwbc' by Dee here 
Font: Mirielle

Don't forget to save often.
At any point if you have doubts check my tag.

1. Open a new image 500x500

2. Open paper 'CSD- PP 05' copy and paste as new layer. Resize 70%. Apply your mask. Group Mask.

3. Open element 'CSD- EL 35' copy and paste as new layer. Resize 50%. Arrange it to the bottom right corner of the canvas.

4. Open element 'CSD- EL 61' copy and paste as new layer. Resize 80%. Arrange it to the top left corner of the canvas.

5. Open element 'CSD- EL 60' copy and paste as new layer. Resize 20%. Mirror. Arrange it to the bottom left of the grass.

6. Open your tube. Copy and paste as new layer. Resize as you prefer and arrange it above the grass.
ayer. Resize 80%. Mirror. Arrange it to the Bottom left of the canvas.

8. Add shadow as you prefer. I used 1-1-65-2 black.

9. Add copyright.

10. Add name. I used: Mirielle / size: 48
7. Open element 'CSD- EL 63' copy and paste as new l

Save as PNG

April 2, 2015

Mimi Melody ~ by Joanne Salgado


Tutorial written by Joanne Salgado on February 18th, 2015
for those who have a working knowledge of PSP.
Any resemblance to any other tutorial is coincidental.
Do not copy and paste this tutorial anywhere on the net.
If you want to translate please ask first. 

Tube: CU/PU MIMI BUNNY 2 by Pandora Creations - you can purchase here 
Kit Sweet Spring Melody by CSDesigns - you can purchase here 
Font: Alice and the Wicked Monster

Don't forget to save often.
At any point if you have doubts check my tag.

1. Open a new image 500x500

2. Open element 'CSD- EL 08' copy and paste as new layer. Resize 52%.

3. Open element 'CSD- EL 60' copy and paste as new layer. Resize 50%.

4. Open element 'CSD- EL 15' copy and paste as new layer. Resize 30%. Move this layer bellow the star frame. Mirror. Arrange it to the top right of the star. Duplicate. Mirror/Flip. Arrange it to the bottom left part of the star.

5. Open element 'CSD- EL 06' copy and paste as new layer. Resize 30%. Free Rotate right-25. Arrange it to the right.

6. Open element 'CSD- EL 16' copy and paste as new layer. Resize 25%. Free Rotate right-25. Arrange it to the right.

7. Open your tube. Resize as you prefer. Arrange to the middle of the star.

8. Open element 'CSD- EL 57' copy and paste as new layer. Resize 15%. Arrange it to the bottom right of the tube.

9. Open element 'CSD- EL 63' copy and paste as new layer. Resize 20%. Arrange it to the top left.

10. Add shadow as you prefer. I used 1-1-65-2 black.

11. Add copyright.

12. Add name. I used: Alice and the Wicked Monster / size: 60

Save as PNG

March 18, 2015

Alyona ~ by Joanne Salgado


Tutorial written by Joanne Salgado on February 18th, 2015
for those who have a working knowledge of PSP.
Any resemblance to any other tutorial is coincidental.
Do not copy and paste this tutorial anywhere on the net.
If you want to translate please ask first. 

Tube: Alyona by Natalia NZ - you can purchase here 
Kit Alyona by CSDesigns - you can purchase here 
Font: PonytailScriptSSK

Don't forget to save often.
At any point if you have doubts check my tag.

1. Open a new image 600x600

2. Open element 'CSD- EL 42' copy and paste as new layer. Resize 55%. Arrange it to the top left. Duplicate. Mirror. Duplicate. Flip. Duplicate. Mirror.

3. Open element 'CSD- EL 59' copy and paste as new layer. Mirror. Arrange it to the top right.

4. Open element 'CSD- EL 54' copy and paste as new layer. Resize 55%. Arrange it to the top right. Duplicate. Mirror/Flip.

5. Open element 'CSD- EL 50' copy and paste as new layer. Resize 70%. Move it a little to bottom. With magic wand select inside the frame, expand 2, invert selection. Add new layer, move bellow the frame layer. Flood Fill with white. Add noise with uniform/50/monochrome checked.

6. Open element 'CSD- EL 53' copy and paste as new layer. Resize 55%. Move this layer above the frame layer. Arrange it to the bottom left.

7. Open your tube. I'm using the beautiful Alyona by Natalia NZ. Copy and paste as new layer. Resize as you prefer. Arrange it to the right. With the eraser tool or the freehand tool clean the lower part of the tube so it looks like the tube is coming from inside the frame.

8. Open element 'CSD- EL 20' copy and paste as new layer. Resize 90%. Arrange it to bottom.

9. Add shadow as you prefer. I used 1-1-65-2 black.

10. Add copyright.

11. Add name. I used: PonytailScriptSSK / size: 72

Save as PNG

March 9, 2015

Cyber Pistol ~ by Joanne Salgado


Tutorial written by Joanne Salgado on February 18th, 2015
for those who have a working knowledge of PSP.
Any resemblance to any other tutorial is coincidental.
Do not copy and paste this tutorial anywhere on the net.
If you want to translate please ask first. 

Tube: Cyber Pistol by Andy Cooper - you can purchase here 
Kit Cyber Pistol by CSDesigns - you can purchase here 
Font: Deming EP

Don't forget to save often.
At any point if you have doubts check my tag.

1. Open a new image 600x600

2. Open element 'CSD- Element 20' copy and paste as new layer. Resize 70%.

3. Open element 'CSD- Element 21' copy and paste as new layer. Resize 50%. Arrange it to the upper right. Duplicate. Mirror/Flip.

4. Open element 'CSD- Element 30' copy and paste as new layer. Resize 60%. Free Rotate right-20. Adjust/Hue And Saturation/Colorize - hue: 0 / saturation: 0.

5. Open element 'CSD- Element 40' copy and paste as new layer. Resize 50%. Arrange it to the bottom left of the frame. Move this layer bellow the frame.

6. Open paper 'CSD- Papert 09' copy and paste as new layer. Resize 70%. Select the frame layer, with magic wand select inside it. Expand 4. Invert selection. Select paper layer and hit delete on your keyboard. Selection None.

7. Open element 'CSD- Element 22' copy and paste as new layer. Resize 60%. Arrange it to the middle of the frame. Move this layer above the frame layer. 

8. Open element 'CSD- Element 54' copy and paste as new layer. Resize 40%. Free Rotate left-20. Arrage it to the upper left of the frame.

9. Open your tube. I'm using Cyber Pistol from Andy Cooper. Copy and paste as new image. Resize as you like. Arrange it to the bottom right.

10. Add shadow as you like. I used 1-1-65-2 black.

11. Add copyright.

12. Add name. I used: Deming EP size: 30.

Save.