Showing posts with label Lady Mishka Exclusive. Show all posts

July 4, 2016

Pirate Ale

PIRATE'S LIFE TUTORIAL


Tutorial written by Marcia Salgado on July 4th, 2016
for those who have a working knowledge of PSP.
I'm using PSP9 to create my tuts.
Any resemblance to any other tutorial is coincidental.
Do not copy and paste this tutorial anywhere on the net.
If you want to translate please ask first. 

****************************************
Material:

Tube: "Pirate Ale" by LadyMishka, you can purchase it here
do not use without the proper #license.
PTU Kit "Pirate Ale" by FwTags Creations, you can purchase it here
Font: TradeWind

****************************************

--> Remember to save often and use my tag as reference if necessary. Use a Drop Shadow of your preference on layers. 


1. Create a new image 650x650.

2. Open FwTagsPirateAleFRAME (2). Resize 75%. Copy and paste as new layer.

3. Open FwTagsPirateAleELEMENT (37). Resize 55%. Copy and paste as new layer.Move it way to right. Send this layer below the frame layer.

4. Open FwTagsPirateAleELEMENT (15). Copy and paste as new layer. Move it a little up.

5. Open FwTagsPirateAleELEMENT (19). Copy and paste as new layer.

6. Click on the frame layer. Select inside the frame. Expand > 5. Add a new layer and send it below the frame layer. Open FwTagsPirateAlePAPER (4). Copy and paste into selection. Deselect.

7. Click on frame layer again. Open FwTagsPirateAleFRAME (4). Resize 70%. Copy and paste as new layer.

8. Open FwTagsPirateAleELEMENT (5). Resize 55%. Copy and paste as new layer. Move it up and to left.

9. Open FwTagsPirateAleELEMENT (28). Resize 80%. Copy and paste as new layer. Move it up and a little to right.

10. Open FwTagsPirateAleELEMENT (2). Resize 65%. Copy and paste as new layer. Move it a little to right. Clean the part is over the frame on the left.

11. Open FwTagsPirateAleELEMENT (6). Resize 40%. Copy and paste as new layer.

12. Open FwTagsPirateAleELEMENT (54). Resize 80%. Mirror. Copy and paste as new layer. Move it to right.

13. Open FwTagsPirateAleELEMENT (55). Resize 65%. Copy and paste as new layer. Place it over the tree.

14. Open FwTagsPirateAleELEMENT (48). Resize 55%. Copy and paste as new layer. move it down and to right.

15. Open FwTagsPirateAleELEMENT (7). Resize 20%. Copy and paste as new layer. Place it over the cannon.

16. Open FwTagsPirateAleELEMENT (46). Resize 35%. Copy and paste as new layer. Move it down and to left.

17. Open FwTagsPirateAleELEMENT (10). Resize 35%. Copy and paste as new layer. Move it down and to left. Place it over the barrel.

18. Open FwTagsPirateAleELEMENT (20). Resize 40%. Copy and paste as new layer. Move it down and to left. Place it over the flags bottom.

19. Open your tube. Resize. Copy and paste as new layer. Move it to left.

20. Use Crop > Merged Opaque to get rid of any extra space.


--> Add your copyright info and license#. Add your name and save as PNG.


June 13, 2016

Fairy Red Queen ~ by Joanne Salgado


Tutorial written by Joanne Salgado on June 13th, 2016
for those who have a working knowledge of PSP.
I'm using PSP9 to create my tuts.
Any resemblance to any other tutorial is coincidental.
Do not copy and paste this tutorial anywhere on the net.
If you want to translate please ask first. 

****************************************
Material:

Tube: "Fairy Queen 4" by LadyMishka - you can purchase it here
do not use without the proper #license.
PTU Kit "Red Fairy" by Bibi's Collection - you can purchase it here
Font: Alex Brush

****************************************

Don't forget to save often.
At any point if you have doubts check my tag.

1. Open a new image 650x550

2. Open element 'BIBI-RED FAIRY ELEMS (83)' copy and paste as new layer. Resize 50%.

3. Open element 'BIBI-RED FAIRY ELEMS (53)' copy and paste as new layer. Resize 60%. Arrange it to bottom. I cleaned the red flowers, but if you want leave it there.

4. Open element 'BIBI-RED FAIRY ELEMS (19)' copy and paste as new layer. Resize 50%. Arrange it to the bottom left.

5. Open element 'BIBI-RED FAIRY ELEMS (21)' copy and paste as new layer. Resize 50%. Arrange it to the bottom left.

6. Open element 'BIBI-RED FAIRY ELEMS (59)' copy and paste as new layer. Resize 50%. Arrange it to the bottom right.

7. Open element 'BIBI-RED FAIRY ELEMS (10)' copy and paste as new layer. Resize 27%. Mirror. Arrange it above the well.

8. Open element 'BIBI-RED FAIRY ELEMS (69)' copy and paste as new layer. Resize 20%. Arrange it to the bottom right.

9. Open element 'BIBI-RED FAIRY ELEMS (57)' copy and paste as new layer. Resize 15%. Arrange it to the bottom left.

10. Open element 'BIBI-RED FAIRY ELEMS (8)' copy and paste as new layer. Resize 20%. Arrange it to the bottom left.

11. Open element 'BIBI-RED FAIRY ELEMS (17)' copy and paste as new layer. Resize 20%. Arrange it to the top inside the well.

12. Open element 'BIBI-RED FAIRY ELEMS (31)' copy and paste as new layer. Resize 10%. Arrange it to the bottom left.

13. Open element 'BIBI-RED FAIRY ELEMS (14)' copy and paste as new layer. Resize 25%. Arrange it to the bottom right.

14. Open element 'BIBI-RED FAIRY ELEMS (75)' copy and paste as new layer. Resize 17%. Arrange it to the top right.

15. Open your tube. Copy and paste as new layer. Resize as needed and arrange it to the left.

16. Open element 'BIBI-RED FAIRY ELEMS (12)' copy and paste as new layer. Resize 17%. Arrange it to the bottom left.

17. Add shadow as you prefer.

18. Add copyright. Add name. Save as PNG.

June 9, 2016

Pirate Lia ~ by Joanne Salgado


Tutorial written by Joanne Salgado on June 8th, 2016
for those who have a working knowledge of PSP.
I'm using PSP9 to create my tuts.
Any resemblance to any other tutorial is coincidental.
Do not copy and paste this tutorial anywhere on the net.
If you want to translate please ask first. 

****************************************
Material:

Tube: "Pirate Lia" by LadyMishka - you can purchase it here
do not use without the proper #license.
PTU Kit "Pirate Lia" by Rieneke Designs - you can purchase it here
Font: White Pine

****************************************

Don't forget to save often.
At any point if you have doubts check my tag.

1. Open a new image 650x550

2. Open element 'RD-PirateLia-element (63)' copy and paste as new layer. Rotate right 90.

3. Open paper 'RD-PiratLia-paper (9)' copy and paste as new layer. Resize 60%. Move this layer below the frame layer. Arrange it inside the frame and clean the outside parts.

4. Open element 'RD-PirateLia-element (13)' copy and paste as new layer. Resize 70%. Arrange it to the top inside the frame. Clean the outside parts.

5. Open element 'RD-PirateLia-element (62)' copy and paste as new layer. Arrange it to bottom inside the frame and clean the outside parts.

6. Open element 'RD-PirateLia-element (69)' copy and paste as new layer. Arrange it to the middle and clean the outside parts.

7. Open element 'RD-PirateLia-element (55)' copy and paste as new layer. Resize 30%. Arrange it to the left.

8. Open element 'RD-PirateLia-element (51)' copy and paste as new layer. Resize 40%. Arrange it to the right.

9. Open element 'RD-PirateLia-element (37)' copy and paste as new layer. Resize 15%. Arrange it above the boat.

10. Open element 'RD-PirateLia-element (67)' copy and paste as new layer. Arrange it to the left. Clean the outside parts.

11. Open element 'RD-PirateLia-element (40)' copy and paste as new layer. Arrange it to bottom inside the frame and clean the outside parts.

12. Open element 'RD-PirateLia-element (7)' copy and paste as new layer. Resize 20%. Arrange it to the bottom left.

13. Open element 'RD-PirateLia-element (3)' copy and paste as new layer. Resize 15%. Arrange it to the bottom left.

14. Open element 'RD-PirateLia-element (2)' copy and paste as new layer. Resize 25%. Arrange it to the bottom right. Clean if any parts appears outside the frame.

15. Open element 'RD-PirateLia-element (22)' copy and paste as new layer. Resize 20%. Arrange it to bottom.

16. Open element 'RD-PirateLia-element (24)' copy and paste as new layer. Resize 20%. Arrange it to bottom right.

17. Open element 'RD-PirateLia-element (45)' copy and paste as new layer. Resize 25%. Arrange it to bottom right.

18. Open element 'RD-PirateLia-element (27)' copy and paste as new layer. Resize 20%. Mirror. Arrange it to bottom right.

19. Open element 'RD-PirateLia-element (19)' copy and paste as new layer. Resize 30%. Arrange it to bottom right.

20. Open element 'RD-PirateLia-element (38)' copy and paste as new layer. Resize 30%. Mirror. Arrange it to bottom left.

21. Open element 'RD-PirateLia-element (47)' copy and paste as new layer. Resize 20%. Arrange it to bottom left.

22. Open element 'RD-PirateLia-element (66)' copy and paste as new layer. Resize 20%. Arrange it to bottom right.

23. Open element 'RD-PirateLia-element (54)' copy and paste as new layer. Resize 30%. Arrange it to top.

24. Open element 'RD-PirateLia-element (57)' copy and paste as new layer. Resize 15%. Arrange it to bottom right.

25. Open element 'RD-PirateLia-element (6)' copy and paste as new layer. Resize 30%. Move this layer above the frame layer. Arrange it to the top right.

26. Open your tube. Copy and paste as new layer. Resize as needed and arrange it to the left.

27. Add shadow as you prefer.

28. Add copyright. Add name. Save as PNG.

Fairy Queen ~ by Joanne Salgado


Tutorial written by Joanne Salgado on June 8th, 2016
for those who have a working knowledge of PSP.
I'm using PSP9 to create my tuts.
Any resemblance to any other tutorial is coincidental.
Do not copy and paste this tutorial anywhere on the net.
If you want to translate please ask first. 

****************************************
Material:

Tube: "Fairy Queen 1" by LadyMishka - you can purchase it here
do not use without the proper #license.
PTU Kit "Fairy Queen 1" by Rieneke Designs - you can purchase it here
Font: Andover

****************************************

Don't forget to save often.
At any point if you have doubts check my tag.

1. Open a new image 851x315

2. Open paper 'RD-FairyQueen1-paper (7)' copy and paste as new layer. Use Raster Deform Tool and stretch the paper so it fits the canvas.

3. Open element 'RD-FairyQueen1-element (25)' copy and paste as new layer. Arrange it to the bottom right. Duplicate. Mirror.

4. Open element 'RD-FairyQueen1-element (10)' copy and paste as new layer. Arrange it a little to the left.

5. Open element 'RD-FairyQueen1-element (66)' copy and paste as new layer. Resize 50%. Arrange it a little to the bottom left.

6. Open element 'RD-FairyQueen1-element (29)' copy and paste as new layer. Arrange it to bottom.

7. Open element 'RD-FairyQueen1-element (22)' copy and paste as new layer. Resize 50%. Arrange it a little to the left.

8. Open element 'RD-FairyQueen1-element (36)' copy and paste as new layer. Resize 30%. Mirror. Arrange it to the top left of the arch.

9. Open element 'RD-FairyQueen1-element (47)' copy and paste as new layer. Arrange it to the bottom left. Duplicate. Mirror.

10. Open element 'RD-FairyQueen1-element (52)' copy and paste as new layer. Resize 50%. Arrange it to the bottom right.

11. Open element 'RD-FairyQueen1-element (1)' copy and paste as new layer. Resize 40%. Arrange it a little to the bottom left.

12. Open element 'RD-FairyQueen1-element (34)' copy and paste as new layer. Arrange it to bottom a little to the left.

13. Open element 'RD-FairyQueen1-element (70)' copy and paste as new layer. Resize 50%. Arrange it to the bottom right. Duplicate. Mirror.

14. Open element 'RD-FairyQueen1-element (71)' copy and paste as new layer. Resize 50%. Arrange it to the bottom left.

15. Open element 'RD-FairyQueen1-element (65)' copy and paste as new layer. Resize 50%. Arrange it to the bottom left. Duplicate. Mirror.

16. Open element 'RD-FairyQueen1-element (13)' copy and paste as new layer. Resize 50%. Arrange it to the bottom left. Duplicate. Mirror.

17. Open element 'RD-FairyQueen1-element (35)' copy and paste as new layer. Arrange it to the bottom right. Duplicate. Mirror.

18. Open element 'RD-FairyQueen1-element (33)' copy and paste as new layer. Resize 40%. Arrange it to bottom.

19. Open element 'RD-FairyQueen1-element (32)' copy and paste as new layer. Resize 40%. Arrange it to the bottom left.

20. Open element 'RD-FairyQueen1-element (44)' copy and paste as new layer. Resize 15%. Arrange it to the top left of the arch.

21. Open element 'RD-FairyQueen1-element (14)' copy and paste as new layer. Resize 50%. Arrange it to the top right. Duplicate. Arrange it to the middle. Duplicate. Arrange it to the left.

22. Open element 'RD-FairyQueen1-element (73)' copy and paste as new layer. Arrange it to the right. Duplicate. Mirror/Flip.

23. Open element 'RD-FairyQueen1-element (50)' copy and paste as new layer. Arrange it to the left. Duplicate. Mirror/Flip.

24. Open element 'RD-FairyQueen1-element (5)' copy and paste as new layer. Arrange it to the left. Duplicate. Mirror/Flip.

25. Open element 'RD-FairyQueen1-element (2)' copy and paste as new layer. Resize 25%. Arrange it to the top left.

26. Open element 'RD-FairyQueen1-element (4)' copy and paste as new layer. Resize 15%. Arrange it to the bottom left.

27. Open your tube. Copy and paste as new layer. Resize as needed and arrange it to the right.

28. Add a new layer. Select all. Fill with white, contract 6. hit delete on your keyboard. Select none. Add noise 50.

29. Add a new layer. Select all. Fill with black. Contract 1. Hit delete on your keyboard. Select none.

30. Add shadow as you prefer.

31. Add copyright. Add name. Save as PNG.

May 15, 2016

Fairytale ~ by Joanne Salgado


Tutorial written by Joanne Salgado on May 15th, 2016
for those who have a working knowledge of PSP.
I'm using PSP9 to create my tuts.
Any resemblance to any other tutorial is coincidental.
Do not copy and paste this tutorial anywhere on the net.
If you want to translate please ask first. 

****************************************
Material:

Tube: "Fairytale" by LadyMishka - you can purchase it here
do not use without the proper #license.
PTU Kit "Fairy Tale" by Design by Joan, part of
FAIRY TALE Collab - you can purchase it here
Font: Lemonade

****************************************

Don't forget to save often.
At any point if you have doubts check my tag.

1. Open a new image 650x550

2. Open element 'FAIRY TALE COLLAB_DBJ-ELEM (3)' copy and paste as new layer. Resize 40%. Arrange it to bottom.

3. Open element 'FAIRY TALE COLLAB_DBJ-ELEM (31)' copy and paste as new layer. Resize 55%. Mirror. Arrange it to the right.

4. Open paper 'FAIRY TALE COLLAB_DBJ-PP (2)' copy and paste as new layer. Resize 50%. Move this layer below the arch layer. Arrange it inside the frame and clean the outside parts.

5. Open element 'FAIRY TALE COLLAB_DBJ-ELEM (64)' copy and paste as new layer. Resize 60%. Arrange it to the left of the arch. Clean the parts inside the frame.

6. Open element 'FAIRY TALE COLLAB_DBJ-ELEM (48)' copy and paste as new layer. Resize 80%.

7. Open element 'FAIRY TALE COLLAB_DBJ-ELEM (52)' copy and paste as new layer. Resize 30%. Arrange it inside the arch to the top.

8. Open element 'FAIRY TALE COLLAB_DBJ-ELEM (17)' copy and paste as new layer. Resize 40%. Move this layer above the arch layer. Arrange it to the bottom right.

9. Open element 'FAIRY TALE COLLAB_DBJ-ELEM (7)' copy and paste as new layer. Resize 30%. Arrange it to the bottom left of the arch.

10. Open element 'FAIRY TALE COLLAB_DBJ-ELEM (13)' copy and paste as new layer. Resize 20%. Arrange it to the bottom right.

11. Open element 'FAIRY TALE COLLAB_DBJ-ELEM (9)' copy and paste as new layer. Resize 20%. Arrange it to the bottom right.

12. Open element 'FAIRY TALE COLLAB_DBJ-ELEM (65)' copy and paste as new layer. Resize 25%. Arrange it to the bottom left of the arch.

13. Open element 'FAIRY TALE COLLAB_DBJ-ELEM (18)' copy and paste as new layer. Resize 40%. Arrange it to the bottom left.

14. Open element 'FAIRY TALE COLLAB_DBJ-ELEM (10)' copy and paste as new layer. Resize 30%. Arrange it above the mushroom.

15. Open element 'FAIRY TALE COLLAB_DBJ-ELEM (23)' copy and paste as new layer. Resize 20%. Arrange it to the left around the flower we just added.

16. Open element 'FAIRY TALE COLLAB_DBJ-ELEM (32)' copy and paste as new layer. Resize 62%. Arrange it above the arch.

17. Open element 'FAIRY TALE COLLAB_DBJ-ELEM (50)' copy and paste as new layer. Resize 50%. Arrange it to the bottom right.

18. Open element 'FAIRY TALE COLLAB_DBJ-ELEM (26)' copy and paste as new layer. Resize 30%. Mirror. Arrange it to the bottom right.

19. Open element 'FAIRY TALE COLLAB_DBJ-ELEM (19)' copy and paste as new layer. Resize 20%. Arrange it to the bottom right.

20. Open element 'FAIRY TALE COLLAB_DBJ-ELEM (6)' copy and paste as new layer. Resize 20%. Arrange it to the left.

21. Open element 'FAIRY TALE COLLAB_DBJ-ELEM (42)' copy and paste as new layer. Resize 20%. Arrange it to the bottom next the mushroom.

22. Open element 'FAIRY TALE COLLAB_DBJ-ELEM (41)' copy and paste as new layer. Resize 20%. Arrange it to the right.

23. Open your tube. Copy and paste as new layer. Resize as needed and arrange it to the left.

24. Add shadow as you prefer.

25. Add copyright. Add name. Save as PNG.

May 14, 2016

Underwater ~ by Joanne Salgado


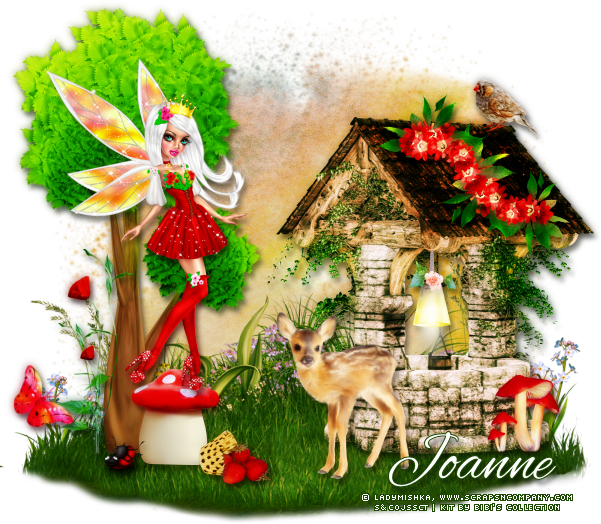
Tutorial written by Joanne Salgado on May 14th, 2016
for those who have a working knowledge of PSP.
I'm using PSP9 to create my tuts.
Any resemblance to any other tutorial is coincidental.
Do not copy and paste this tutorial anywhere on the net.
If you want to translate please ask first. 

****************************************
Material:

Tube: "Mermaid Magic" by Ladymishka Commission, you can purchase it here
do not use without the proper #license.
PTU Kit "Oh Mermaid" by Bibi's Collection, you can purchase it here
Animation: SimoneAni-277, HERE at Scrappy Bit Of Fun and any Bubble animation you have.
Font: Wide Latin

****************************************

--> Remember to save often and use my tag as reference if necessary. Use a Drop Shadow of your preference on layers. This a tutorial with many steps, remember to keep saving.


1. Create a new image 700x500. All extra space will be removed at the end.

2. Open BIBI-OH MERMAID ELEMS (114). Resize 50%. Copy and paste as new layer. Rename this layer FRAME. Now click on Layer 1 (bottom layer) and leave it invisible.

3. Select inside the frame. Expand > 10. add a new layer and move it below the frame layer. Open BIBI-OHMERMAID PAPERS (2). Copy and paste into selection. Duplicate and rename this layer BACK. Turn the original layer and the frame invisible. Keep selected. If isn't active, please be sure to click on BACK layer now.

4. Now everything will be used over the background. Open BIBI-OH MERMAID ELEMS (96). Add a new layer. Copy and paste into selection. Blend Mode: Burn. Invert selection.

5. Open BIBI-OH MERMAID ELEMS (34). Resize 35%. Copy and paste as new layer. Move it a little up. Delete (you're using inverted selection to keep outside clean, keep selected until I say to deselect).

6. Open BIBI-OH MERMAID ELEMS (119). Resize 8%. Copy and paste as new layer. Move it up and a little to left.

7. Open BIBI-OH MERMAID ELEMS (127). Resize 10%. Copy and paste as new layer. Move it to right. Duplicate. Mirror. Resize 70%. Place it near the first one.

8. Open BIBI-OH MERMAID ELEMS (30). Resize 15%. Copy and paste as new layer. Move it slightly to left. Duplicate. Resize 70%. Mirror. Move it up and to right. Mirror again. Free Rotate: Left-10. Place it near the first one. 

9. Open BIBI-OH MERMAID ELEMS (135). Resize 20%. Copy and paste as new layer. Move it down and to left. Delete.

10. Open BIBI-OH MERMAID ELEMS (27). Resize 20%. Copy and paste as new layer. Move it below the castle layer and place it behinf the towers on left showing only the top. Duplicate and place it under the right towers as well.

11. Click on castle layer. Open BIBI-OH MERMAID ELEMS (88). Resize 25%. Mirror. Copy and paste as new layer. Move it down. Delete.

12. Open BIBI-OH MERMAID ELEMS (31). Resize 20%, Copy and paste as new layer. Move it down and to left. Delete. Deselect.

13. Open BIBI-OH MERMAID ELEMS (123). Resize 15%. Copy and paste as new layer. Place it above the castle on the left. Merge all visible layer. Rename it ANI. Turn it invisible and visible the FRAME layer.

14. Click on FRAME layer. Open BIBI-OH MERMAID ELEMS (106). Resize 60%. Copy and paste as new layer. Move it down and to left.

15. Open BIBI-OH MERMAID ELEMS (139). Resize 20%. Copy and paste as new layer. Move it down and to left. Duplicate. Mirror. Duplicate again. Place it on the right side of the first one.

16. Open BIBI-OH MERMAID ELEMS (51). Resize 45%. Copy and paste as new layer. Move it to right.

17. Open BIBI-OH MERMAID ELEMS (79). Resize 50%. Copy and paste as new layer. Move it to right.

18. Open BIBI-OH MERMAID ELEMS (129). Resize 20%. Copy and paste as new layer. Move it down and a little to right.

19. Open BIBI-OH MERMAID ELEMS (122). Resize 40%. Mirror. Copy and paste as new layer. Move it down and to right.

20. Open BIBI-OH MERMAID ELEMS (26). Resize 45%. Copy and paste as new layer. Move it down and to left. Place it in front of the two flowers. 

21. Open your tube. Resize. Copy and paste as new layer. Place the mermais seated on the rock at the left.

22. Open BIBI-OH MERMAID ELEMS (13). Resize 30%. Mirror. Copy and paste as new layer. Move it down and to right. Place it like is leaving the frame.

23. Add your copyright info and license#. Add your name and merge all visible layers. Rename it FRAME. Leave it open to ease the bottom elements placement. Turn the original paper back visible. Click on the Layer 1 (bottom layer, but keep it invisible).

24. Open BIBI-OH MERMAID ELEMS (64). Copy and paste as new layer. Move it down and to right. Duplicate. Mirror. Flip.

25. Open BIBI-OH MERMAID ELEMS (89). Resize 55%. Copy and paste as new layer. Move it to left. Duplicate. Mirror.

26. Open BIBI-OH MERMAID ELEMS (108). Resize 10%. Copy and paste as new layer. Place it over the tree braches. Duplicate and cover some other branches with it. Use mirror and resize again if wanted.

27. Open BIBI-OH MERMAID ELEMS (109). Resize 15%. Copy and paste as new layer. Place it over the tree braches. Duplicate and cover some other branches with it. Use mirror and resize again if wanted.

28. Turn FRAME layer invisible and merge all visible layers. Rename it BACK.

29. Use Crop > Merged Opaque to get rid of any extra space. Turn Layer 1 (bottom layer) visible. Now we start to animate. 

OPCIONAL --> If you do not want to do the animation turn all layers visible and save as PNG.


ANIMATION SHOP

1. PSP -> With BACK layer and Layer 1 visible and all other layers invisible. Copy merged.

2. AS -> Activate the Propagate Paste. Paste as new animation. Reserve.

3. PSP -> With FRAME layer and Layer 1 visible and all other layers invisible. Copy merged.

4. AS -> Paste as new animation. Reserve.

5. PSP -> With ANI layer and Layer 1 visible and all other layers invisible. Copy merged.

6. AS -> Click on Effects > Insert Image Effect. Chose Underwater and use the settings I show below (including the waves):


7. Click on first frame and delete. Now you have 9 frames. Click on first frame and select all. 

8. Activate your tag BACK. Duplicate it until you have 9 frames. Click on first frame and select all. 

9. Click on the underwater animation and copy. 

10. Activate the tag BACK. Paste into selected frames. Use the paper background as placement. Click to insert the animation.

11. Activate the tag FRAME. Copy. 

12. Activate the tag almost ready you made. Made sure all frames are selected. Paste into selected frames. Take care when placing the frame over the background.

13. Open Simone's animation. Select all frames. Resize 35%. Cull animation as shown below twice to keep 6 frames in total. Click on first frame and select all. Copy.


14. Activate your tag. Click on frame 3 and holding shift click on frame 8 (6 frames). On frame 3 paste into selected frames and place it over the dolphin head. 

15. OPTIONAL -> Open your Bubble animation. Click on first layer to select all. Copy. Activate your tag. Click on frame 1. Select all. Paste into selected frames and place the bubbles in two places.

16. Click on frame 1. Select all. Change the Frame Properties to 18. Save as GIF.


May 4, 2016

Mermaid Dream ~ by Joanne Salgado


Tutorial written by Joanne Salgado on May 04th, 2016
for those who have a working knowledge of PSP.
Any resemblance to any other tutorial is coincidental.
Do not copy and paste this tutorial anywhere on the net.
If you want to translate please ask first. 

Tube: Mermaid Dream by LadyMishka - you can purchase here
Kit Mermaid Dream by Design by Joan - you can purchase here
Font: Monoclyceride

Don't forget to save often.
At any point if you have doubts check my tag.

1. Open a new image 650x550

2. Open element 'MERMAID DREAM_DBJ-ELEM (69)' copy and paste as new layer. Resize 75%.

3. Open paper 'MERMAID DREAM_DBJ-PP (1)' copy and paste as new layer. Resize 65%. Apply mask. Merge Group. Move this layer below the frame layer.

4. Open element 'MERMAID DREAM_DBJ-ELEM (54)' copy and paste as new layer.

5. Open element 'MERMAID DREAM_DBJ-ELEM (61)' copy and paste as new layer. Resize 40%. Move this layer above the frame layer. Arrange it to the bottom right.

6. Open element 'MERMAID DREAM_DBJ-ELEM (36)' copy and paste as new layer. Resize 40%. Mirror. Arrange it to the left.

7. Open element 'MERMAID DREAM_DBJ-ELEM (73)' copy and paste as new layer. Resize 40%. Arrange it to the bottom left.

8. Open element 'MERMAID DREAM_DBJ-ELEM (71)' copy and paste as new layer. Resize 60%. Arrange it to bottom.

9. Open element 'MERMAID DREAM_DBJ-ELEM (26)' copy and paste as new layer. Resize 50%. Arrange it to the bottom left.

10. Open element 'MERMAID DREAM_DBJ-ELEM (44)' copy and paste as new layer. Resize 45%. Arrange it to top.

11. Open element 'MERMAID DREAM_DBJ-ELEM (12)' copy and paste as new layer. Resize 30%. Arrange it to the bottom right.

12. Open element 'MERMAID DREAM_DBJ-ELEM (70)' copy and paste as new layer.

13. Open element 'MERMAID DREAM_DBJ-ELEM (3)' copy and paste as new layer. Resize 30%. Arrange it to the top left.

14. Open element 'MERMAID DREAM_DBJ-ELEM (22)' copy and paste as new layer. Resize 60%. Change opacity to 54.

15. Open element 'MERMAID DREAM_DBJ-ELEM (82)' copy and paste as new layer. Resize 30%. Arrange it to the left.

16. Open your tube. Copy and paste as new layer. Resize as needed and arrange it to the right.

17. Open element 'MERMAID DREAM_DBJ-ELEM (30)' copy and paste as new layer. Resize 30%. Arrange it to the bottom right.

18. Open element 'MERMAID DREAM_DBJ-ELEM (55)' copy and paste as new layer. Resize 25%. Arrange it to bottom.

19. Open element 'MERMAID DREAM_DBJ-ELEM (34)' copy and paste as new layer. Resize 25%. Arrange it to the bottom right.

20. Open element 'MERMAID DREAM_DBJ-ELEM (63)' copy and paste as new layer. Resize 25%. Arrange it to the bottom left.

21. Open element 'MERMAID DREAM_DBJ-ELEM (18)' copy and paste as new layer. Resize 10%. Arrange it to the top.

22. Open element 'MERMAID DREAM_DBJ-ELEM (59)' copy and paste as new layer. Resize 20%. Arrange it to the top right.

23. Open element 'MERMAID DREAM_DBJ-ELEM (43)' copy and paste as new layer. Arrange it to bottom.

24. Add shadow as you prefer.

25. Add copyright. Add name. Save as PNG.

Princess Loreta ~ by Joanne Salgado


Tutorial written by Joanne Salgado on May 04th, 2016
for those who have a working knowledge of PSP.
Any resemblance to any other tutorial is coincidental.
Do not copy and paste this tutorial anywhere on the net.
If you want to translate please ask first. 

Tube: Dark Princess Loreta by LadyMishka - you can purchase here
Kit Dark Princess Loreta by Rieneke Designs - you can purchase here
Font: Tenebrae

Don't forget to save often.
At any point if you have doubts check my tag.

1. Open a new image 650x600

2. Open element 'RD-DarkPrincesLoreta-element (9)' copy and paste as new layer. Resize 80%.

3. Open element 'RD-DarkPrincesLoreta-element (17)' copy and paste as new layer. Move this layer below the frame layer. Arrange it to bottom.

4. Open element 'RD-DarkPrincesLoreta-element (46)' copy and paste as new layer. Arrange it to the top right. Duplicate. Mirror.

5. Open element 'RD-DarkPrincesLoreta-element (5)' copy and paste as new layer. Arrange it to the top.

6. Open paper 'RD-DarkPrincessLoreta-paper (9)' copy and paste as new layer. Resize 40%. Arrange it inside the frame and clean the outside parts.

7. Open element 'RD-DarkPrincesLoreta-element (43)' copy and paste as new layer. Resize 40%. Arrange it to the top left inside the frame and clean the outside parts.

8. Open your tube. Copy and paste as new layer. Resize as needed. Move this layer above the frame layer. Arrange the tube inside the frame and clean the lower parts.

9. Open element 'RD-DarkPrincesLoreta-element (28)' copy and paste as new layer. Resize 30%. Arrange it to the left a little to the bottom.

10. Open element 'RD-DarkPrincesLoreta-element (6)' copy and paste as new layer. Resize 30%. Arrange it to the right.

11. Open element 'RD-DarkPrincesLoreta-element (4)' copy and paste as new layer. Resize 30%. Arrange it a little below the one we just added.

12. Open element 'RD-DarkPrincesLoreta-element (22)' copy and paste as new layer. Resize 22%. Arrange it to the top left.

13. Open element 'RD-DarkPrincesLoreta-element (16)' copy and paste as new layer. Arrange it to the bottom of the frame.

14. Open element 'RD-DarkPrincesLoreta-element (35)' copy and paste as new layer. Resize 8%. Arrange it to the bottom near the skull.

15. Open element 'RD-DarkPrincesLoreta-element (56)' copy and paste as new layer. Resize 30%. Arrange it to the bottom right.

16. Open element 'RD-DarkPrincesLoreta-element (60)' copy and paste as new layer. Resize 25%. Arrange it to the bottom right.

17. Open element 'RD-DarkPrincesLoreta-element (40)' copy and paste as new layer. Resize 40%. Arrange it to the top left.

18. Open element 'RD-DarkPrincesLoreta-element (20)' copy and paste as new layer. Resize 50%. Arrange it to the bottom left.

19. Open element 'RD-DarkPrincesLoreta-element (19)' copy and paste as new layer. Resize 50%. Arrange it to the bottom left.

20. Open element 'RD-DarkPrincesLoreta-element (24)' copy and paste as new layer. Resize 15%. Arrange it to the bottom right.

21. Open element 'RD-DarkPrincesLoreta-element (14)' copy and paste as new layer. Resize 18%. Arrange it to bottom.

22. Add shadow as you prefer.

23. Add copyright. Add name. Save as PNG.

Mermaid Tears ~ by Joanne Salgado


Tutorial written by Joanne Salgado on May 04th, 2016
for those who have a working knowledge of PSP.
Any resemblance to any other tutorial is coincidental.
Do not copy and paste this tutorial anywhere on the net.
If you want to translate please ask first. 

Tube: Mermaid Tears Gaela by LadyMishka - you can purchase here
Kit Mermaid Tears by Chili Designz - you can purchase here
Font: White Pine

Don't forget to save often.
At any point if you have doubts check my tag.

1. Open a new image 650x550

2. Open frame 'CHILI_DESIGNZ_MermaidTears_frame2' copy and paste as new layer. Resize 65%.

3. Open element 'CHILI_DESIGNZ_MermaidTears_flower' copy and paste as new layer. Move this layer below the frame layer. Arrange it to the top right.

4. Open element 'CHILI_DESIGNZ_MermaidTears_coral' copy and paste as new layer. Rotate right 90. Arrange it to the right.

5. Open element 'CHILI_DESIGNZ_MermaidTears_flower2' copy and paste as new layer. Arrange it to the bottom right.

6. Open element 'CHILI_DESIGNZ_MermaidTears_coral' again, copy and paste as new layer. Arrange it to the top left.

7. Open element 'CHILI_DESIGNZ_MermaidTears_gem2' copy and paste as new layer. Arrange it to the top left.

8. Open element 'CHILI_DESIGNZ_MermaidTears_sand3' copy and paste as new layer. Arrange it to bottom.

9. Open paper 'CHILI_DESIGNZ_MermaidTears_paper14' copy and paste as new layer. Resize 40%. Arrange it inside the frame and clean the outside parts.

10. Open element 'CHILI_DESIGNZ_MermaidTears_greenery3' copy and paste as new layer. Resize 50%. Move this layer above the frame layer. Arrange it to the bottom left.

11. Open element CHILI_DESIGNZ_MermaidTears_coral2' copy and paste as new layer. Resize 50%. Arrange it to the bottom right.

12. Open element 'CHILI_DESIGNZ_MermaidTears_coral3' copy and paste as new layer. Resize 40%. Arrange it to the bottom left.

13. Open element 'CHILI_DESIGNZ_MermaidTears_coral4' copy and paste as new layer. Resize 50%. Arrange it to the bottom left.

14. Open element 'CHILI_DESIGNZ_MermaidTears_pearls3' copy and paste as new layer. Resize 50%. Arrange it to the bottom left.

15. Open element 'CHILI_DESIGNZ_MermaidTears_chest' copy and paste as new layer. Resize 50%. Arrange it to the bottom left.

16. Open element 'CHILI_DESIGNZ_MermaidTears_fish4' copy and paste as new layer. Resize 30%. Arrange it to the top left.

17. Open element 'CHILI_DESIGNZ_MermaidTears_fish8' copy and paste as new layer. Resize 30%. Arrange it to the bottom left.

18. Open element 'CHILI_DESIGNZ_MermaidTears_crab2' copy and paste as new layer. Resize 30%. Mirror. Arrange it to the bottom left.

19. Open element 'CHILI_DESIGNZ_MermaidTears_fish7' copy and paste as new layer. Resize 30%. Arrange it to the top right.

20. Open element 'CHILI_DESIGNZ_MermaidTears_shell' copy and paste as new layer. Resize 25%. Arrange it to the bottom right.

21. Open element 'CHILI_DESIGNZ_MermaidTears_shell19' copy and paste as new layer. Resize 30%. Arrange it to the bottom left.

22. Open element 'CHILI_DESIGNZ_MermaidTears_starfish3' copy and paste as new layer. Resize 30%. Arrange it to the top right of the frame.

23. Open element 'CHILI_DESIGNZ_MermaidTears_turtle' copy and paste as new layer. Resize 30%. Arrange it to the right.

24. Open your tube. Copy and paste as new layer. Resize as needed and arrange it a little to the right.

25. Open element 'CHILI_DESIGNZ_MermaidTears_goble' copy and paste as new layer. Resize 30%. Arrange it to the left.

26. Open element 'CHILI_DESIGNZ_MermaidTears_fish3' copy and paste as new layer. Resize 30%. Arrange it to the bottom right.

27. Open element 'CHILI_DESIGNZ_MermaidTears_shell8' copy and paste as new layer. Resize 25%. Arrange it to the bottom.

28. Open element 'CHILI_DESIGNZ_MermaidTears_sparkles4' copy and paste as new layer. Mirror. Change opacity to 58.

29. Open element 'CHILI_DESIGNZ_MermaidTears_sparkles' copy and paste as new layer. Arrange it to the top right.

30. Open element 'CHILI_DESIGNZ_MermaidTears_bubbles2' copy and paste as new layer. Resize 80%. Arrange it to the right and change opacity to 66.

31. Open element 'CHILI_DESIGNZ_MermaidTears_bubbles' copy and paste as new layer. Resize 80%. Arrange it to the left and change opacity to 56.

32. Open element 'CHILI_DESIGNZ_MermaidTears_water4' copy and paste as new layer. Resize 70%. Arrange it to the top.

33. Add shadow as you prefer.

34. Add copyright. Add name. Save as PNG.

May 1, 2016

Princess Gaela ~ by Joanne Salgado


Tutorial written by Joanne Salgado on April 29th, 2016
for those who have a working knowledge of PSP.
Any resemblance to any other tutorial is coincidental.
Do not copy and paste this tutorial anywhere on the net.
If you want to translate please ask first. 

Tube: Dark Princess Gaela by LadyMishka - you can purchase here
Kit Dark Princess by Chili Designz - you can purchase here
Font: AnnaEF

Don't forget to save often.
At any point if you have doubts check my tag.

1. Open a new image 650x550

2. Open element 'CHILI_DESIGNZ_DarkPrincess_entrance' copy and paste as new layer. Resize 70%.

3. Open paper 'CHILI_DESIGNZ_DarkPrincess_paper8' copy and paste as new layer. Resize 40%. Move this layer below the entrance layer.

4. Open element 'CHILI_DESIGNZ_DarkPrincess_bg' copy and paste as new layer. Resize 50%. Arrange it inside the entrance and change opacity to 50.

5. Open element 'CHILI_DESIGNZ_DarkPrincess_lightning' copy and paste as new layer. Resize 50%. Arrange it inside the entrance. Clean the parts outside.

6. Open element 'CHILI_DESIGNZ_DarkPrincess_leaf' copy and paste as new layer. Resize 50%. Arrange it to the top right.

7. Open element 'CHILI_DESIGNZ_DarkPrincess_flower3' copy and paste as new layer. Arrange it to the top right. Clean the parts that appears inside the entrance.

8. Open element 'CHILI_DESIGNZ_DarkPrincess_bat3' copy and paste as new layer. Resize 35%. Move this layer above the entrance layer. Arrange it a little to the top right of the entrance.

9. Open element 'CHILI_DESIGNZ_DarkPrincess_orchid' copy and paste as new layer. Resize 50%. Arrange it to the bottom left.

10. Open element 'CHILI_DESIGNZ_DarkPrincess_rose2' copy and paste as new layer. Resize 50%. Arrange it to the bottom left.

11. Open element 'CHILI_DESIGNZ_DarkPrincess_stone3' copy and paste as new layer. Resize 50%. Arrange it to the bottom left.

12. Open element 'CHILI_DESIGNZ_DarkPrincess_deco6' copy and paste as new layer. Resize 28%. Arrange it to the bottom left.

13. Open element 'CHILI_DESIGNZ_DarkPrincess_glass' copy and paste as new layer. Resize 30%. Arrange it to the bottom left, a little to the right of the deco we just added.

14. Open element 'CHILI_DESIGNZ_DarkPrincess_mushroom2' cdopy and paste as new layer. Resize 25%. Arrange it to the bottom left.

15. Open element 'CHILI_DESIGNZ_DarkPrincess_mushroom3' copy and paste as new layer. Resize 25%. Mirror. Arrange it to the bottom left, to the right from the tombstone.

16. Open element 'CHILI_DESIGNZ_DarkPrincess_raven' copy and paste as new layer. Resize 40%. Arrange it to the bottom left above the tombstone.

17. Open element 'CHILI_DESIGNZ_DarkPrincess_skull' copy and paste as new layer. Resize 30%. Mirror. Arrange it to the bottom left.

18. Open element 'CHILI_DESIGNZ_DarkPrincess_butterfly' copy and paste as new layer. Resize 60%. Arrange it to the top a little to the left.

19. Open element 'CHILI_DESIGNZ_DarkPrincess_candles' copy and paste as new layer. Resize 50%. Arrange it to the bottom right.

20. Open your tube. Copy and paste as new layer. Resize as needed and arrange it to the right.

21. Open element 'CHILI_DESIGNZ_DarkPrincess_roses' copy and paste as new layer. Resize 20%. Arrange it to the bottom left above the left side of the tombstone.

22. Open element 'CHILI_DESIGNZ_DarkPrincess_cat' copy and paste as new layer. Resize 35%. Arrange it to the bottom right.

23. Open element 'CHILI_DESIGNZ_DarkPrincess_sparkles4' copy and paste as new layer. Arrange it to the bottom left.

24. Open element 'CHILI_DESIGNZ_DarkPrincess_sparkles' copy and paste as new layer. Resize 75%. Arrange it to the right.

25. Add shadow as you prefer.

26. Add copyright. Add name. Save as PNG.