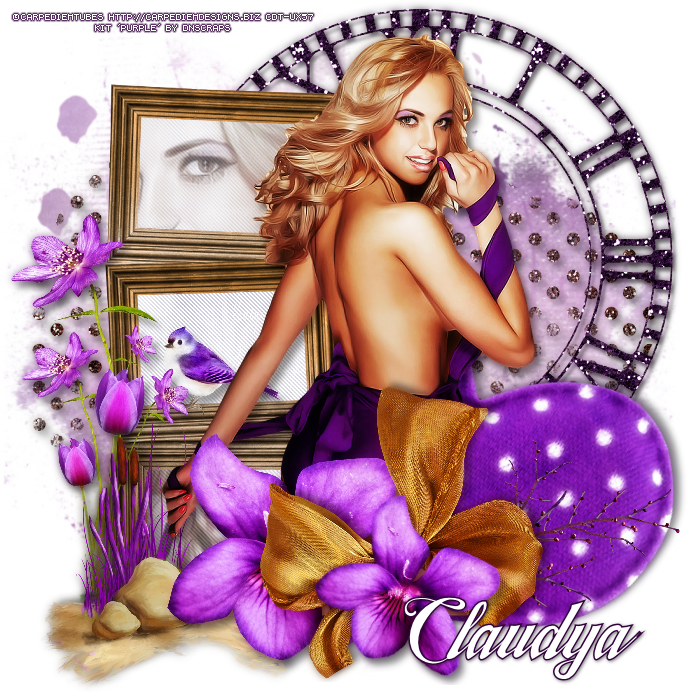
Showing posts with label DnScraps. Show all posts

July 24, 2015

Purple

PURPLE TUTORIAL


Tutorial written by Marcia Salgado on July 24th, 2015
for those who have a working knowledge of PSP.
Any resemblance to any other tutorial is coincidental.
Do not copy and paste this tutorial anywhere on the net.
If you want to translate please ask first. 

****************************************
Material:

Tube: "Purple" by Carpe Diem, you can purchase it at her store, here 
do not use without the proper #license.
PTU Kit "Purple" by DnScraps, you can purchase it here  
Mask: Rachel Design Mask, RD_MaskSet80_Mask4, here
Plugin: Penta.com
Font: TradeWind

****************************************

--> Remember to save often and use my tag as reference if necessary. Use a Drop Shadow of your choice. 

1. Create a new image 700x700. Add a new layer. Select all.

2. Open Purplekitpudnpaper5. Copy and paste into selection. Deselect. Apply Rachel's mask. Merge group. Move it up left. Duplicate. Mirror. Flip. Merge down. 

3. Open Purplekitpudnmasks. Resize 80%. Copy and paste as new layer.

4. Open Purplekitpudnclock. Resize 70%. Copy and paste as new layer. Move it up right.

5. Open Purplekitpudnbigheart. Resize 60%. Free Rotate: Right-25. Copy and paste as new layer. Move it down right.

6. Open Purplekitpudntreeframe. Resize 70%, Copy and paste as new layer. Move it to left. Select inside all 3 frames. Expand > 3. Add a new layer and move it below frame layer.

7. Open Purplekitpudnpaper3. Copy and paste into selection. Deselect. Apply Penta.com > Jeans.

8. Click on frame layer. Select only first frame. Add a new layer. Expand > 3. Open your tube, mirror it and with selection tool - Rectangle Shape - select a part of it. Copy and paste into selection. Move this layer below frame Select inside the third frame. Expand > 3. Click on layer below the frame. Select another part of your tube the same way you did before. Copy and paste into selection. Blend Mode: Luminance (Legacy) and low the opacity to 48.

9. Click on frame layer. Open Purplekitpudnbird. Resize 15%. Copy and paste as new layer. Place it over the second frame border.

10. Open Purplekitpudnprettyflowers. Resize 50%. Mirror. Copy and paste as new layer. Move it down left and place it on frames side.

11. Open Purplekitpudntulips. Resize 30%. Copy and paste as new layer. Move it down left and place it in front of the previous flower.

12. Open Purplekitpudnscene. Resize 35%. Copy and paste as new layer. Move it down left and place it over the flowers base.

13. Open your tube. Resize it if needed. Copy and paste as new layer. Move it to right.

14. Open Purplekitpudnbranchs. Resize 50%. Copy and paste as new layer. Move it down right.

15. Open Purplekitpudnflowersss2. Resize 30%. Copy and paste as new layer. Move it down. Duplicate. Resize 70%. Free Rotate: Right-30. Move a little down and to right.

16. Open Purplekitpudnbow. Resize 40%. Copy and paste asnew layer. Move it don a little to right and place it between the two previous flowers - just below first frame.

--> Resize if needed. Add your copyright info and license#. Add your name and save as PNG.


July 5, 2015

Rolana with Forest Secret

ENCHANTRESS TUTORIAL

*Click to see original size*

Tutorial written by Marcia Salgado on July 5th, 2015
for those who have a working knowledge of PSP.
Any resemblance to any other tutorial is coincidental.
Do not copy and paste this tutorial anywhere on the net.
If you want to translate please ask first. 

****************************************
Material:

Tube: "Rolana" by Natalia Nz, you can purchase it here
do not use without the proper #license.
PTU Kit "Forest Secret" by DnScraps, you can purchase it here 
Mask: Narah_mask_0295, here
**Narah's Masks are no longer online 
so I have her mask available on my materials**
Filter: Penta.com
Font: DJB Holly Berry Wonderland

****************************************

--> Remember to save often and use my tag as reference if necessary. Use a Drop Shadow of your like.

1. Create a new image 780x500. Add a new layer. Open ForestSecretdnkitpupaper5. Copy and paste into selection. Deselect. Apply Narah's mask. Merge group.

2. Open Forestsecretdnkitpulightss. Resize 80%. Free Rotate: Right-90. Copy and paste as new layer. Move it up and left.

3. Open Forestsecretdnkitpumagicstars. Resize 70%. Copy and paste as new layer.

4. Open Forestsecretdnkitpuswirl. Resize 80%. Free Rotate: Left-100. Copy and paste as new layer. Move it up and left. Join the left side of the branch with the circle top.

5. Open Forestsecretdnkitpuleavess3. Resize 70%
. Mirror. Copy and paste as new layer. Move it to left.

6. Open Forestsecretdnkitpuleavess2. Mirror. Copy and paste as new layer. Select inside the frame part

7. Add a new layer. Open ForestSecretdnkitpupaper5. Copy and paste into selection. Keep selected. Apply Penta.com > Jeans > Default. Move this layer one down. Open your tube close up, resize if needed. Copy and paste as new layer. Place inside the frame part of the branch. Invert the selection and hit delete. Select all. Selections > Clip to canvas. Image > Crop to selection.

8. Open Forestsecretdnkitpumagicframe. Resize 50%. Copy and paste as new layer. Move it to right and place it under the branch frame.

9. Click on first layer, should be the branch frame. Open Forestsecretdnkitpumagic. Resize 40%. Copy and paste as new layer. Move it to right. Hang it on the frame.

10. Open Forestsecretdnkitpuleaves. Resize 40%. Free Rotate: Left-100. Copy and paste as new layer. Move it to right. Place it over the branch. Duplicate. Flip. Resize 70%. Move it up and to the left. Place over another part of the branch.Duplicate it and resize 70% and place it around  and place it around as much as you want (did it twice).

11. Open Forestsecretdnkitputree. Resize 50%. Select the tree trunk and hit delete. Free Rotate: Right-100. Copy and paste as new layer. Duplicate. Mirror. Flip. Resize 70%. Free rotate: Right-30. Duplicate it and resize 70% and place it around as much as you want (did it twice).

12. Open Forestsecretdnkitpudragonfly. Resize 20%. Copy and paste as new layer. Move it to left and a little down.

--> Resize if wanted. Add your copyright info and license#. Add your name. Save as PNG.


July 3, 2015

Ingrid and Magical Wishes - Xmas in July Collab

MAGIC XMAS TUTORIAL


Tutorial written by Marcia Salgado on July 1st, 2015
for those who have a working knowledge of PSP.
Any resemblance to any other tutorial is coincidental.
Do not copy and paste this tutorial anywhere on the net.
If you want to translate please ask first. 

****************************************
Material:

Tube: "Ingrid" by Carpe Diem, and PTU Kit: "Magical Wishes" by DnScraps,
a Store Collab you can purchase here 
do not use without the proper #license.
Mask: Dee's masks - DD_2014FM2.jpg, here and DD_WinterMask_3, here
and Tonya's mask - Mask47byTonya here
Frame Glass: mar2015_ovalglass1 by me, just click and save.
Font: Xiomara

****************************************

--> Remember to save often and use my tag as reference if necessary. Used the Drop Shadow: 1-1-50-5 in most layers. 

--> The elements placements are chosen to be used with my tube, if you are using a different one you may want to arrange them to better fit yours.

1. Create a new image 700x700. Add a new layer. Select all. Open Magicalwishesdnpupaper. Copy and paste as new layer. Apply the mask DD_2014FM2.jpg. Merge group. 

2. Add a new layer. Fill it with #3b5415. Apply the mask DD_WinterMask_3. Merge group. Move it to right.

3. Add a new layer. Fill it with #a61b13. Apply the mask Mask47byTonya. Move it to left.

4. Open Magicalwishesdnsnowflakes2. Resize 50%. Copy and paste as new layer. Move it to bottom left.

5. Open Magicalwishesdnstars. Resize 85%. Copy and paste as new layer. Move it to right.

6. Open Magicalwishesdnoldframe. Resize 85%. Copy and paste as new layer. Move it to left.

7. Select inside the frame. Add a new layer. Open Magicalwishesdnpupaper4. Copy and paste into selection. 

8. Open Magicalwishesdntreestars. Resize 60%. Free Rotate: Left-8. Copy and paste as new layer. Place it on center of the paper oval frame.

9. Open mar2015_ovalglass1. Copy and paste as new layer. Place it over the paper oval frame and tree.

10. Click on first frame, should be the frame. Open Magicalwishesdnlabels. Resize 65%. Free Rotate: Left-50. Copy and paste as new layer. Move it up and left. Place it on frame left border.

11. Open Magicalwishesdnembellement. Resize 65%. Copy and paste as new layer. Move it up and left. Place it over the frame left border.


12. Open Magicalwishesdnsnowsstars. Resize 65%. Copy and paste as new layer. Move it down.

13. Open Magicalwishesdnribbonsnow. Resize 65%. Copy and paste as new layer. Move it down.

14. Open Magicalwishesdnwordart2. Resize 60%. Manual Color Correction: Black to #a40c05. Free Rotate: Left-8. Copy and paste as new layer. Move it to left a little down. Place it on left frame side. 

15. Open Magicalwishesdnsnowtree. Resize 60%. Copy and paste as new layer. Move it down and right.

16. Open your tube. Resize if needed. Copy and paste as new layer. Move it to right and place it in front of the snow tree. Add a suitable shadow.

--> Resize if wanted. Add your copyright info and license#. Add your name. Save as PNG.


July 1, 2015

Collab Kit - Xmas In July Store Collab


XMAS IN JULY STORE COLLAB

Tags made using the Sensational Xmas In July Store Collab with tons and tons of beautiful items! Inside this huge Collab you will find Tube, CU, Alphas, Scrapkits, and more...

You can add the Collab in your cart or receive it for FREE with a purchase.

Collab Kit kit can be found  at:

-> Scraps N Company - S&Co., here


June 29, 2015

Letana with Grabbag Forest

TRUE MIRROR TUTORIAL


Tutorial written by Marcia Salgado on June 29th, 2015
for those who have a working knowledge of PSP.
Any resemblance to any other tutorial is coincidental.
Do not copy and paste this tutorial anywhere on the net.
If you want to translate please ask first. 

****************************************
Material:

Tube: "Letana" by Natalia NZ, you can purchase it here 
do not use without the proper #license.
PTU Kit "Grabbag Forest" by DnScraps, you can purchase it here 
Mask: Dee's mask DD_NFM_2015_2, here (second from top)
Plugin: MuRa's Meister
My Materials: extra itens made by me, here
Font: fox in the snow

****************************************

--> Remember to save often and use my tag as reference if necessary. Used the Drop Shadow: 1-1-50-5 in most layers. Flower used is from Natalia's tube.

1. Create a new image 700x700. Open mar2015_simpleground from my materials. Copy and paste as new layer. Move it down.

2. Open your tube and select a part of it. Copy and paste as new layer. Apply MuRa's Meister > Copies > Wall Paper(rotate) > Default. Gaussian Blur > 10. Apply Dee's mask. Merge group. Texture Effects > Weave with the settings below (color #6b5b52):


3. Open Grabbagforesttree. Resize 40%. Copy and paste as new layer. Move it to left.

4. Open Grabbagforestfence. Resize 50%. Copy and paste as new layer. Move it down.

5. Open Grabbagforestwindow. Resize 40%. Copy and paste as new layer. Move it to right.

6. Open mar2015_mirrorplace from my materials. Copy and paste as new layer. Move it below the forest window layer and place it behind the window frame. It's to show where the mirror animation should be added later, but if you decided not to animate the tag, it will work as a motionless mirror as well. Rename the layer MIRROR.

7. Click on first layer, should be the forest window layer. Open Grabbagforestleaves. Resize 25%. Mirror. Copy and paste as new layer. Place it over the forest window top.

8. Open Grabbagforestleaves2. Resize 30%. Copy and paste as new layer. Move it down. Place it over the fence.

9. Open Grabbagforestoldtrunk. Resize 30%. Mirror. Copy and paste as new layer. Move it down. Place it on forest window bottom.

10. Open Grabbagforestspiral. Resize 25%. Copy and paste as new layer. Move it down and left.

11. Now I'm using the dress flower of Natalia's tube. Place them on many places to embellish the tag.

12. Open your tube. Resize if needed. Copy and paste as new layer. Move it to right.

13. Open mar2015_darewordart from my materials. Copy and paste as new layer. Move it up left.

--> Resize if wanted. Add your copyright info and license#. Add your name.

--> If you do not want to animate just save as PNG.

ANIMATION

1. PSP -> Click on MIRROR layer. From this layer down turn all layers invisible. Merge Visible. Rename it TOP. Turn the merged layer invisible and all rest visible. Merge visible again. Rename BACK. Copy merged.

2. Animation Shop -> Paste as new animation. Duplicate it until you have 6 frames. Select all. Open mar2015_mirrorani. Delete first frame (with my copyright). Select all. Copy. Back to main tag frames. Paste into selected frames and place the mirror over the marked place. Click to fix it.

3. PSP -> Turn BACK layer invisible and TOP layer visible. Copy merged.

4. Animation Shop -> Edit > Propagate paste. Paste as new animation. Copy. Click on your main tag layers. Paste into selected frames. Position and click to fix it. 

5. Animation Shop -> Open mar2015_dareani from my materials. Select all. Copy. Back to your main tag frames. Paste into selected frames. Place it over the word "dare" and click to fix it. Change the Frame Properties to 18. Save as GIF.


June 21, 2015

Angry Woman

LOCKED TUTORIAL

**Click to see original size**

Tutorial written by Marcia Salgado on June 21th, 2015
for those who have a working knowledge of PSP.
Any resemblance to any other tutorial is coincidental.
Do not copy and paste this tutorial anywhere on the net.
If you want to translate please ask first. 

****************************************
Material:

Tube: "Angry Woman" by Danny Lee, you can purchase it here 
do not use without the proper #license.
PTU Kit "Angry Woman" by DnScraps, you can purchase it here 
Font: P22 Cezanne Regular

****************************************

--> Remember to save often and use my tag as reference if necessary. Used the Drop Shadow: 1-1-50-5 in most layers. 

1. Create a new image of 851x315. Add a new layer. Select all. Open Angrywomandnkitpupaper4 Custom Selection: Left-0, Top-0, Right-799, Bottom-355. Copy and paste into selection. Deselect.

2. Open Angrywomandnkitpuhallo. Resize 50%. Copy and paste as new layer. Move it up. Duplicate. Mirror. Move to left. Merge down.

3. Open Angrywomandnkitpucity. Copy and paste as new layer. Move it to left. Duplicate. Move it to right. Merge down. Blend Mode: Multiply.

4. Open Angrywomandnkitpuarrow3. Resize 50%. Copy and paste as new layer. Move it up.

5. Open Angrywomandnkitpuarrow. Resize 50%. Copy and paste as new layer. Move it to up left.

6. Open Angrywomandnkitpuballs. Resize 40%. Copy and paste as new layer. Move it way right.

7. Open Angrywomandnkitpuflux2. Resize 40%. Copy and paste as new layer. Move it a little down and right.

8. Open Angrywomandnkitpumetalframe. Resize 40%. Copy and paste as new layer. Move it way to left.

9. Open Angrywomandnkitpucuteelve and Angrywomandnkitpucuteelve2. Resize 30%. Copy and paste as new layer. Move them down left. On black inverted heart use Free Rotate: Right-25. Merge down.

10. Open Angrywomandnkitpuflowers. Resize 40%. Copy and paste as new layer. Move it way down. Duplicate. Resize 80%. Move it a little to right and down. Duplicate. Mirror. Move it more to right and up.

11. Open Angrywomandnkitpudarks. Resize
 50%. Copy and paste as new layer. Move it to bottom left corner. Show only 1/4 of the element.

12. Open Angrywomandnkitpuclock. Resize 50%. Copy and paste as new layer. Move it down and right. 

13. Open Angrywomandnkitpulock. Resize 30%. With Free Selection tool create a selection around the padlock, keep the element open and the selection. Copy and paste as new layer. Place it over the top of red inverted heart.

14. Open Angrywomandnkitpumagicball. Resize 40%. Copy and paste as new layer. Place the lace part over the padlock arch. 

15. Open Angrywomandnkitpucompass2. Resize 20%. Copy and paste as new layer. Place it over the middle of magic ball thread. Erase the top of the circle of compass pendant.

16. Back to Angrywomandnkitpuclock. Invert the selection. Copy and paste as new layer. Mirror. Place it on the bottom edge of magic ball thread. Erase a part of the key left side to look like the knot is passing through key hole.

17. On your foreground color use #7a0c08 and in background color put #d68960. Create a Foreground+Background gradient: Angle-45, Repeat-1, Style-Linear. Add a new layer. Select all. Fill with the gradient. Contract > 5. Delete. Deselect. Noise: Gaussian-100-Monochrome.

18. Open your tube close up. Resize if needed. Copy and paste s new layer. Move it to right.

19. Add a new layer. Select all. Fill with black. Contract > 1. Delete. Deselect.

--> Add your copyright info (no URL by Facebook TOU) and license#. Add your name. Save as PNG.

--> Sometimes I had to change my Timeline size to 846x313 because when I add it to Facebook the image has extra pixels and do not fit perfectly. So try this size if the same is happening to you. 


June 11, 2015

Sharon - Show Off


**Click to see original size**


== NEW PTU TAG AND TIMELINE S&CO. CT ==
CARPE DIEM AND DNSCRAPS

Featuring "Sharon", a Carpe Diem tube 
and "Sharon", DnScraps kit at Scraps N Company - S&Co.

DnScraps kit has 8 papers and 60 elements so you can play with it. Very versatile and can be used with any other tubes and artists you have.

Carpe Diem's tube can be found  at:
-> Scraps N Company - S&Co., here

DnScraps kit can be found  at:
-> Scraps N Company - S&Co., here


May 24, 2015

Umbrelland ~ by Joanne Salgado


Tutorial written by Joanne Salgado on May 24th, 2015
for those who have a working knowledge of PSP.
Any resemblance to any other tutorial is coincidental.
Do not copy and paste this tutorial anywhere on the net.
If you want to translate please ask first. 

Tube: Alice in Umbelland by Danny Lee - you can purchase here
Kit Alice in Umbelland by DnScraps - you can purchase here
Font: Ladybird

Don't forget to save often.
At any point if you have doubts check my tag.

1. Open a new image 600x500

2. Open element 'Aliceinumbrelldnpudnwater2' copy and paste as new layer. Resize 70%. Arrange to bottom.

3. Open element 'Aliceinumbrelldnpudncloud' copy and paste as new layer. Resize 40%. Mirror. Arrange it to the top left.

4. Open element 'Aliceinumbrelldnpudnpaperboat' copy and paste as new layer. Resize 15%. Arrange it to the bottom right.

5. Open element 'Aliceinumbrelldnpudnumbrellatowater' copy and paste as new layer. Resize 30%. Mirror. Arrange it to the bottom right. Move this below the paper boat layer.

7. Open element 'Aliceinumbrelldnpudnstarss' copy and paste as new layer. Resize 80%. Mirror. Move this above the water floor.

8. Open element 'Aliceinumbrelldnpudnbank' copy and paste as new layer. Resize 40%. Arrange it to the bottom left.

9. Open element 'Aliceinumbrelldnpudnbunny' copy and paste as new layer. Resize 20%. Arrange it above the bank.

10. Open element 'Aliceinumbrelldnpudnlattern' copy and paste as new layer. Resize 50%. Arrange it to the right. Move this below the umbrella layer.

11. Add shadow. I used: 1-1-65-2 #486f94

12. Add copyright.

13. Add name. I used: Ladybird / size: 48

Save as PNG

May 14, 2015

Golden Guitar ~ by Joanne Salgado


Tutorial written by Joanne Salgado on May 14th, 2015
for those who have a working knowledge of PSP.
Any resemblance to any other tutorial is coincidental.
Do not copy and paste this tutorial anywhere on the net.
If you want to translate please ask first. 

Tube: New Guitar Star by Celinart Pinup - you can purchase here
Kit New Guitar Star by DnScraps - you can purchase here
Font: Interdimensional

Don't forget to save often.
At any point if you have doubts check my tag.

1. Open a new image 600x500

2. Open element 'Newguitarstdnkitpudarkframe' copy and paste as new layer. Resize 50%.

3. Open element 'Newguitarstdnkitpuspeakers' copy and paste as new layer. Resize 70%. Move this layer below the frame layer. Arrange it to the top.

4. Open element 'Newguitarstdnkitpudisc' copy and paste as new layer. Resize 30%. Arrange it to the bottom right.

5. Open element 'Newguitarstdnkitpustarrss' copy and paste as new layer. Resize 60%. Arrange it to the bottom right.

6. Open paper 'Newguitarstdnkitpupaper9' copy and paste as new layer. Resize 50%. Clean the parts that appears outside the frame.

7. Open element 'Newguitarstdnkitpuspeaker' copy and paste as new layer. Resize 40%. Move this layer above the frame layer. Arrange it to the bottom left.

8. Open element 'Newguitarstdnkitpumusics' copy and paste as new layer. Resize 40%. Arrange it above the speaker.

9. Open element 'Newguitarstdnkitpuguitar3' copy and paste as new layer. Resize 40%. Arrange it by the right side of the speaker.

10. Open your tube. Copy and paste as new layer. Resize as you prefer and arrange it inside the frame. Clean the bottom of the tube so it looks like its coming from inside the frame.

11. Open element 'Newguitarstdnkitpububbles' copy and paste as new layer. Resize 70%. Mirror.

12. Open element 'Newguitarstdnkitpulights' copy and paste as new layer. Resize 70%. Arrange it to the bottom. Duplicate. Flip.

13. Open element 'Newguitarstdnkitpusweethallo' copy and paste as new layer. Resize 60%. Arrange it to the top right. Change opacity to 60.

14. Add shadow. I used: 1-1-65-2 black.

15. Add copyright.

16. Add name. I used: Interdimensional / size: 48

Save as PNG

Moments ~ by Joanne Salgado


Tutorial written by Joanne Salgado on May 14th, 2015
for those who have a working knowledge of PSP.
Any resemblance to any other tutorial is coincidental.
Do not copy and paste this tutorial anywhere on the net.
If you want to translate please ask first. 

Tube: Bonnie Pink by LadyMishka Dolls - you can purchase here
Kit Spring White by DnScraps - you can purchase here
Font: Almond Script

Don't forget to save often.
At any point if you have doubts check my tag.

1. Open a new image 500x500

2. Open element 'Springwhitekitpudnstarss2' copy and paste as new layer. Resize 60%. Arrange it to the left. Duplicate, mirror.

3. Open element 'Springwhitekitpudngrungeframe' copy and paste as new layer. Resize 60%.

4. Open paper 'Springwhitekitdnpaper8' copy and paste as new layer. Resize 50%. Move this layer below the frame layer. Arrange it inside the frame and clean the parts that appears outside the frame.

5. Open element 'Springwhitekitpudntulips' copy and paste as new layer. Resize 40%. Move this layer above the frame layer. Arrange it to the bottom left the frame as its coming from inside the frame. Clean the parts that appears outside.

6. Open your tube. Copy and paste as new layer. Resize as you prefer and arrange it to the left.

7. Open element 'Springwhitekitpudnbubbles' copy and paste as new layer. Resize 50%. Mirror.

8. Add shadow as you prefer. I used: 1-1-65-2 #404040.

9. Add copyright.

10. Add name. I used: Almond Script / size: 36

Save as PNG

May 13, 2015

Magic Land ~ by Joanne Salgado


Tutorial written by Joanne Salgado on May 13th, 2015
for those who have a working knowledge of PSP.
Any resemblance to any other tutorial is coincidental.
Do not copy and paste this tutorial anywhere on the net.
If you want to translate please ask first. 

Tube: Kitty 1 by Ladymishka Dolls - you can purchase here 
Kit Bunny Ears by DnScraps - you can purchase here 
Font: Agency FB

Don't forget to save often.
At any point if you have doubts check my tag.

1. Open a new image 500x500

2. Open element 'Bunnyeartskitpudnhousemagic' copy and paste as new layer. Resize 64%.

3. Open element 'Bunnyeartskitpudnedgehoge' copy and paste as new layer. Resize 10%. Arrange it to the bottom right of the grass.

4. Open element 'Bunnyeartskitpudnbutterfly' copy and paste as new layer. Resize 10%. Arrange it to the top left of the house.

5. Open element 'Bunnyeartskitpudnsquirrel' copy and paste as new layer. Resize 20%. Mirror. Arrange it to the bottom left of the grass.

6. Open element 'Bunnyeartskitpudnbird' copy and paste as new layer. Resize 10%. Arrange it to the top of the house.

7. Open your tube. Copy and paste as new layer. Resize as you prefer and arrange it to the right.

8. Open element 'Bunnyeartskitpudnlights2' copy and paste as new layer. Resize 60%.

9. Open element 'Bunnyeartskitpudnlights' copy and paste as new layer. Resize 60%. Arrange it to the bottom.

10. Add shadow. I used 1-1-65-2 black.

11. Add copyright.

12. Add name. I used: Agency FB / size: 36

Save as PNG

Chicago

ATTITUDE TUTORIAL


Tutorial written by Marcia Salgado on April 30th, 2015
for those who have a working knowledge of PSP.
Any resemblance to any other tutorial is coincidental.
Do not copy and paste this tutorial anywhere on the net.
If you want to translate please ask first. 

****************************************
Material:

Tube: "Chicago" by Andy Cooper, you can purchase it here
do not use without the proper #license.
PTU Kit "Chicago Street" by DnScraps,
you can purchase it here 
Template: my template, mar2015_template10, here
Font: OlgaCTT

****************************************

--> Remember to save often and use my tag as reference if necessary. Used the Drop Shadow: 1-1-50-5 in most layers. 

1. Open my template. Duplicate. Close original. Delete © layer. Click on dodecagon layer. Select it. Add a new layer. Open ChicagoStreetdnkitpupaper5. Copy and paste into selection. Delete dodecagon layer. 

2. Click on rectangle left layer. Change the color #808080 to #676888. Select it. Add a new layer. Open ChicagoStreetdnkitpupaper7. Copy and paste into selection. Change the blend mode to Luminance (Legacy). Add a white border of 2px to rectangle left layer. Repeat all steps on rectangle right layer.

3. Open Chicagostreetkitpudntrafficlights2. Resize 50%. Copy and paste as new layer. Move it ot left up. Open Chicagostreetkitpudnsignal. Resize 50%. Copy and paste as new layer. Move it to right.

4. Click on ovel layer. Select it. Add a new layer. Open ChicagoStreetdnkitpupaper2. Copy and paste into selection. Delete oval layer. Open Chicagostreetkitpudncity. Copy and paste as new layer. Move a little up. Erase the unwanted shadow on sides.

5. Open Chicagostreetkitpudnstars. Copy and paste as new layer. Move it a little up. Click on rectangle white layer. Change the white color to #676888. Select it. Add a new layer. Open ChicagoStreetdnkitpupaper13. Copy and paste into selection. Blend Mode: Luminance (Legacy).

6. Click on white frame layer. Open your tube closeip. Copy and paste as new layer. Move it to right. Open Chicagostreetkitpudnfence. Resize 70%. Copy and paste as new layer. Move it to bottom right. Open Chicagostreetkitpudncrate. Resize 15%. Copy and paste as new layer. Move it to bottom left. Place it over fence left border.

7.  Open Chicagostreetkitpudnmail. Resize 30%. Copy and paste as new layer. Move it way middle right. Click on attitude layer. Change blacl color to #8eaaca. Add Noise: Gaussian-25-Monochrome. Apply Inner Bevel as shown below:


8. Click on i have one layer and change the color to white. Do the same on i don't need layer. Open Chicagostreetkitpudnmustangcar2. Resize 30%. Copy and paste as new layer. Move it to middle left. Place it over attitude word.

--> Add your copyright info and license#. Add your name and save as PNG.


April 26, 2015

Honey Bee ~ by Joanne Salgado


Tutorial written by Joanne Salgado on April 26th, 2015
for those who have a working knowledge of PSP.
Any resemblance to any other tutorial is coincidental.
Do not copy and paste this tutorial anywhere on the net.
If you want to translate please ask first. 

Tube: Honey Bee by Danny Lee - you can purchase here 
Kit Honey Bee by DnScraps - you can purchase here 
Template by me here 
Font: AR CHRISTY

Don't forget to save often.
At any point if you have doubts check my tag.

1. Open the template. Duplicate. Close the original. Delete the INFO layer.

2. Open element 'Honeybeekitpuspakles2' copy and paste as new layer. Resize 60%. Mirror.

3. Open element 'Honeybeekitpuhoney' copy and paste as new layer. Clean all the upper part of the element, we need just the floor honey. Arrange it to the bottom.

4. Open element 'Honeybeekitpubarrel' copy and paste as new layer. Resize 30%. Arrange it to the left.

5. Open element 'Honeybeekitpubee2' copy and paste as new layer. Resize 15%. Arrange it above the barrel.

6. Open element 'Honeybeekitpubee' copy and paste as new layer. Resize 15%. Arrange it to the top of the circle.

7. Open element 'Honeybeekitpulights' copy and paste as new layer. Resize 80%.

8. Open element 'Honeybeekitpulights2' copy and paste as new layer. Resize 79%.

9. Open your tube. Copy and paste as new layer. Resize as you prefer and arrange it to the right.

10. Open element 'Honeybeekitpucutestars' copy and paste as new layer. Resize 70%. Mirror. Arrange it to the bottom right.

11. Add shadow. I used: 1-1-65-2 black.

12. Add copyright.

13. Add name. I used: AR CHRISTY / size: 48

Save as PNG