Showing posts with label ChocUKDesigns. Show all posts

June 8, 2015

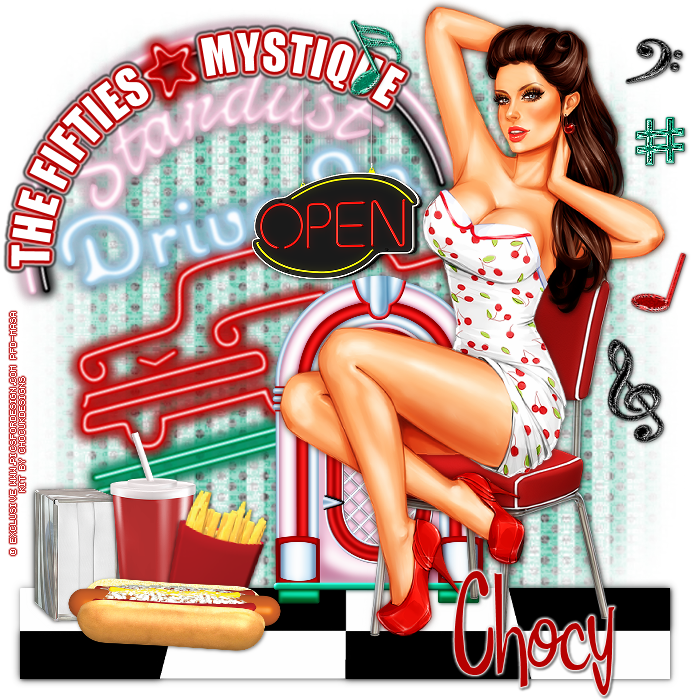
Rockin Rockabilly

FIFTIES TUTORIAL


Tutorial written by Marcia Salgado on June 8th, 2015
for those who have a working knowledge of PSP.
Any resemblance to any other tutorial is coincidental.
Do not copy and paste this tutorial anywhere on the net.
If you want to translate please ask first. 

****************************************
Material:

Tube: "Gwendolyn" a PFD Exclusive tube, you can purchase it here
PTU Kit "Rockin Rockabilly" by ChocUKDesigns, you can purchase it at:
Smiley Creations Shop here and Mystical Scraps here
Mask: Insatiable Dreams (Cat) - 67InsatiableDreams (Mask 4), here
Wordart: by me - mar2015_fiftieswordart (optional) - just click and save,
it's in white color:

Font: Fabulous 50s

****************************************

--> Remember to save often and use my tag as reference if necessary. Used the Drop Shadow: 1-1-50-5 in most layers.

1. Create a new image 700x700. Add a new layer. Select all. Open 'Paper' 10. Copy and paste into selection. Deselect. Apply Cat's Mask. Merge Group. With Deforme Tool (or Pick Tool) enlarge it a little on its sides. Low the opacity layer to 75.

2. Open 'element' 71. Resize 65%. Copy and paste as new layer. Move it to bottom.

3. Open 'element' 8. Free Rotate: Left-15. Copy and paste as new layer. Move it to left top.

4. Open 'element' 49. Resize 50%. Copy and paste as new layer. Move it up. Place its strings over the neon half circle.

5. Open 'element' 39. Resize 50%. Copy and paste as new layer. Move it down right.

6. Open 'element' 52. Mirror. Copy and paste as new layer. Move it to right.

7. Open 'element' 57. Resize 50%. Copy and paste as new layer. Move it left bottom.

8. Open 'element' 54. Resize 60%. Copy and paste as new layer. Move it left bottom. Place it on napkings right side.

9. Open 'element' 67. Resize 40%. Fre Rotate: Right-15. Copy and paste as new layer. Move it down and place it over soda drink right side.

10. Open 'element' 63. Resize 50%. Copy and paste as new layer. Move it left bottom. Place it in front of napkins, drink and fried potatoes.

11. This step is optional - Open the wordart. Copy and paste as new layer. Place it over the neon half circle. Add a 3px #b50101 border, a 2px white border and a 2px black border.

12. Open 'elements' 103, 104, 106, 107 and 110. Resize 30%. Copy and paste as new layer each one and with the Deform Tool (or Pick Tool) rotate the elements a little and place them around the tag.

13. Open your tube and resize if needed. Copy and paste as new layer. Move it to right and if it's possible use it seated on chair. Arrange elements to better fit your tube.

--> Resize if needed. Add your copyright and #license. Add your name. Save as PNG.


April 6, 2015

Carry On My Wayward Son - Show Off


== NEW CT CHOCUKDESIGNS PTU TAGS AND FB COVER ==

Featuring PTU Kit "Carry On My Wayward Son" by ChocUKDesigns, you can purchase it at 2 stores: PicsForDesign and Smiley Creations Shop

Chocy is a huge Supernatural fan and decided to dedicate her first goth kit to one of her favourite TV Shows. Whether you are a Dean, Sam, Castiel, Crowley or even a Bobby's girl or you may not even be a fan but love 'Dark Gothic' themed kits, this is for you! 

P.S. If you are a Fan of the show there's some awesome elements including Dean's baby!!!

The kit has 201 elements and 21 papers, so you can play with it. 
Tagger size. Personal use only

Kit can be found in two stores:

-> PicsForDesign - here

-> Smiley Creations Shop - here

Visit her blog:


March 15, 2015

Have An Eggsellent Easter ~ by Joanne Salgado


Tutorial written by Joanne Salgado on February 18th, 2015
for those who have a working knowledge of PSP.
Any resemblance to any other tutorial is coincidental.
Do not copy and paste this tutorial anywhere on the net.
If you want to translate please ask first. 

Tube: Keith Garvey - you can purchase here 
Kit Have An Eggsellent Easter by ChocUKDesigns - you can purchase here , here and here
Font: KG Two is Better Than One

Don't forget to save often.
At any point if you have doubts check my tag.

1. Open a new image 600x600.

2. Open frame '12' copy and paste as new layer. Resize 70%.

3. Open paper ' 10'copy and paste as new layer. Move this layer bellow the frame layer. Select the frame layer, with magic wand select inside it. Expand 3. Invert Selection. Select the paper layer, hit delete on your keyboard. Selection None.

4. Open element '64' copy and paste as new layer. Resize 60%. Mirror. Arrange it to the left of the frame. Move this layer bellow the paper layer.

5. Open element '65' copy and paste as new layer. Resize 60%. Arrange it to the bottom right of the frame.

6. Open element '54' copy and paste as new layer. Resize 30%. Move this layer above the frame layer. Arrange it to the top right of the frame.

7. Open element '51' copy and paste as new layer. Resize 20%. Arrange it to the top right above the purple flower.

8. Open element '52' copy and paste as new layer. Resize 10%. Arrange it to the top right above the blue flower.

9. Open your tube, copy and paste as new layer. Resize as you prefer and arrange it at the center of the frame. If needed use the eraser tool to clean tha parts that show outside the frame, but we will add other elements, so don't worry much.

10. Open element '96' copy and paste as new layer. Resize 50%. Mirror. Arrange it to the left of the frame.

11. Open element '100' copy and paste as new layer. Resize 50%. Mirror. Arrange it to the bottom of the frame. Move a little to the right.

12. Open element '52' copy and paste as new layer. Resize 30%. Arrange it to the left. The basket will cover a part of it so don't worry.

13. Open element '92' copy and paste as new layer. Resize 50%. Arrange it to the bottom left of th frame.

14. Open element '32' copy and paste as new layer. Resize 30%. Free Rotate left-35. Arrange it to the bottom to the right of the basket.

15. Open element '53' copy and paste as new layer. Resize 20%. Free Rotate right-35. Arrange it to the bottom of the basket.

16. Open element '34' copy and paste as new layer. Resize 15%. Arrange it to the handle of the basket (to the right).

17. Add shadow as you like. I used 1-1-65-2 black.

18. Add copyright.

19. Add name. I used: KG Two is Better Than One / size: 60

Save as PNG.

March 11, 2015

Have An Eggsellent Easter

EGGSELLENT EASTER TUTORIAL


Tutorial written by Marcia Salgado on March 11th, 2015
for those who have a working knowledge of PSP.
Any resemblance to any other tutorial is coincidental.
Do not copy and paste this tutorial anywhere on the net.
If you want to translate please ask first. 

****************************************
Material:

Tube: Misticheskaya Exclusive, you can purchase it at PFD, here 
PTU Kit "Have An Eggsellent Easter" by ChocUKDesigns, 
you can purchase it at 3 stores:
My template, here
Plugin: Eye Candy 6 > Gradient Glow
Font: Bazar

****************************************

--> Remember to save often and use my tag as reference if necessary. Used the Drop Shadow: 1-1-50-5 in most layers -> apply only after finished all tag.

1. Open my template, duplicate and close the original. Click on right circle layer and select the circle. Open paper 17. Copy and paste as new layer. Invert selection. Delete. Delete right circle layer. Apply Eye Candy > Gradient Glow. Settings below. Twice.

2. Click on round rectangle layer. Select the shape. Open paper 19. Copy and paste as new layer. Invert selection. Delete. Delete round rectangle layer. Apply Eye Candy > Gradient Glow same settings. Also twice. Open element 68. Resize 70%. Mirror. Flip. Copy and paste as new layer. Move it over the round rectangle shape. Open element 96. Resize 75%. Copy and paste as new layer. Move it over the round rectangle too, but a little to left.

3. Click on left circle layer. Select the circle. Open paper 16. Copy and paste as new layer. Invert selection. Delete. Delete left circle layer. Apply Eye Candy > Gradient Glow same settings. Also twice. Open element 65. Flip. Copy and paste as new layer. Move it a little to right. Open element 64. Resize 80%. Copy and paste as mew layer. Move it to left.

4. Click on big rectangle layer. Select the rectangle. Open paper 7. Copy and paste as new layer. Invert selection. Delete. Deselect. Delete big rectangle layer. Apply Eye Candy > Gradient Glow same settings. Same way before. Open element 90. Resize 53%. Copy and paste as new layer. Move it a little to left and to bottom. Open element 53. Resize 82%. Copy and paste as new layer. Move it to right and down a little. Open element 102. Resize 57%. Copy and paste as new layer. Move it between the pink flower and first chocolate egg.

5. Open your tube. Resize if needed. Copy and paste as new layer. Move where it suits you better.  Open element 107. Resize 47%. Copy and paste as new layer. Move it to bottom left. Open element 93. Resize 40%. Flip. Free Rotate: Left-15. Copy and paste as new layer. Copy to bottom left, in front of the basket.Open element 1. Resize 41%. 

6. Click on wordart layer. Apply Same Eye Candy > Gradient Glow using the color black but only once this time. Select All. Selections > Clip to Canvas. Image > Crop to selection. Now you can apply drop shadow on all layers.

--> Resize if needed. Add your copyright and #license. Add your name, I'm using Bazar, size: 30. Salve as PNG.


March 8, 2015

Baby Blue ~ by Joanne Salgado


Tutorial written by Joanne Salgado on February 18th, 2015
for those who have a working knowledge of PSP.
Any resemblance to any other tutorial is coincidental.
Do not copy and paste this tutorial anywhere on the net.
If you want to translate please ask first. 

Kit Angels & Artists Against Lyme by ChocUKDesigns - you can purchase here
Template 734 by Millie here 
Font: KG Lego House

Plugins
AP [Lines]

Don't forget to save often.

1. Open template. Duplicate. Close original. Delete layers: cr, 8, 7 and background.

2. Open element '54' copy and paste as new layer. Duplicate, change blend mode to screen, merge down. Arrange it to the bottom right. Move this layer behing layer 1. Add shadow 0-0-65-2 black. Duplicate, mirror and flip.

3. Open paper '22' with flood fill change to pattern (scale 60) and colorize layers 1 and 2. Plugins AP [Lines] - SilverLining with backslash, change the three colors to 255. Apply this plugin on layers 1 and 2.

4. Select layer 3. Adjust/Color Balance/Manual Color Correction with source: #c0c0c0 and target: #000000.

5. Select layer 4. Adjust/Color Balance/Manual Color Correction with source: #e553b0 and target: #ffffff. Effects/Texture Effects/Weave with 1-5-1-black-black-fill gaps checked.

6. Open element '96' select the first butterfly - copy and paste as new layer. Resize 30%. Duplicate, change blend mode to screen, merge down. Free Rotate 25-left. Arrange it to the the left above the black square. Now select the last butterfly - copy and paste as new layer. Resize 40%. Duplicate, change blend mode to screen, merge down. Free Rotate 25-right. Arrange it to the the left a little above the black square. (see my tag at any moment if you have doubts).

7. Open element '53' copy and paste as new layer. Resize 40%. Duplicate, change blend mode to screen, merge down. Arrange it to the upper right.

8. Open element '98' copy and paste as new layer. Resize 50%. Duplicate, change blend mode to screen, merge down. Arrange it to the lower left of the black rectangle.

9. Open element '70' copy and paste as new layer. Resize 70%. Duplicate, change blend mode to screen, merge down. Free Rotate 25-left. Arrange it to the lower right crossing the black square.

10. Open element '93' copy and paste as new layer. Resize 40%. Duplicate, change blend mode to screen, merge down. Arrange it to the upper left.

11. Open element '31' copy and paste as new layer. Resize 70%. Arrange it to the right.

12. Add shadow as you like. I used 1-1-65-2 black.

13. Add copyright.

14. Add your name. I used KG Lego House/size: 55.

Save.

March 5, 2015

Spring Fling ~ by Joanne Salgado


Tutorial written by Joanne Salgado on February 18th, 2015
Any resemblance to any other tutorial is coincidental.
Do not copy and paste this tutorial anywhere on the net.
If you want to translate please ask first. 

Tube: Lilu by Lightartist_XXX - you can purchase here 
Kit Spring Fling by ChocUKDesigns - you can purchase here , here and here
Template by Millie here 
Font: BankGothic Lt BT

Don't forget to save often.

1. Open template. Duplicate. Close original. Delete layes: cr, 13, 12, 11, 10 and background

2. Open paper '8'. Copy and paste as new layer. Move this layer above layer 1. Select layer 1. Selections/Select all. Selections/Float. Selections/Defloat. Selections/Invert. Select the paper layer. Hit delete on your keyboard. Add shadow 1-1-65-2 black. Delete layer 1. 

3. Open paper '25'. With the flood fill tool, change to pattern, look for the paper. Match Mode: RGB Value. Colorize layers 2 and 3.

4. Open paper '22'. With the flood fill tool, change to pattern, look for the paper. Match Mode: RGB Value. Colorize layers 4 and 5.

5. Open paper '10'. With the flood fill tool, change to pattern, look for the paper. Match Mode: RGB Value. Colorize layer 6.

6. Open element '83'. Copy and paste as new layer. Resize 50%. Arrange to the upper left behind the oval frame. Add shadow 1-1-65-2 black.

7. Open element '23'. Copy and paste as new layer. Resize 50%. Arrange to the upper right behind the oval frame. Add shadow 1-1-65-2 black.

8. Open element '79'. Copy and paste as new layer. Resize 50%. Arrange to the right behind the oval frame, a little in front of the green flower. Add shadow 1-1-65-2 black.

9. Open element '22'. Copy and paste as new layer. Resize 50%. Arrange to the lower left behind the oval frame. Add shadow 1-1-65-2 black.

10. Open element '77'. Copy and paste as new layer. Resize 50%. Image/Mirror. Image/Flip. Arrange to the left behind the oval frame. Add shadow 1-1-65-2 black.

11. Open paper '8'. With the flood fill tool, change to pattern, look for the paper. Match Mode: RGB Value. Colorize layer 8.

12. Open your tube close up. Copy and paste as new layer. Arrange to the right of the oval frame. Select layer 8. Selections/Select all. Selections/Float. Selections/Defloat. Selections/Invert. Select the close up tube layer. Hit delete on your keyboard.

13. Open your tube. Copy and paste as new layer. Resize if needed. Arrange to the Left. If your tube don't fit the canvas like mine, clean it as its coming out of the oval frame. Move the tube layer above the layer 9. Add shadow 1-1-65-2 black. See my tag.

14. Open element '55'. Copy and paste as new layer. Resize 20%. Arrange to the upper right. Add shadow 1-1-65-2 black.

15. Open element '124. Select the pink butterfly, copy and paste as new layer. Resize 40%. Image/Rotate/Free Rotate (right/25). Arrange to the upper left. Add shadow 1-1-65-2 black.

16. Now select the green butterfly. Copy and paste as new layer. Resize 20%. Image/Rotate/Free Rotate (left/25). Arrange a little bellow the pink butterfly. Add shadow 1-1-65-2 black.

17. Open the element '72'. Copy and paste as new layer. Resize 50%. Arrange to the bottom right.

18. Open the element '74'. Copy and paste as new layer. Resize 50%. Arrange to the bottom right.

19. Open the element '75'. Copy and paste as new layer. Resize 50%. Arrange to the bottom right.

20. Open the element '43'. Copy and paste as new layer. Resize 30%. Arrange to the bottom right. Add shadow 1-1-65-2 black.

21. Open the element '68'. Copy and paste as new layer. Resize 20%. Image/Mirror. Arrange to the bottom right. Add shadow 1-1-65-2 black.

22. Add your name. I used BankGothic Lt BT / size: 72. Same shadow as before.

23. Add your copyright.

Save.